ShadowSocks is used to encrypt the data between client and server communication. ShadowSocks server is a proxy server that will communicate with ShadowSocks client use the specified encryption method. It is not a VPN, but it can act like a VPN to protect you by encrypting your internet data. So this article will tell you how to set up and configure the ShadowSocks server in Ubuntu and how to set up and use the ShadowSocks client tool in macOS, Windows, and Linux.
1. Setup ShadowSocks Server In Ubuntu.
- Use SSH client to connect to the Ubuntu server.
- Execute
sudo -ito switch to the root user. - Update and upgrade the OS packages with the below command.
# apt update
# apt upgrade
- Enable BBR by edit /etc/sysctl.conf file with gedit. Enable BBR can improve the ShadowSocks proxy performance by maximizing network bandwidth usage.
~# gedit /etc/sysctl.conf
- Add below two lines at end of file /etc/sysctl.conf and save.
net.core.default_qdisc=fq
net.ipv4.tcp_congestion_control=bbr
- Execute command
rebootto reboot the ubuntu os. - After reboot, run
lsmod | grep bbrcommand to verify the bbr configurations. If you see the tcp_bbr line in the console output that means bbr is enabled correctly.~#lsmod | grep bbr tcp_bbr 20480 11
- Now you can install the ShadowSocks server by executing either of the below commands.
~# apt install shadowsocks
or
~# apt install python-pip
~# pip install shadowsocks
- After that, you can run the command
ssserverin the terminal to verify that the ShadowSocks server has been installed.
2. Configure And Start ShadowSocks Server.
- Create a directory /etc/shadowsocks if the folder does not exist.
$ sudo mkdir /etc/shadowsocks
- Create a ShadowSocks configuration file in the above folder if the file does not exist.
$ sudo gedit /etc/shadowsocks/config.json
- Add below JSON data in the above file. Use your own server IP, port number, etc in the below JSON data.
{ "server":"0.0.0.0", ## Proxy server external ip address. "server_port":8888, ## Proxy server listening port number. "local_address":"127.0.0.1", "local_port":1080, ## Local listening port number. "password":"888888", ## Proxy server connect password "timeout":300, "method":"aes-256-cfb",## Data encryption method "dast_open":false } - Start ShadowSocks server with the below command. To make sure the ShadowSocks server can be started without error, remove the
-dcommand argument to show the server log in the console.~$ sudo ssserver -c /etc/shadowsocks/config.json -d start
- If you meet error messages like below.
AttributeError: /usr/lib/x86_64-linux-gnu/libcrypto.so.1.1: undefined symbol: EVP_CIPHER_CTX_cleanup - You need to edit /usr/local/lib/python2.7/dist-packages/shadowsocks/crypto/openssl.py file.
Change line 52 from libcrypto.EVP_CIPHER_CTX_cleanup.argtypes = (c_void_p,) to libcrypto.EVP_CIPHER_CTX_reset.argtypes = (c_void_p,),
Change line 111 from libcrypto.EVP_CIPHER_CTX_cleanup(self._ctx) to libcrypto.EVP_CIPHER_CTX_reset(self._ctx). - Then start the ShadowSocks server again, the error will disappear.
- If you meet socket.error: [Errno 99] Cannot assign requested address error when you startup the ShadowSocks server like below. To fix it, just change the server ip to “0.0.0.0” in the /etc/shadowsocks/config.json file.
root@instance-3:~# ssserver -c /etc/shadowsocks/config.json start
INFO: loading config from /etc/shadowsocks/config.json
2019-02-06 09:47:00 INFO loading libcrypto from libcrypto.so.1.1
2019-02-06 09:47:00 INFO starting server at 34.73.193.214:9090
Traceback (most recent call last):
File "/usr/bin/ssserver", line 11, in <module>
load_entry_point('shadowsocks==2.9.0', 'console_scripts', 'ssserver')()
File "/usr/lib/python2.7/dist-packages/shadowsocks/server.py", line 74, in main
tcp_servers.append(tcprelay.TCPRelay(a_config, dns_resolver, False))
File "/usr/lib/python2.7/dist-packages/shadowsocks/tcprelay.py", line 733, in __init__
server_socket.bind(sa)
File "/usr/lib/python2.7/socket.py", line 228, in meth
return getattr(self._sock,name)(*args)
socket.error: [Errno 99] Cannot assign requested address
3. Setup ShadowSocks Client Tool.
You can download the ShadowSocks client tool from the official download page.
3.1 For macOS.
- Download ShadowsocksX-NG from GitHub.
- It is a zip file, after unzip, you can use it directly.
- When you click it to start, it will appear at the top right corner of the macOS Finder bar. The first little plane icon is just the ShadowSocks client tool icon.

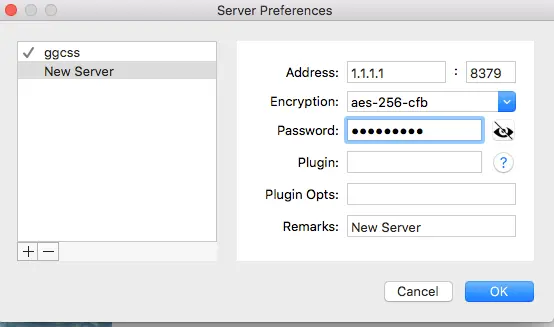
- Click the little plane icon, it will popup a menu list, click Servers —> Server Preferences… menu item to open server manager dialog.
- Click the + button in the server list to add a new ShadowSocks server, input related server information such as server address, port number, Encryption method, Password, etc, and click the OK button to save it.
- Now you can use the ShadowSocks server by clicking the ShadossocksX-NG icon( a little plane on macOS top right toolbar) —> Servers menu item, then you can select a ShadowSocks server from the popup server list.
- Open a web browser, then you can find the web traffic go through the ShadowSocks server.
3.2 For Windows.
ShadowSocks windows client tool is similar to macOS client tool, you can download shadowsocks-win from GitHub, and the configuration is also easy like macOS.
3.3 For Linux.
3.3.1 Setup ShadowSocks Client Tool.
This tool will communicate with the ShadowSocks server use encrypted communication data.
- Install ShadowSocks in your Linux follows Section 1, 2 in this article.
- ShadowSocks installation can be used as a server, but it can also be used as a client tool. When you use it as a server you use the command ssserver to start it, and when you run the command sslocal, it will start the client tool.
- Run the below command to install ShadowSocks software.
~$ sudo apt install shadowsocks
- After install, the /etc/shadowsocks/config.json file has been created. Just edit its content to your own.
~$ sudo gedit /etc/shadowsocks/config.json { "server":"1.2.1.2", "server_port":8888, "local_address":"127.0.0.1", "local_port":1080, "password":"888888", "timeout":300, "method":"aes-256-cfb", "dast_open":false } - Run the command sslocal to start the ShadowSocks client tool. When you see the below message, it means the client tool has been started successfully.
jerry@jerry-VirtualBox:~$ sslocal -c /etc/shadowsocks/config.json
INFO: loading config from /etc/shadowsocks/config.json
2018-10-01 21:28:25 INFO loading libcrypto from libcrypto.so.1.1
2018-10-01 21:28:25 INFO starting local at 127.0.0.1:1080
3.3.2 Setup Local HTTP Proxy Server.
The polipo is a caching web proxy, it can redirect your HTTP request to socks5 proxy server. Or you can use another HTTP proxy tool which has the same feature that you are familiar with.
- Install polipo in ubuntu using the below command.
~$ sudo apt-get install polipo
- Stop polipo and add below proxy configuration code in polipo configuration file /etc/polipo/config
~$ sudo service polipo stop
~$ sudo gedit /etc/polipo/config

# Add below polopo settings data
socksParentProxy = localhost:1080
proxyPort = 8787
- Start polipo service again.
~$ sudo service polipo start
- Run
ps -ef | grep polipoto ensure the polipo proxy server has started.jerry@jerry-VirtualBox:~$ ps -ef|grep polipo proxy 641 1 0 15:37 ? 00:00:00 /usr/bin/polipo -c /etc/polipo/config pidFile=/var/run/polipo/polipo.pid daemonise=true
- Add
export http_proxy=http://127.0.0.1:8787at the end of the current user$HOME/.bashrcfile. - Run
source $HOME/.bashrccommand to make the above configuration effective.
3.3.3 Configure Firefox To Use polipo Local HTTP Proxy Server.
- Open Firefox web browser. Click the Open Menu button at the top right corner, then click the Preferences menu item, input proxy in the top search box, click the Settings… button behind Network Proxy configuration, then it will popup the Connection Settings configuration dialog.
- In the Connection Settings pop-up window, choose the Manual proxy configuration radio button, and input 127.0.0.1 after the HTTP Proxy address input box, and 8787 in the Port number input box ( our polipo caching proxy just run at localhost and listen on port 8787.). Check the checkbox Use this proxy server for all protocols.
3.3.4 Set Chrome Use polipo Local HTTP Proxy Server.
- Open the google chrome Settings dialog by clicking the three-vertical-dot icon on the chrome browser top right corner, then click the Settings menu item in the drop-down menu list.
- Search the keyword proxy in the google chrome settings dialog.
- Click Open your computer’s proxy settings item to open the Ubuntu Linux Network configuration dialog.
- Click Network Proxy item to manually change proxy server IP to 127.0.0.1 and port number to 8787 which the polipo HTTP proxy server is using.
3.3.5 Set ShadowSocks Android App.
- Download ShadowSocks android app from google play store.
- Install it on an android device.
- Click the ShadowSocks icon to start the android app.
- Click the + icon at the app top right corner to add a ShadowSocks server profile in the app.
- Input the profile name, server IP, server port number, password, encrypt method, click the checkmark( √ ) to save the server profile.
- Select a ShadowSocks server in the profiles list, then click the little plane button at the app bottom right to connect to the ShadowSocks server.
- When you see a key icon displayed at the top status bar, the ShadowSocks server has been connected.
4. Question & Answer.
4.1 How to connect to company network secure through the internet.
- I use macOS in daily work from home, and I want to connect to my company network through the internet, can I use the ShadowSocks client & server tool to achieve the goal? Thanks a lot.
- Yes, you can follow this article to install the ShadowSocks server-side on your company machine ( the server machine should have a public IP address ), and install the ShadowSocks macOS client tool on your macOS at home, then you can connect to your company machine through the ShadowSocks.
Reference
Thank you for the detailed guide! I found the step-by-step instructions super helpful, especially for the Mac setup. It’s great to finally have a reliable VPN solution that works seamlessly across all my devices. Looking forward to your future posts!
Great post! The step-by-step instructions for setting up ShadowSocks on different operating systems are super helpful. I finally got it working on my Mac, and the performance is impressive. Thanks for the clear explanations!
Ppcine Android version is optimized for smartphones and tablets. Brazilian users prefer ppcine android for watching HD movies and series without subscription fees. The app supports smooth playback and easy navigation.
Great tutorial! I found the step-by-step instructions really helpful for setting up ShadowSocks on my Mac. The tips for troubleshooting were a lifesaver too. Thanks for making it so easy to understand!
Great post! I found the step-by-step instructions really helpful for setting up ShadowSocks on my Mac. The troubleshooting tips were a lifesaver as well. Thanks for sharing!
Thank you for the detailed guide! Setting up ShadowSocks on my Mac was much easier than I expected. Your step-by-step instructions were clear and helpful. I appreciate the troubleshooting tips as well—those will definitely come in handy. Looking forward to trying it out on my Windows and Linux devices next!
Great guide! I appreciate the step-by-step instructions for setting up ShadowSocks on different platforms. I was a bit lost before reading this, but now I feel confident I can get it working on my Mac. Thanks for the clear explanations and tips!
Great post! The step-by-step guide was super helpful, especially for someone like me who’s new to setting up VPNs. I appreciate the clear instructions for each OS. Looking forward to trying it out on my Mac!
Great guide! The step-by-step instructions made setting up ShadowSocks on my Mac super easy. I appreciate the detailed screenshots too. Thanks for sharing!
Great step-by-step guide! I found the instructions easy to follow, and I appreciate the tips for troubleshooting common issues. Setting up ShadowSocks has been seamless thanks to your post. Thanks for sharing!
Great post! I found your step-by-step instructions really helpful for setting up ShadowSocks on my Mac. Everything was clear and easy to follow. Thanks for sharing these tips!
Great tutorial! The step-by-step instructions made it really easy to set up ShadowSocks on my Mac. I appreciate the tips on configuring the settings for better performance. Thanks for sharing!
Great guide! I found the step-by-step instructions really helpful, especially for Mac. It made the setup process much easier than I expected. Thanks for sharing!
Great tutorial! I successfully set up ShadowSocks on my Mac using your instructions. The step-by-step guide was super helpful, especially for someone like me who is new to VPNs. Thanks for sharing!
Thanks for this detailed guide! Setting up ShadowSocks on my Mac was a breeze thanks to your clear instructions. I appreciate the step-by-step approach, especially for Linux users who might find it tricky. Looking forward to testing out the speeds now!
Great post! I found the step-by-step instructions really helpful for setting up ShadowSocks on my Mac. The troubleshooting tips were a nice touch too. Thanks for sharing!
Great guide! I appreciate the detailed steps for setting up Shadowsocks on different operating systems. The tips for troubleshooting are especially helpful. Can’t wait to give it a try on my Mac!
Great guide! I found the step-by-step instructions really helpful for setting up ShadowSocks on my Mac. The troubleshooting tips were a nice touch too. Thanks for sharing this!
This tutorial is exceedingly helpful! I’ve been looking for a straightforward method to establish a ShadowSocks VPN on my Mac for a while, and this blog entry did not disappoint. The instructions are easy to follow, and I had my VPN up and running quickly. Many thanks for sharing your expertise!
I use the ShadowSocks windows client tool to connect to my ShadowSocks server. When I use it, I select the global mode to make the ShadowSocks network as the global agent. Now I can make all web browsers such as google Chrome and Firefox to use the ShadowSocks network to browse the internet securely. My question is can I make other client software use the ShadowSocks network and how to implement it? Thanks.
You can use the proxychains on unix based OS( Linux and macOS).
First you should install the proxychains by executing the command sudo apt-get install proxychains on Ubuntu Linux, and run the command brew install proxychains on macOS.
After you install the proxychains, you should edit the proxychains configuration file. If you use Ubuntu Linux the configuration file is /etc/proxychains.conf, if you use macOS the configuration file is ~/.proxychains/proxychains.conf. Edit the linux configuration file and add the line socks5 127.0.0.1 1080 in it. Edit the macOS configuration file and add the line socks5 127.0.0.1 1086 in it. You should comment the sock4 configuration line if exists.
Now you can use the proxychain on Ubuntu Linux with the command proxychains wget https://www.google.com. And if your os is macOS, you can run the command proxychains4 wget https://www.google.com to use the proxychains.
I am working from home these days, I am an android programming developer. Recently, my company tells us that we should connect to our company network through a secure connection for example use VPN etc. And I find this article, then I want to know whether can I use the ShadowSocks to implement the secure connection between my home and my company. My requirement is that I need to connect to my company private cod repository in the android emulator, can I implement this? Thanks.
Yes, you can install the ShadowSocks server on your company computer and then install the ShadowSocks client tool in your andorid emulator, then you can connect to your company server from your android emulator securely. And your company server must have a public IP address.
Hey, I am receiving this message on MEmu: Failed to connect the remote server: Cannot run program “/data/app/com.github.shadowsocks-1/lib/arm64/libsslocal.so”(in directory “/ …
What can I do to resolve this?
If you find above function can not work, you can change the encryption method, try to use any encryption method in the list. The best one maybe rc4-md5, this encryption method is not easy to be decoded.
ShadowsocksX NG has lots of issue, it starts very slow and it also takes long time to be shut down. The ShadowsockS is handy on Mac.