SSH is a popular security protocol, it is mainly used to encrypt remote login session data and ensure the security of the data transmission. In this article we will tell you how to install and configure SSH server on Ubuntu and how to connect to the SSH server from macOS, Linux and Windows use an ssh client.
1. Check Whether SSH Service Has Been Installed Or Not.
- Open a terminal and run
ps -ef|grep sshdto check whether ssh service is running or not. If you do not see the output as below, that means the ssh service is not running.jerry@jerry-VirtualBox:~$ ps -ef|grep sshd root 706 1 0 08:46 ? 00:00:00 /usr/sbin/sshd -D
- Run
sudo service ssh startto check whether ssh has been installed. If you get the Unit ssh.service not found error message, that means the ssh service does not install.jerry@jerry-VirtualBox:~$ sudo service ssh start [sudo] password for jerry: Failed to start ssh.service: Unit ssh.service not found.
2. Install SSH Service In Ubuntu.
- Run
sudo apt-get updatein the above terminal to update all Ubuntu source package lists. - Run
sudo apt-get install openssh-serverto install ssh server in ubuntu. - After installation, you can run
ps -ef|grep sshdto check whether ssh service is running. - If ssh service is not running, run the command sudo service ssh start to start it.
3. Connect To SSH Service From macOS & Linux.
- Before you can connect to the ssh server, you should run
ifconfigto get the machine’s IP address. If you install the ssh in a ubuntu virtual machine use VirtualBox, you can read the article How To Install Ubuntu On Virtualbox Mac - If you connect to the ssh server from macOS or Linux, you can run the below command in the terminal to connect to the ssh server.
192:~$ ssh [email protected]
[email protected]'s password:
Welcome to Ubuntu 18.04.1 LTS (GNU/Linux 4.15.0-29-generic x86_64)
......
Last login: Sun Sep 30 19:39:22 2018 from 127.0.0.1
jerry@jerry-VirtualBox:~$
- The ssh server default port number is 22, you can run
sudo gedit /etc/ssh/sshd_configto edit the ssh server configuration file to change ssh service settings.
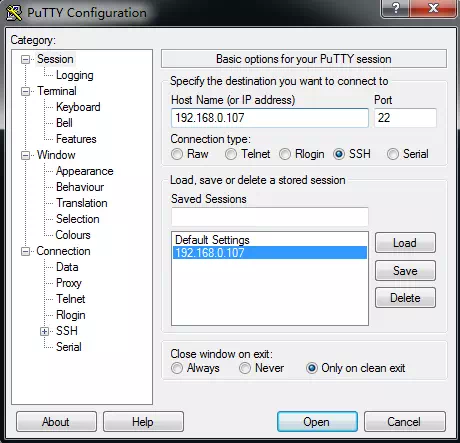
4. Connect To SSH Service From Windows.
- Download putty and install it. Putty is a famous Windows ssh client tool.
- Double click the putty icon to start it.
- Input ssh server IP and PORT number in the opened putty dialog, do not forget to select the SSH radio button in the Connection type section. Then click the Open button to connect to the ssh server.
- Input the correct user name and password in the popup window, then you can log in to the SSH server successfully.