MySQL server is a very popular relational database server in the world. It is used widely on the server-side. Ubuntu is also the most popular Linux OS in the world. This article will tell you how to install MySQL server in Ubuntu and install MySQL workbench to access the MySQL server.
1. Install MySQL Server On Ubuntu.
Open a terminal in ubuntu and run the below command to install MySQL server and client command-line software.
- Update ubuntu installation package index.
$ sudo apt-get update
- Install MySQL server.
$ sudo apt-get install mysql-server
- Install MySQL client command-line software.
$ sudo apt-get install mysql-client
- Verify MySQL server is installed and started successfully.
$ ps -ef|grep mysqld
mysql 6473 1 0 15:56 ? 00:00:01 /usr/sbin/mysqld --daemonize --pid-file=/run/mysqld/mysqld.pid
- Verify MySQL server is listening and running.
$ sudo netstat -tap|grep mysql
tcp 0 0 localhost:mysql 0.0.0.0:* LISTEN 963/mysqld
2. Install MySQL Workbench.
MySQL Workbench is a free client software to manage MySQL Server. You can download it from MySQL’s official website or you can install it directly in the Ubuntu software store.
2.1 Install MySQL Workbench With Download File.
- Double click the download file.
- Click the Install button in the open dialog until installation success.
2.2 Install MySQL Workbench In Ubuntu Software Store.
- Click the Ubuntu Software icon in the desktop left navigation bar.
- Click the search button and input the keyword MySQL Workbench in the search box. Then click the icon in the bottom list to install it.
2.3 Fix Can Not Download Through Local Proxy Error.
Whatever method you choose, you may encounter an error when installing it, the error message is something like ‘Can not download required software through the local proxy server.’. This is because your Ubuntu OS uses a global proxy configuration. You should disable the configuration as following.
- Click the Show Applications icon at the bottom left corner.
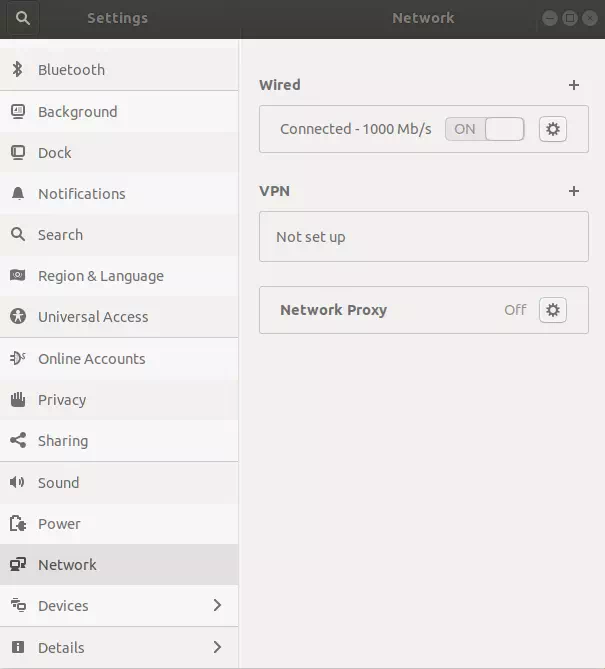
- Then click the Settings icon in the applications list to open Ubuntu global settings panel.
- Click the Network menu item on left then click Network Proxy in the right panel to disable it. Then the error will be fixed.
3. Connect MySQL Server With MySQL Workbench.
- After you install MySQL workbench successfully, you can open it and connect to your local MySQL server by clicking the Local instance icon in the MySQL workbench.
- But for the first time, it will prompt error messages like ERROR 1698 (28000): Access denied for user ‘root’@’localhost’, to fix this error, you need to follow the below steps.
- Open terminal in Ubuntu, input below command to open MySQL client.
~$ sudo mysql -u root -p
- Then execute the below SQL command in MySQL console to change user ‘root’@’localhost’ password to a new one.
mysql> ALTER USER 'root'@'localhost' IDENTIFIED WITH mysql_native_password BY 'root';
Query OK, 0 rows affected (0.01 sec)
mysql> exit
- Now you can use MySQL workbench to connect to the locally installed MySQL server successfully and manage the database. If you want to learn more about how to use MySQL Workbench, please read the article How To Use MySql On Mac – Manage MySQL Database With MySQL Workbench section.
Great post! The step-by-step instructions were super helpful, and I appreciated the troubleshooting tips for common issues. I encountered a minor problem during the installation, but your suggestions made it easy to resolve. Thanks for sharing!
Great guide! I followed your steps to install MySQL on Ubuntu, and everything worked perfectly. The troubleshooting tips were especially helpful. Thanks for sharing!
Great tutorial! I followed the steps to install MySQL on Ubuntu, and it worked perfectly. The Windows tricks were really helpful too for dual-boot setups. Thanks for sharing!
Great post! The step-by-step guide for installing MySQL on Ubuntu was super helpful. I also loved the iPhone tricks you shared at the end. Looking forward to trying those out!