We have learned how to add a button click event process function in the article iOS Add Click Event To UIButton Swift Example. In that article, if you want to process multiple button click events, you should create multiple IBAction functions to process. But sometimes, for code simplicity, you need to use only one IBAction function to process multiple button’s click event, this article will tell you how to do it.
1. Use One IBAction Function To Process Multiple Button’s Click Event Demo.
If the above video can not be seen, you can watch it on URL https://youtu.be/lnHwqd6XtGQ.
- First, let us look at the example demo video as above. There are one label and two buttons on the screen, when you click the different buttons, it will display different text in the label. The two buttons’ click events are processed in one IBAction function.
2. Create Example Project Steps.
- Create a new swift Xcode project, you can refer article How To Create A Swift Project In Xcode.
- Open Xcode UI component Library and add one label and two buttons in the screen by edit the Main.storyboard file. You can refer article How To Display Xcode Library, Assistant Editor, Inspectors Window.
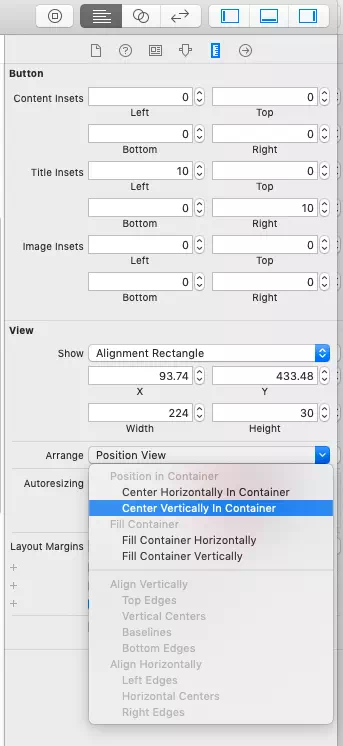
- To make the three UI components full fill the screen width, just select it, then click View —> Inspectors —> Show Size Inspector menu item at the Xcode top menu bar to display the Size Inspector. Then click Fill Container Horizontally drop down item to select it in the Size inspector —> View —> Arrange ( Position View ) —>Fill Container drop-down list.
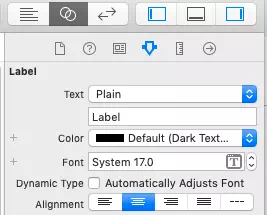
- To make the label text align center, you should select the label in the Main.storyboard file, then click View —> Inspectors —> Show Attributes Inspector menu item at the Xcode top menu bar to open the attributes inspector, then click Center alignment in Alignment section.
- Now we need to set tag attribute value for the two buttons. Click Main.storyboard file to open it, then select Button One on the screen, and click View —> Inspectors —> Show Attributes Inspector menu item to display the button’s attribute inspector panel in Xcode project right side like below.
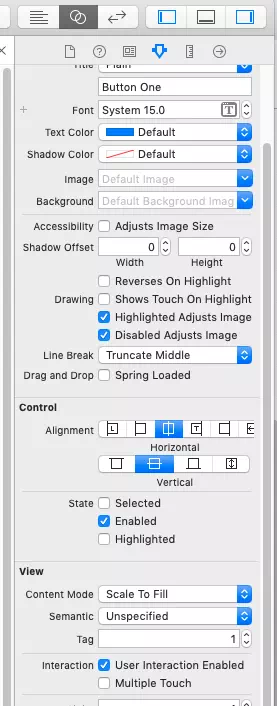
- Scroll down the attributes inspector panel, until you see Tag attribute in the View section like above, then input value 1 in the text box after Tag attribute. The tag value for each UI component should be unique in the same Xcode project, we use this tag value to identify the UI component uniquely.
- Select Button Two and set its Tag attribute value with 2.
- Now each button has one Tag attribute value, and the value is unique.
- Now open the assistant editor by click View —> Assistant Editor —> Show Assistant Editor menu item at Xcode top menu bar. Press the Control key and drag Button One from the Main.storyboard file to the assistant editor to create one IBAction function to process it’s Touch Up Inside event. You can refer article How To Connect Storyboard UI Component To ViewController Class Code.
- To make Button Two use the same IBAction function to process it’s Touch Up Inside event, you should press the Control key and drag Button Two from the Main.storyboard to the assistant editor and connect it to the same IBAction function which Button One is used like in below video. So to connect multiple buttons to the same IBAction function, you just need to press the Control key and drag every button from the Main.storyboard to the same IBAction function in the assistant editor. You can see the demo video for this step at the end of this article.
- Now you only need to add below swift source code in ViewController.swift source file, in the source code, we use the event source button’s tag attribute value to identify which button sends the event, then change the label text accordingly.
//
//  ViewController.swift
//  SwiftOneFunctionPorecessMultipleButtonClickExample
//
//  Created by song zhao on 7/9/19.
//  Copyright © 2019 dev2qa.com. All rights reserved.
//

import UIKit

class ViewController: UIViewController {

    @IBOutlet weak var msgLabel: UILabel!

    override func viewDidLoad() {
        super.viewDidLoad()

        msgLabel.text = ""
    }


    @IBAction func btnClick(_ sender: UIButton) {

        switch sender.tag{

        case 1:
            msgLabel.text = "Button one is clicked."
        case 2:
            msgLabel.text = "Button two is clicked."
        default:
            msgLabel.text = ""
        }
    }
}
If you can not see the above video, please browse the URL https://youtu.be/CsYD5BEGmgU on youtube.