This example will show you how to add a UIButton object and a UILabel object to your iOS app. It will also show you how to add a swift button action process method to handle the button click event to change the label text accordingly when the user clicks the button.
1. Add UI Views In Main.storyboard.
- Create an Xcode project with the name ButtonLabelExample.
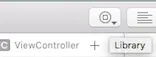
- Open the Main.storyboard file, then click Library icon in the top right corner to open the UI views library panel.
- In the library panel, search the keyword button and drag the button into Main.storyboard. Do the same to add a Label view.

2. Add Button onClick Event Process Method.
- Now the UI view components have been added successfully, we will add a swift button action process method to process button onClick event process method and an instance variable that refers to the label.
- First, click the Show the Assistant editor icon
 at top right to display both UI designer and the ViewController class source code together.
2.1 Add Button onClick Event Handler Method.
- Below is the demo video for this action ( drag button plus control key to add event processing method ).
- Like in the above video, just click the button and Control key at the same time, and drag the button to the ViewController class source code on the right side.
- Release the mouse when you see a popup message like “Insert Action, Outlet or Outlet Collection“. Then there will popup a dialog like the below.
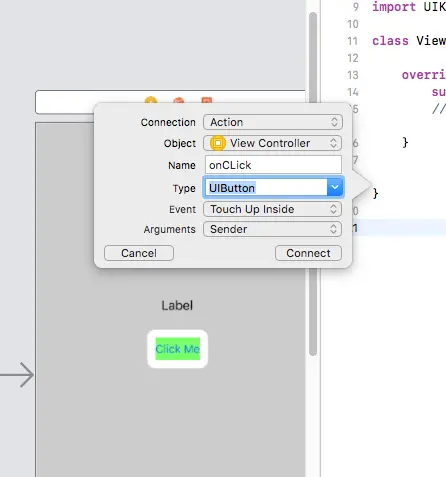
- Input onClick ( or any method name ) in the Name text box. Select Touch Up Inside in the event drop-down list. In the Arguments drop-down list, you can select Sender or Sender And Event.
- Click Connect button, there will add a method in the ViewController source code.
2.2 Add Label Referral Instance Variable.
- Now you have added a swift button action process method to handle the button click event, you can write code in the onClick method. But how to references the label in the source code, so that we can change its text when the button is clicked.
- Below is the demo video of this process (add label related instance variable in view controller class).
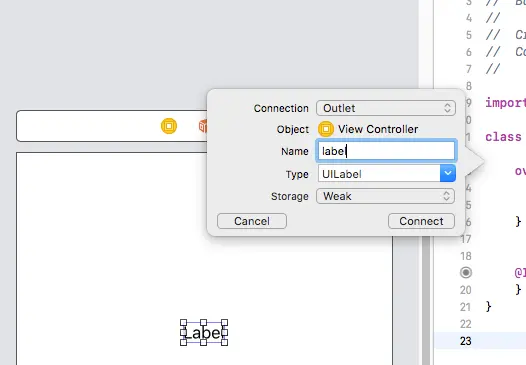
- Click the label view component and press the Control key at the same time, and drag the label to the right side ViewController source code. It will also pop up a dialog like below. Input name label and click Connect button to add a UILabel type instance variable in the ViewController source code.
2.3 ViewController Source Code.
- Input below source code in the ViewController class source file ViewController.swift.
//ViewController.swift
//ButtonLabelExample
//Copyright © 2022 dev2qa.com. All rights reserved.


import UIKit

class ViewController: UIViewController {

    // Refer to the label.
    @IBOutlet weak var label: UILabel!

    override func viewDidLoad() {
        super.viewDidLoad()
        // Do any additional setup after loading the view, typically from a nib.
    }

    @IBAction func onClick(_ sender: UIButton, forEvent event: UIEvent){

        // Get current label text.
        let currLabelText = label.text;

        // Set new label text according to current text.
        if(currLabelText == "You just click the button.")
        {
            label.text = "You click the button again.";
        }else
        {
            label.text = "You just click the button.";
        }

        // Make label size fit new text.
        label.sizeToFit();
    }
}
3. Use Stack View To Group Button And Label.
- Now all the source code has been added complete, you can run the example, but when you start it, you will find the button and label layout may not look well, so we need to use the StackView component to group the button and label together to make it’s layout beautiful.
- StackView is a container view, it can group some child view together and freeze them to a block. And then you just need to add constraints to the StackView object to create the layout.
- Select both the button and label together.
- Click the Embed In icon at the bottom right bar to put the button and label into a StackView. Select the newly created StackView and click Align icon at the bottom right to add constraints to layout the StackView stay at screen center in both directions.
- Below is the demo video of this process ( embbed label and button into stack view and add stackview constraints to layout it in the screen center ).
- Now run the example again, you will see below demo video ( ios button click event change label text example ).
4. How To Add Button, Label In iOS App Programmatically.
- The above method tells you how to add iOS UIButton, UILabel object from the UI component library. Now I will tell you how to add them in source code programmatically.
- We should create the UIButton and UILabel instance in the ViewController‘s viewDidLoad() method, set their attributes, and add them to the iOS app subview.
override func viewDidLoad() { super.viewDidLoad() // Create a UILabel object. let lab = UILabel() lab.text = "This is a iOS label." lab.font = UIFont(name: "MarkerFelt-Thin", size: 45) // Create a UIButton object. let btn = UIButton() btn.setTitle("Click Me", forState: .Normal) btn.setTitleColor(UIColor.blueColor(), forState: .Normal) // Add above UILabel and UIButton object to the iOS app. self.view.addSubview(lab) self.view.addSubview(btn) } - Then we should create a swift button action process method ( func onClick(sender: UIButton!) ) to handle the button on-click event.
func onClick(sender: UIButton!) { print("Button is Clicked") } - Call the UIButton object’s addTarget method to connect the button with the onClick event. This line of code should be placed inside the above viewDidLoad method.
btn.addTarget(self, action: #selector(self.onClick(_:)), forControlEvents: .TouchUpInside)
5. How To Make One Swift Button Action Process Method Handle Multiple Button On-Click Event.
- If there are multiple swift buttons in one iOS app, we can also use one method to process all those buttons’ on-click events.
- For example, if there are 3 buttons in the above example, btn1, btn2, and btn3.
- The first method is to connect all the 3 buttons to the onClick swift button action process method follow section 2.1 Add Button onClick Event Handler Method.
- Then distinguish each button in the onClick method by the sender parameter.
@IBAction func onClick(_ sender: UIButton, forEvent event: UIEvent) { if sender === btn1 { // } else if sender === btn2 { // } else if sender === btn3 { // } } - If we create the button in source code programmatically then we can invoke the 3 button’s addTarget method to add a target object ( usually the ViewController class itself ), an action method ( that process the on-click event ), and an event ( represent the action event type such as UIControl.touchUpInside ) as below.
btn1.addTarget(self, action: "btnClicked:", for: .touchUpInside)
btn2.addTarget(self, action: "btnClicked:", for: .touchUpInside)
btn3.addTarget(self, action: "btnClicked:", for: .touchUpInside)
- Below is the source code for method btnClicked.
func btnClicked(_ sender: AnyObject?) {
  if sender === btn1 {
    // do something
  } else if sender === btn2 {
    // do something
  } else if sender === btn3 {
    // do something
  }
}
6. Video Demo For This Article.
- You can watch this example demo video below.