UIKit.UIButton class is used to create a button in the iOS swift app programmatically. When you use this class to create a button object, you should provide a type parameter to UIButton class’s initializer method to tell swift which kind of button that you want to create.
We only create a default system button in the article How To Create Multiple Button And Add Button Action Function Programmatically In iOS Swift, this article will tell you how to create other type buttons.
1. Swift Button Types.
- There are six button types in the iOS app, they are system default button, detail disclosure button, info light button, info dark button, contact add button, and customized button. You can refer apple buttons document for detailed explanations.
- Below is the source code to create different types of buttons.
- System default button.
let systemDefaultBtn:UIButton = UIButton(type: UIButton.ButtonType.system)
- Detail disclosure button.
let detailDisclosureBtn:UIButton = UIButton(type: UIButton.ButtonType.detailDisclosure)
- Info light button.
let infoLightBtn:UIButton = UIButton(type: UIButton.ButtonType.infoLight)
- Info dark button.
let infoDarkBtn:UIButton = UIButton(type: UIButton.ButtonType.infoDark)
- Contact add button.
let contactAddBtn:UIButton = UIButton(type: UIButton.ButtonType.contactAdd)
- Custom button.
let customButton:UIButton = UIButton(type: UIButton.ButtonType.custom)
2. Create Different Swift Type Buttons Programmatically Example.
- This example will tell you how to create the six types of buttons. Below is a picture of the example screen, it will list all the six type buttons from top to the bottom.
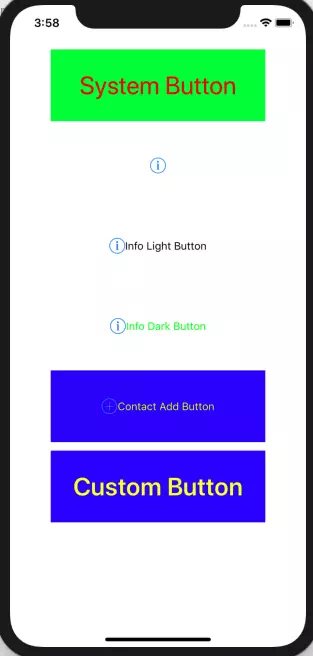
- The first button is the system default button, the last button is a customized button. The second to the fifth button are all info-type buttons, they are generally be used to display only an icon ( no title, no background color ), and when a user clicks the icon, it will popup other modal views to show more things.
- To implement this example, you need to create a Swift Xcode project, then edit ViewController.swift file with the below source code.
//
//  ViewController.swift
//  SwiftFiveButtonTypeExample
//
//  Copyright © 2019 dev2qa.com. All rights reserved.
//

import UIKit

class ViewController: UIViewController {

    // Get screen width and height.
    static let screenWidth:CGFloat = UIScreen.main.bounds.width
    static let screenHeight:CGFloat = UIScreen.main.bounds.height

    // In this example, all the button's center x value is half of the screen width.
    let horizontialCenter:CGFloat = screenWidth/2

    // Each of the example button's center y value is increased by creenHeight/8 one by one.
    let verticalDistance:CGFloat = screenHeight/8

    override func viewDidLoad() {
        super.viewDidLoad()

        createSystemButton()

        createDetailDisclosureButton()

        createInfoLightButton()

        createInfoDarkButton()

        createContactAddButton()

        createCustomButton()

    }

    /* This function will create a system default button. */
    func createSystemButton(){

        let systemDefaultBtn:UIButton = UIButton(type: UIButton.ButtonType.system)
        systemDefaultBtn.frame = CGRect(x: 10, y: 100, width: 300, height: 100)
        systemDefaultBtn.center = CGPoint(x: horizontialCenter, y: verticalDistance)
        systemDefaultBtn.backgroundColor = UIColor.green
        systemDefaultBtn.setTitle("System Button", for: UIControl.State.normal)

        systemDefaultBtn.setTitleColor(UIColor.red, for: UIControl.State.normal)

        systemDefaultBtn.titleLabel?.font = UIFont.systemFont(ofSize: 35)

        self.view.addSubview(systemDefaultBtn)
    }

    /* This function will create a detail disclosure button. */
    func createDetailDisclosureButton(){

        let detailDisclosureBtn:UIButton = UIButton(type: UIButton.ButtonType.detailDisclosure)
        // If you do not set the button's frame property, then the button text will not be shown. This is also the generally usage of this kind of button.
        //detailDisclosureBtn.frame = CGRect(x: 10, y: 100, width: 300, height: 100)

        detailDisclosureBtn.center = CGPoint(x: horizontialCenter, y: 2*verticalDistance)

        // Clear the detail disclosure button background color, this will make it's background color white.
        detailDisclosureBtn.backgroundColor = UIColor.clear

        // Because do not set button frame, so no need to set button title, title color and title font.
        // detailDisclosureBtn.setTitle("Detail Disclosure Button", for: UIControl.State.normal)
        // detailDisclosureBtn.setTitleColor(UIColor.red, for: UIControl.State.normal)
        // detailDisclosureBtn.titleLabel?.font = UIFont.systemFont(ofSize: 35)

        self.view.addSubview(detailDisclosureBtn)
    }

    /* This function will create a info light button. */
    func createInfoLightButton(){
        let btnFrame: CGRect = CGRect(x: 0, y:0, width: 300, height: 100)
        let btnCenter: CGPoint = CGPoint(x: horizontialCenter, y: 3*verticalDistance)
        let btnBgColor: UIColor = UIColor.clear
        let btnTitle: String = "Info Light Button"
        let btnTitleColor: UIColor = UIColor.black
        let btnTitleFont: UIFont = UIFont.boldSystemFont(ofSize: 55)

        let infoLightBtn:UIButton = createButtonByType(btnType: UIButton.ButtonType.infoLight, btnFrame: btnFrame, btnCenter: btnCenter, bgColor: btnBgColor, title: btnTitle, titleColor: btnTitleColor, titleFont: btnTitleFont)

        self.view.addSubview(infoLightBtn)
    }

    /* This function will create a info dark button. */
    func createInfoDarkButton(){
        let btnFrame: CGRect = CGRect(x: 0, y:0, width: 300, height: 100)
        let btnCenter: CGPoint = CGPoint(x: horizontialCenter, y: 4*verticalDistance)
        let btnBgColor: UIColor = UIColor.clear
        let btnTitle: String = "Info Dark Button"
        let btnTitleColor: UIColor = UIColor.green
        let btnTitleFont: UIFont = UIFont.boldSystemFont(ofSize: 55)

        let infoDarkBtn:UIButton = createButtonByType(btnType: UIButton.ButtonType.infoDark, btnFrame: btnFrame, btnCenter: btnCenter, bgColor: btnBgColor, title: btnTitle, titleColor: btnTitleColor, titleFont: btnTitleFont)

        self.view.addSubview(infoDarkBtn)
    }

    /* This function will create a contact add button. */
    func createContactAddButton(){
        let btnFrame: CGRect = CGRect(x: 10, y: 100, width: 300, height: 100)
        let btnCenter: CGPoint = CGPoint(x: horizontialCenter, y: 5*verticalDistance)
        let btnBgColor: UIColor = UIColor.blue
        let btnTitle: String = "Contact Add Button"
        let btnTitleColor: UIColor = UIColor.yellow
        let btnTitleFont: UIFont = UIFont.boldSystemFont(ofSize: 35)

        let contactAddButton:UIButton = createButtonByType(btnType: UIButton.ButtonType.contactAdd, btnFrame: btnFrame, btnCenter: btnCenter, bgColor: btnBgColor, title: btnTitle, titleColor: btnTitleColor, titleFont: btnTitleFont)

        self.view.addSubview(contactAddButton)
    }

    /* This function will create a customized button. */
    func createCustomButton(){
        let btnFrame: CGRect = CGRect(x: 10, y: 100, width: 300, height: 100)
        let btnCenter: CGPoint = CGPoint(x: horizontialCenter, y: 6*verticalDistance)
        let btnBgColor: UIColor = UIColor.blue
        let btnTitle: String = "Custom Button"
        let btnTitleColor: UIColor = UIColor.yellow
        let btnTitleFont: UIFont = UIFont.boldSystemFont(ofSize: 35)

        let customButton:UIButton = createButtonByType(btnType: UIButton.ButtonType.custom, btnFrame: btnFrame, btnCenter: btnCenter, bgColor: btnBgColor, title: btnTitle, titleColor: btnTitleColor, titleFont: btnTitleFont)

        self.view.addSubview(customButton)
    }

    /* This is the general function to create button, the input parameter decide the button type and outlook. */
    func createButtonByType(btnType:UIButton.ButtonType, btnFrame:CGRect, btnCenter: CGPoint, bgColor: UIColor, title: String, titleColor: UIColor, titleFont: UIFont) -> UIButton {

        // Create the button with the button type.
        let btn:UIButton = UIButton(type: btnType)

        // Set button frame.
        btn.frame = btnFrame

        // Set button center point location.
        btn.center = btnCenter

        // Set button background color.
        btn.backgroundColor = bgColor

        // Set button title.
        btn.setTitle(title, for: UIControl.State.normal)

        // Set button title color.
        btn.setTitleColor(titleColor, for: UIControl.State.normal)

        // Set button title font.
        btn.titleLabel?.font = titleFont

        // Return the created button object.
        return btn

    }


}
3. Create Different Swift Type Buttons Visually Example.
- You can also create a swift button by drag & drop from the component library, and then just need to change it’s properties in Xcode Attributes inspector like this.
- Find and drag a button from the Xcode UI component library, then drop the button to the swift project Main.storyboard file.
- Then select the button and click View —> Inspectors —> Show Attributes Inspector menu item at Xcode top menu bar to display Xcode Attributes inspector.
- Select the button type from the Attributes inspector —> Type drop-down list.
Reference