When you use VirtualBox to manage a virtual machine, you may encounter the issue virtual disk space is not enough, so you have to create a new virtual machine with a bigger virtual disk or you can increase the current virtual machine disk space size to make more disk space to use. This article will tell you how to increase the virtual machine disk size in VirtualBox. This example will use the VirtualBox macOS version and the virtual machine is Ubuntu Linux.
1. Increase Virtual Machine Disk Virtual Size.
- Open VirtualBox and click Global Tools —> Virtual Media Manager menu item on the Oracle VM VirtualBox Manager window top right corner.
- Then you can select the virtual disk file(Ubuntu.vdi) and change the file size use the bottom slider bar.
- You can only increase the disk file size, can not decrease the file size. Do not forget to click the Apply button to save the changes.

- You can also run the VBoxManage command in the terminal to resize the virtual disk file size as below.
192:Ubuntu$ VBoxManage modifymedium "/Users/jerry/VirtualBox VMs/Ubuntu/Ubuntu.vdi" --resize 30000
0%...10%...20%...30%...40%...50%...60%...70%...80%...90%...100%
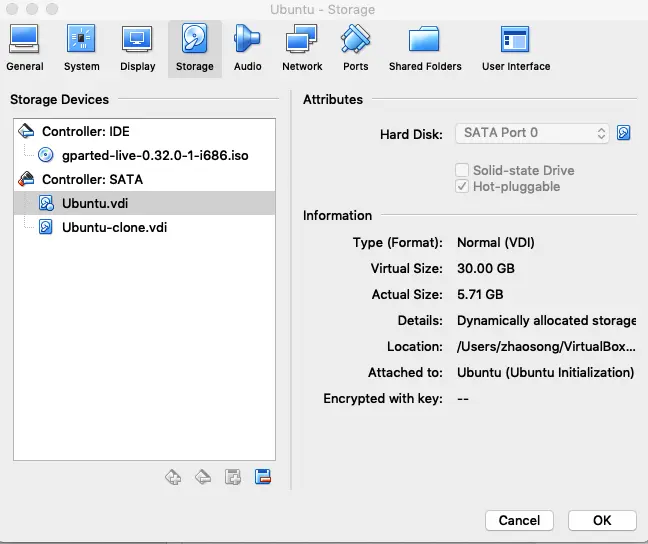
- Now right-click the Ubuntu virtual machine in VirtualBox, click Settings menu item, then click Storage and select the virtual disk file ( Ubuntu.vdi ) on left, you can see its detailed information on the right side.
- From the below picture, we can see that the new Virtual Size is 30 GB, but the Actual Size is 5.71 GB. Now the virtual disk file’s virtual size has been increased, we need to allocate the newly added space in the virtual machine os.
2. Convert Virtual Machine Disk File Storage Allocation Mode From Dynamic To Fixed.
- Before you can allocate additional space size in virtual machine os, you should make sure that your virtual machine storage allocation mode is Fixed size storage.
- If the storage allocation mode is Dynamic, you should first convert the Dynamic mode to Fixed size storage mode. Otherwise, you can not find the place to allocate newly added disk space in virtual machine os.
- From the above picture, we can find our virtual disk file storage allocation mode is Dynamically allocated storage in the right panel Details line. So we need first to clone the virtual disk to another one and then set the storage allocate mode to Fixed size.
- Clone virtual disk file to convert storage allocation mode from Standard( Dynamic) to Fixed size. Open a terminal and run the below command.
$ VBoxManage clonemedium disk "/Users/jerry/VirtualBox VMs/Ubuntu/Ubuntu.vdi" "/Users/jerry/VirtualBox VMs/Ubuntu/Ubuntu-clone.vdi" -variant Fixed
- In the above command line, we use the VBoxManage command to clone the Ubuntu.vdi to Ubuntu-clone.vdi, and pass -variant Fixed argument to make the new virtual machine disk file Fixed storage allocation mode.
- Open the virtual machine Settings window, click the Storage tab at the top then click the Adds hard disk icon(the last icon in Controller: SATA item like the below picture), and choose the newly cloned virtual machine disk file ( Ubuntu-clone.vdi ). Click the .vdi file, you can find the Virtual Size and Actual Size are all 30.00 GB.
- Right-click the old Ubuntu.vdi file, click Remove Attachment menu item to remove the old virtual machine disk file.
3. Allocate Additional Space Size In Virtual Machine OS.
3.1 Use Ubuntu Disks Utility Tool.
- Start and login ubuntu os.
- Then search keyword disk in the Show Applications area ( Click the bottom left icon in ubuntu-desktop to show all applications).
- Click the Disks utility tool to open it.
- Click the VBOX HARDDISK item on left, then you can find the unallocated disk space ( Free Space ) on right.
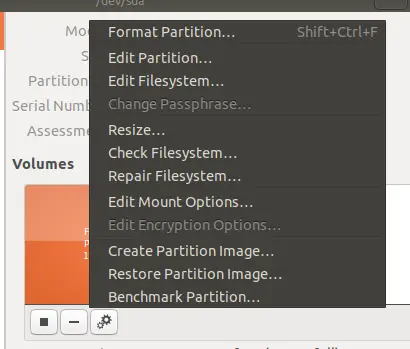
- Click the Additional partition options icon ( the third icon ) at Volumes bottom. Then click Resize… menu item to open the Resize Volume popup dialog. You can change the disk volume space size in it.
3.2 Use Third-Party Tool Gparted.
- Gparted is an open-source free disk volume management tool. You can download the GParted iso file from its official website.
- Then install the iso file in the VirtualBox virtual machine Settings —>Storage —> Controller: IDE as the DVD disk.

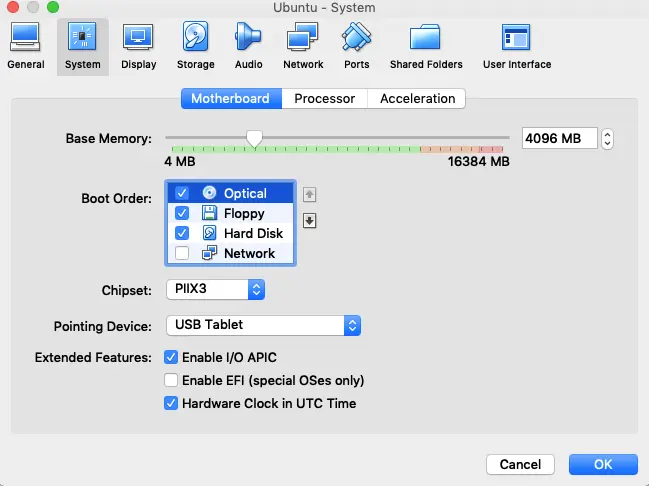
- Open virtual machine Settings dialog, click System icon, then move the Optical device to the first order in the Boot Order list to load the os from the GParted iso.
- Now restart the ubuntu virtual machine, it will load the GParted iso file, follow the steps in the prompt dialog, click enter key three times, then you can see below GParted GUI.
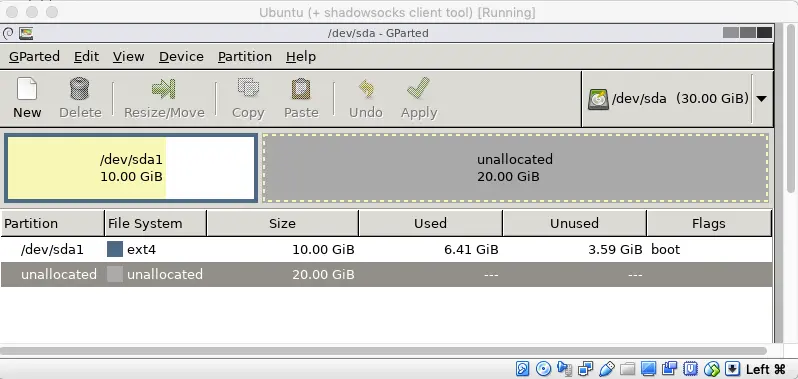
- Select the /dev/sda1 partition, then click Resize/Move menu icon at the top menu, then you can assign additional disk space to the /dev/sda1 partition.
3.3 Install Gparted Tool After Start Ubuntu.
- Besides load the GParted at the ubuntu start time, you can also install GParted after ubuntu os start.
- Login ubuntu os.
- Open a terminal and run the below command to install GParted in ubuntu.
$ sudo apt-get install gparted
- After installing GParted successfully, run the command
gpartein the terminal to open the GUI dialog to increase the partition size.$ gparte
4. Question & Answer.
4.1 How to change the size of vmdk file in a VirtualBox virtual machine.
- I use VirtualBox to create a Linux virtual machine, the virtual machine’s virtual disk is a vmdk file. Recently I found the virtual disk has little free space then I want to increase its disk size with the command
vboxmanage modifyhd Testdisk.vmdk --resize 102400. But the command gives me an error which said VBoxManage: error: Resize hard disk operation for this format is not implemented yet! and the progress state is VBOX_E_NOT_SUPPORTED, can anyone tell me how to fix it? Thanks. - The VirtualBox virtual machine disk file format is vdi, so if you want to keep using the vmdk format for the virtual disk, you can follow the below steps. Of cause sometimes we need to keep the vmdk format file because it can be used by VMware also.
#Clone your vmdk file to a vdi file
VBoxManage clonemedium "your-old.vmdk" "new-cloned.vdi" --format vdi

# Resize the newly cloned vdi virtual disk file to 100GB.(100 * 1024MB)
VBoxManage modifymedium "new-cloned.vdi" --resize 102400

# Clone the resized vdi virtual disk file to vmdk format file.
VBoxManage clonemedium "new-cloned.vdi" "your-resized.vmdk" --format vmdk
- Use the GParted iso tool to resize the virtual machine disk size as this article introduced in section 3.2.
Reference
Thank you very much.
in the settings .. its size is changed, but when running it, ubuntu shows a message that low disk space! I’m confused. does its size really changed or not?
In its settings: the virtual size is changed, but its actual size remain the same and did not increased. Pls help.
Thanks in advance
Hi! Thanks so much for this instruction. I have an error – it tells me I cannot run gparted without root privileges. I am surprised to see that I don’t have root privileges.. do you think it could be that I removed the first vdi without transferring root privileges to the clone?
I am not very sure also, but you can try it to check your conclusion. Thanks.