Visual studio code is an open-source lightweight code editor provided by Microsoft. It can startup very quickly. It can support any coding language development and debug through its extension. There are so many extensions in the visual studio code marketplace.
In single words, visual studio code is not a java IDE, but it can be used to develop and debug Java projects by install related java extensions in it. If you want to use visual studio code to develop and debug C++ or Python programs, you can install related extensions in it to achieve the goal. This article will show you how to use visual studio code to develop and debug a java project.
1. Install Visual Studio Code.
Install visual studio code is very easy, just go to the visual studio code download page to download the related OS version, then just install it as normal by clicking the installer or unzip it to use directly.
2. Install Visual Studio Java Project Extension.
2.1 Install Visual Studio Java Project Extensions Manually.
Before you can use visual studio to develop and debug a java project, you need to add the below extensions to it.
- Language Support for Java(TM) by Red Hat.
- Debugger for Java.
- Maven for Java.
- Java Extension Pack.
- Java Test Runner.
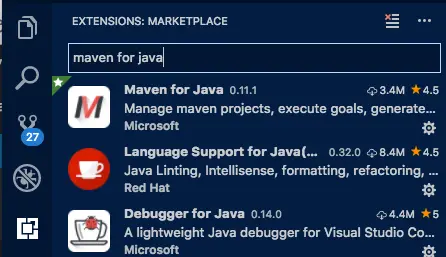
You should install them one by one. Now I just demo how to install Maven for Java extension, other extension installation is similar.
- Open visual studio code.
- Click View —> Extensions menu item in the top menu bar to open the extension panel on the left. It will list all the INSTALLED and RECOMMENDED extensions in the EXTENSIONS panel.
- Input keyword maven for java in the search box, it will list related extensions below. If the extension is not installed, there will have an Install button at the extension right bottom corner. Click the Install button to install it. Follow the same method to install other extensions.
2.2 Install Visual Studio Java Project Extensions With One Click.
- Visual studio code provides a shortcut for you to install the visual studio java project extensions with a single click.
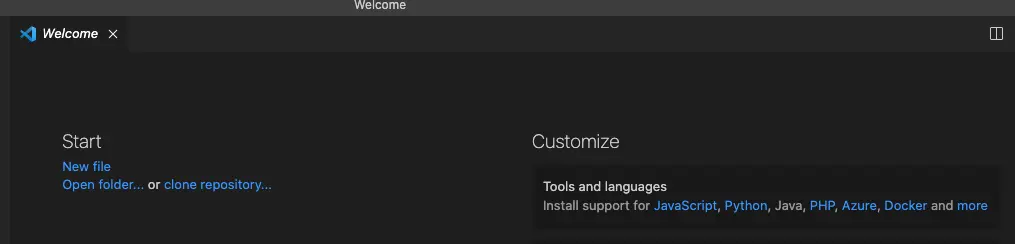
- Open Microsoft visual studio, click the Help —> Welcome menu item, it will open the visual studio welcome page.
- Click the Java link under the Customize section on the visual studio code welcome page right side. Then it will install all the java extensions which you need when you use visual studio to develop and debug a java project.
3. Configure Maven Tool Settings.
Because we want to use maven to manage(create, build, compile, etc) our java project. We should tell visual studio code where the maven settings.xml file and the mvn binary executable file are saved. The below step is for macOS, it is similar for Windows and Linux. First, you need to confirm maven has been installed on your macOS. You can refer to Create Java Project With Maven to learn more.
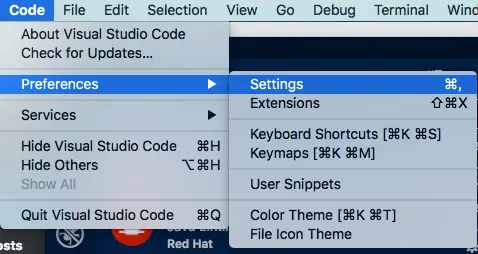
- Click Code —> Preferences —> Settings menu item in visual studio code.
- Input keyword maven in the Settings search box and there will list maven related items.
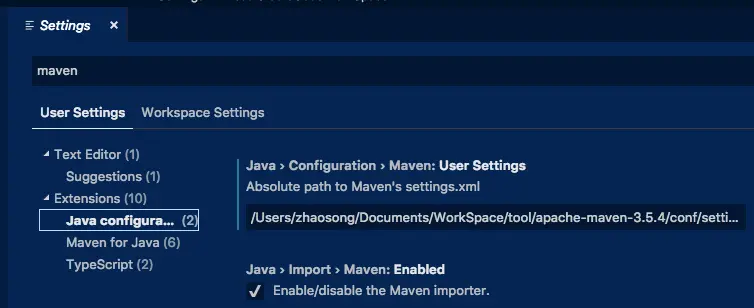
- Click the Java menu item under Extensions on the left side, and input the maven settings.xml file absolute full path on the right side input box under Java > Configuration > Maven: User Settings item.
- Click Maven for Java menu item on the left side and input maven executable file absolute full path in Maven > Executable:Path input box on the right side.
- All the configurations will be saved automatically after you input them.
4. Create Visual Studio Java Project With Maven Archetype.
Before we can edit and debug java code, we need to use visual studio to create a java project with the maven archetype as below.
- Create a folder named VisualStudioCodeWorkSpace.
- Open visual studio code, then click File —> Open and select the above folder.
- Then click View —> Command Palette… menu item. It will open a command input text box at the top.
- Input keyword maven in the text box, and select Maven: Create Maven Project item in the popup dropdown list.
- After a while, it will list all maven archetypes for you to choose from, input the keyword jdk in the search text box, and select archetype-quickstart-jdk8 in the list.

- Choose a version in the next version drop-down list.
- Select a target folder in the browse directory popup window and click the Select Destination Folder button.
- Then the maven command will execute and download related jars from the maven central repository, you can see all this interaction process log information in the terminal area at the visual studio code bottom panel.
- If it prompts you to input something such as groupId, artifactId, version, etc just input them. This process may take a little longer, please be patient.
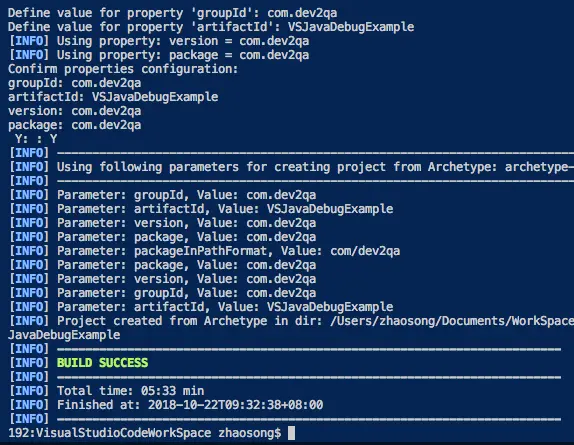
- When the build process completes successfully, you can find a folder like VSJavaDebugExample ( artifactId name ) under the workspace folder. And there are src and pom.xml files in it.
- You can also create the java project use the Yeoman tool, you can read the article How To Use Yeoman To Scaffold Java Spring Project.
5. Develop And Debug Visual Studio Java Project In Visual Studio Code.
5.1 How To Open The Created Or Existing Visual Studio Java Project.
- Open visual studio code, click the View —> Explorer menu item at the top menu bar.
- You can see there has an open a Java project link and Create Java Project button at the end of the EXPLORER.
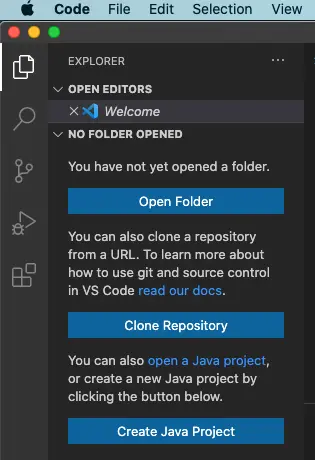
- Click the open a Java project link to open the java project which we just created.
- You can find the visual studio java project source files in the left side list panel.
5.2 How To Debug Visual Studio Java Project.
- Click the App.java file in the visual studio java project left side explorer to open and edit it on the right side.
- Click the beginning of each code line to enable/disable a breakpoint. When you see a red color point, it means the breakpoint is enabled.
- Click Run —> Start Debugging menu item to start debugging the file. The Run —> Start Without Debugging menu item will just run the java app without stopping at the breakpoint.
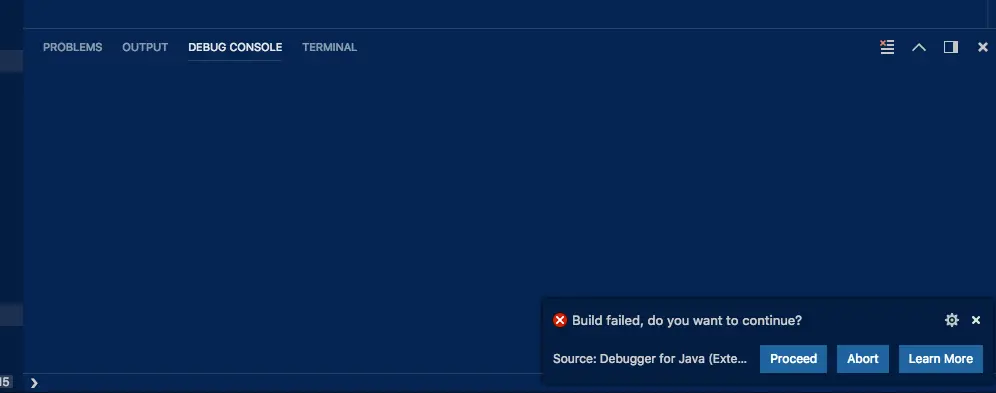
- If you encounter an error message which tells you the build failed, you can click the PROBLEMS tab to see what problem occurred. If there has no problem, then just click Proceed button to continue the debug process. Click the Learn More button will open the error resolution page.
- If everything went well, the string ‘Hello World!’ will be printed on the TERMINAL.
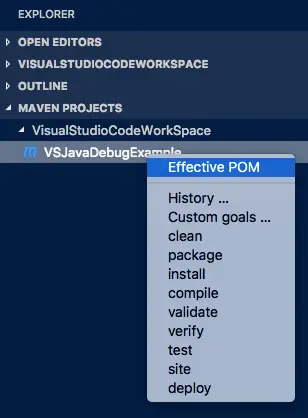
6. Run Maven Task.
Because you had added visual studio code Maven for Java extension, so there is a MAVEN tab in the left panel. Right-click the M file, you can run any maven task in the popup menu list. For example, we run a maven package task, after the task complete, a jar file will be created in the WorkSpace / Java_Project / target folder.