Virtualbox is open-source free software that can host Windows, Linux, macOS, and other operating systems in a virtual machine. It is owned by Oracle company. It can be installed and run on macOS, Linux, and Windows. In this article, we will focus on how to install Virtualbox on macOS, and we will create a virtual machine that installs Ubuntu on the Virtualbox mac version. It will also tell you how to resolve some common issues when you install Ubuntu on the Virtualbox mac version like below.
- How to enable copy & paste between hosts ( macOS ) and guests (ubuntu virtual machine os).
- How can you find and execute ubuntu applications in guest os?
- How to fix error “host os (macOS) can not ping guest os (ubuntu virtual machine)”.
- How to fix keyboard not working error.
1. Install Virtualbox For Mac.
- First of all, you should download the Virtualbox MacOS version.
- Then install the Virtualbox macOS version by clicking the downloaded dmg file. Follow the setup wizard to successfully install it.
2. Install Ubuntu On Virtualbox ( Mac Version ) Virtual Machine.
- Launch Virtualbox on macOS.
- Create a new virtual machine by clicking the New button, then input a virtual machine name in the Name input text box, select the guest OS type ( Linux ) from the Type drop-down list. Then select guest OS version Ubuntu(64 – bit) in the Version drop-down list.
- In the next wizard, click the Continue button and adjust the virtual machine’s hard disk size, memory size, and CPU processor number.
- After you adjust all the settings, the new ubuntu virtual machine is ready to install.
- Before you install Ubuntu Linux OS, you should download the ubuntu iso file to a local folder.
- Click to select the virtual machine in the left virtual machine list panel, click the Settings tab button at the top menu bar, then click the Storage tab button at the popup window top menu bar.
- Select the laser disk in the left Storage Devices list panel, then click the laser disk icon behind the Optical Drive label on the right side and click Choose Virtual Optical Disk File… menu item to select the ubuntu iso file which you had downloaded in step 5.
- Select the virtual machine on the Virtualbox left side and click the right mouse key, then click Start —> Normal Start menu item in the popup menu list to launch ubuntu Linux os install process.
- After some text scrolling on the screen, it will pop up the ubuntu installation welcome GUI wizard.
- In the first wizard dialog, there are two buttons Try Ubuntu and Install Ubuntu. The Try Ubuntu button will let you use the ubuntu os from the iso file without modifying the virtual machine disk files. The Install Ubuntu button will install ubuntu Linux os on the virtual machine.
- Choose the Keyboard layout language which you are preferred in the next wizard dialog, then click the Continue button.
- The next wizard dialog will let you choose what software will be installed in ubuntu os. I choose the Normal installation radio button, it will install a web browser, utilities, office software, games and media players, etc.
- In the next wizard dialog, if you do not need the data in the virtual machine anymore, and you want the installer to manage disk partitions, you can choose the Erase disk and install Ubuntu radio button, this will use all default settings(partition settings, etc) for this ubuntu os. If you want to manage the virtual machine disk partition by yourself, you can choose the Something else radio button to customize the ubuntu os installation.
- The final step is to create a user account that is used to log in to ubuntu. Please remember the username and password carefully.
- Now ubuntu Linux os has been installed on Virtualbox virtual machine successfully. Our version is the ubuntu 18.04.1 desktop version. When you start it and log in with your account, you can find it is stable like MacOS and it is easy to use as Windows. In the next article, we will tell you how to configure SSH in the Ubuntu Linux OS and how to login into it remotely.
3. Find And Execute Application In Ubuntu Linux OS.
- When you want to run ubuntu applications, you can follow the below steps.
- Click the Show Applications button at the bottom left corner of the ubuntu os desktop.
- Input application name ( for example Terminal ) in the search box at the top, then the related application will be displayed below it. Click the application icon to start it.
4. Enable Copy & Paste Between Host (Local Machine) And Guest (Virtual Machine) OS.
- To enable copy and paste between host and guest OS, you need to follow the below steps.
- Start the Virtualbox virtual machine, and click Devices —> Insert Guest Additions CD image… menu item at the top of the VirtualBox VM toolbar.
- Then it will mount a disk in the guest Ubuntu virtual machine OS like below, it will prompt you to run it, click the Run button and this will install the guest additions cd image.
"VBox_GAs_S.2.18" contains software intended to be automatically started. Would you like to run it? If you don't trust this location or aren't sure, press Cancel. Cancel Run - If you meet the below error messages when clicking the Devices —> Insert Guest Additions CD image… menu item, this means the cd image has been mounted in the guest os already, so you just need to run it in the ubuntu virtual OS manually.
Unable to insert the virtual optical disk /Applications/VirtualBox.app/Contents/MacOS/VBoxGuestAdditions.iso into the machine Ubuntu.
Could not mount the media/drive '/Applications/VirtualBox.app/Contents/MacOS/VBoxGuestAdditions.iso' (VERR_PDM_MEDIA_LOCKED).
- You can also run
sudo apt-get install virtualbox-guest-utilscommand in terminal to install the guest additions support packages to enable copy & paste function. - Now to enable Copy & Paste between host and guest OS, you also need to set shared clipboard configuration value in the VM general advanced settings.
- Right-click the virtual machine in the left panel and click Settings… menu item in the popup menu item list.
- Click General —> Advanced, then select Bidirectional menu item in both Shared Clipboard and Drag’n’Drop drop-down list. Click OK to save the settings and restart the virtual machine, now you can copy and paste data between host and guest OS successfully.
5. Resolve Can Not Ping Virtual Machine OS Issue.
-
- Now the Ubuntu virtual machine has been installed and you have created an admin account for it. You can log in to the system with that account. But when you want to access it from another machine, you should first find the ubuntu virtual machine’s external IP address with the command
ifconfig. - Open a terminal in ubuntu, and run
ifconfigcommand in it.jerry@jerry-VirtualBox:~$ ifconfig enp0s3: flags=4163<UP,BROADCAST,RUNNING,MULTICAST> mtu 1500 inet 192.168.0.107 netmask 255.255.255.0 broadcast 192.168.0.255
- Now the Ubuntu virtual machine has been installed and you have created an admin account for it. You can log in to the system with that account. But when you want to access it from another machine, you should first find the ubuntu virtual machine’s external IP address with the command
- If you get the error message Command ‘ifconfig’ not found, you can run the command
$ sudo apt install net-toolsto install it. - The IP address after inet is just the IP v4 IP address of this virtual machine.
- But when you ping this IP address from your host os, it will show a request timeout error, this is because your virtual machine is not configured correctly.
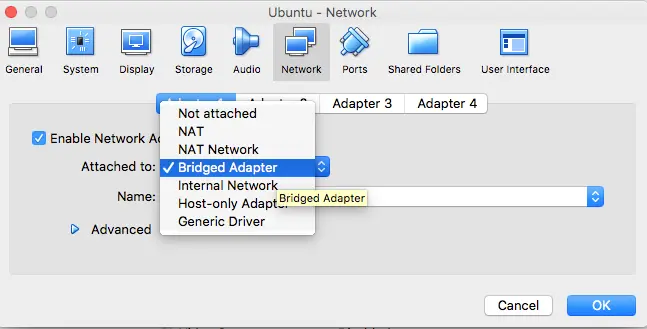
- Open the virtual machine Settings dialog again, then click Network —> Adapter1. Change the Attached to: drop-down list value from NAT to Bridged Adapter. Then restart the ubuntu os, now you can ping the ubuntu os from host os.
6. How To Fix Keyboard Not Working Error.
- Sometimes you may encounter a keyboard does not respond error after pressing the Enter key at the beginning of the installation.
- Solution 1: Turn off the virtual machine, then open the VM Settings dialog, click Display —> Screen, adjust Video Memory to a big number such as 128M.
- Solution 2: Open the VM Settings dialog, click the System button at the top area, then increase the Base Memory value to a bigger number such as 4GB.
- Solution 3: Open the VM Settings dialog, click User Interface —> Input dropdown list, uncheck and check the checkbox before the Keyboard item.
- Solution 4: Install VirtualBox extension package that fits your VirtualBox version ( How To Install Virtualbox Extension Pack Correctly ). Check whether USB3 has been enabled in the Virtual Machine, if not then enable it. Exit and power off all VirtualBox instances, then run command
VBoxManage setextradata "$Your_Virtual_Machine_Name" VBoxInternal2/EfiGraphicsResolution Xin a command-line window. You can refer article How To Fix Mouse And Keyboard Stuck After Install Mac OS On VirtualBox
7. How To Fix MacOS VirtualBox Ubuntu Virtual Machine Stop At UEFI Interactive Shell Issue.
7.1 Question.
- I installed the VirtualBox on my MacBookPro, and create a Ubuntu virtual machine on it.
- When the virtual machine installation process is finished, it requires me to restart the virtual machine.
- I restart the Ubuntu virtual machine as expected and install software on it, but suddenly the virtual machine exited.
- When the virtual machine restart, it stops at the UEFI Interactive Shell screen. I can not restart the Ubuntu virtual machine since then.
- I open the Ubuntu VM’s Settings window, then click the Storage item, I find the Ubuntu installation iso file has been removed automatically.
- Then I select and attach the Ubuntu installation iso file again to the VM. I can install it again, but the error still exists.
7.2 Answer1.
- I think you had better save the Ubuntu VM’s state after you install it successfully, but not restart the VM.
- After that when you run it, the VM starts from the state that you can run it.
- I think you can do it when you close the VM window, there is a choice to save the machine state, choose it and it will be ok.
7.3 Answer2.
- Open your Ubuntu VM’s Settings dialog, then click the System —> Motherboard tab.
- Check whether you have checked the Enable EFI (special OSes only) checkbox, if not checked then you need to check it.
- Then restart your Ubuntu virtual machine again.
7.4 Answer3.
- I think maybe this issue is because of the Ubuntu VM’s low swap memory not because of the virtual box.
- You can check the Ubuntu VM’s swap memory usage with the command htop.
- First, install the Ubuntu htop library with the command sudo apt install htop.
- Then run the command htop, then you can see the swap memory usage on the screen top area.
- If the swap memory has been fully used, then you can run the command below to increase the swap memory size.
# turn off swap.
sudo swapoff -a

# increase the swap file to 6 GB.
sudo dd if=/dev/zero of=/swapfile bs=1G count=6

# change the swap file permission.
sudo chmod 0600 /swapfile

# create swap with the file.
sudo mkswap /swapfile

# activate the swap file.
sudo swapon /swapfile
- After running the above command, the Ubuntu virtual machine abort issue may disappear.
Hi , I am stuck at Step 8, Ubuntu is failing to install. It goes through the install process 100%,yet Aborts after the reboot.
I meet the same error, the installation aborts, that is because I install the minim ubuntu, after I select the normal ubuntu packages installation, it installed successfully.
Superb… best one.
At step 11 the installation has started. But its been 2 hours and i see messages : Out of memory kill process XXXX core 2 or sacrifice child. I see only out of memory messages.
I have followed the default options as shown in the screenshot.
I got to step 9, and after choosing my language and clicking continue, nothing happened. It stayed on the same screen. So I waited a while and went off to do other things while it worked itself out. When I came back and turned my computer on, the screen had gone black, and there was some text on the screen. I couldn’t type or do anything. So I closed it out and opened it back up again. The problem persists.
Great! Thanks Jerry
how long should it take after step 11, to get to step 12?
my Mac just seems to be hanging and not moving on to the next step.
its been about 10 minutes now since I clicked “install now” on step 11.
appreciate the advice.
It finally went to the next step but now I can’t type anything to fill in the spaces on step 12???????
any help?
I am also unable to type anything to fill the spaces on step 12. Did you get any solution?
I came across the same issue. I powered off the Ubuntu machine and allocated more Base memory in Virtual Box (Settings -> System -> MotherBoard) to 2048MB. Then I was able to type in the input fields.
Hey, thank you for the solution ! Finally got it working thanks to you.
Which part do you think is complicated to you, thanks.