When I follow the article How To Create A Swift App Without Storyboard to learn how to create an iOS app without using the storyboard, after I remove the Main.storyboard file and run it. I meet an error message like this Could not find a storyboard named ‘Main’ in bundle NSBundle.
1. How To Fix Error Could Not Find A Storyboard Named ‘Main’ In Bundle NSBundle In Xcode 11.0.
- Below are the full error messages.
2019-10-24 21:01:02.763498+0800 iOSAppUseXibFiles[4524:133328] *** Terminating app due to uncaught exception 'NSInvalidArgumentException', reason: 'Could not find a storyboard named 'Main' in bundle NSBundle
- Finally, I find out how to resolve this error. It is because my Xcode is upgraded to version 11.0. And when I use this version’s Single View App template to create an iOS Xcode project, it will create a file that is SceneDelegate.swif.
- And the template also adds some configuration data in the project’s Info.plist file.
- Click Application Scene Manifest —> Scene Configuration —> Application Session Role —> Item 0 (Default Configuration) to expand it.
- Click the minus(
-) button at the end of the Storyboard Name item to remove it, because it’s value is Main, this item means the scene delegate needs the Main.storyboard file, but we removed the Main.storyboard file, so the error is thrown. - Now when you run your project, the error will disappear, but you will find there is only a black screen in the iOS simulator. You should follow the article How To Set Application Root View Controller Programmatically In Xcode 11 to know how to add the root view controller in the scene delegate class.
- But because the Main.storyboard file has been removed, so you should use below source code in SceneDelegate.swift file’s function func scene(_ scene: UIScene, willConnectTo session: UISceneSession, options connectionOptions: UIScene.ConnectionOptions).
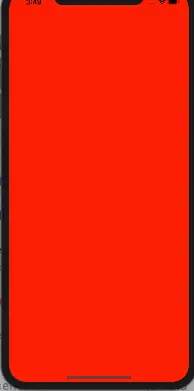
- Below source code will change the app’s default scene’s background color to red.
var window: UIWindow? func scene(_ scene: UIScene, willConnectTo session: UISceneSession, options connectionOptions: UIScene.ConnectionOptions) { print("Scene willConnectTo.") // Force convert UIScene type variable to UIWindowScene type variable. let windowScene:UIWindowScene = scene as! UIWindowScene; // Create the UIWindow variable use above UIWindowScene variable. self.window = UIWindow(windowScene: windowScene) // Set this scene's window's background color. self.window!.backgroundColor = UIColor.red // Create a ViewController object and set it as the scene's window's root view controller. self.window!.rootViewController = ViewController() // Make this scene's window be visible. self.window!.makeKeyAndVisible() guard let _ = (scene as? UIWindowScene) else { return } } - Below is the screen when the example code is executed.