In the previous article How To Draw Rectangle View Use Swift In the iOS App we have learned how to draw a rectangle, how to set the rectangle background color, and how to add the rectangle as the subview of the iOS app’s main view.
But when we set the rectangle background color, we use the built-in color of UIKit.UIColor class (such as UIColor.green). This article will give you examples about how to set customize color for a rectangle view and how to set an image as the rectangle view’s background.
1. Example Demo.
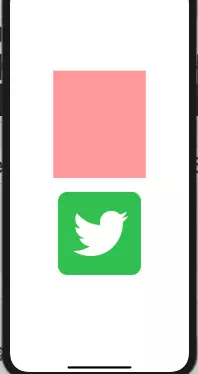
- Before start, let us look at the example demo first. When the example iOS app starts, there will show one rectangle with customized color at the top, and one rectangle which uses an image as it’s background locate just beneath the first rectangle.
2. How To Set Customize Color As Rectangle UIView Background.
- Create an instance of UIKit.UIColor class, pass the color RGB(red, green, blue) value and color opacity (alpha) value to the UIColor class’s initializer. You can refer UIKit.UIColor initializer document.
let backgroundColor = UIColor(red:CGFloat(red), green:CGFloat(green), blue:CGFloat(blue), alpha:CGFloat(alpha))
- Now set above customized UIColor object variable as the rectangle view’s background color.
customView.backgroundColor = backgroundColor
3. How To Set Image As UIView Background.
3.1 Add Image To The Swift Project.
- First, you should get a jpg or png format image.
- Right-click the swift project in Xcode left panel, then click Add Files to “project name” menu item in the popup menu list.
- Select the image in the top file explorer, and select the project name in Add to targets area. Then click Add button.
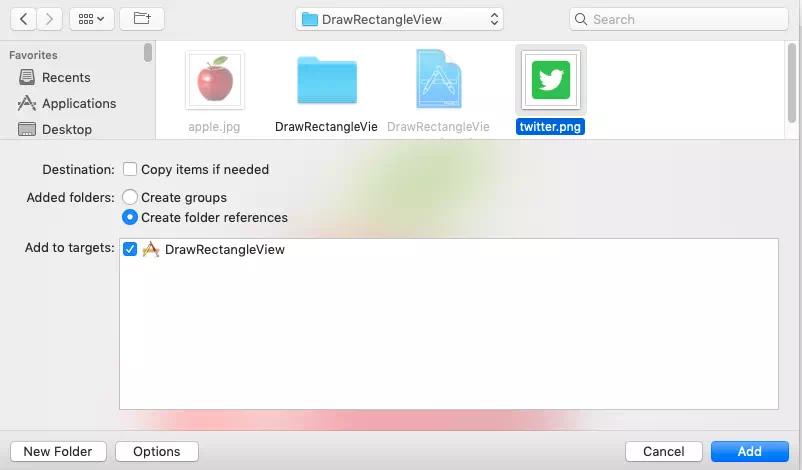
- Now you can see that the image ( twitter.png in this example ) has been added to the Xcode swift project.
3.2 Set The Image As UIView Background In Swift Source Code.
- Create an instance of UIKit.UIImage, pass the image name as named parameter’s value of UIImage initializer.
let uiImage = UIImage(named: imageName)
- Create a UIKit.UIColor object with above UIImage instance as initializer parameter. The parameter name is patternImage.
let backgroundColor = UIColor(patternImage: uiImage!)
- Set above customized UIColor object variable to the UIView’s backgroundColor property.
imageView.backgroundColor = backgroundColor
4. Example Project Source Files.
- Below are the example project source files. The only one source file needs to be edited is ViewController.swift. All the UIView objects are created in this file.
HelloWorldSwift HelloWorldSwift DrawRectangleView.xcodeproj DrawRectangleView twitter.png AppDelegate.swift ViewController.swift Main.storyboard Assets.xcassets LaunchScreen.storyboard Info.plist - Below is the source code, you can read the comments for more detail.
ViewController.swift// // ViewController.swift // DrawRectangleView // import UIKit class ViewController: UIViewController { /* This method will be invoked after the iOS app's view is loaded. */ override func viewDidLoad() { super.viewDidLoad() // First calculate out the device screen width and height. var screenSizeArr:Array<Float> = calculateScreenSize() let screenWidth:Float = screenSizeArr[0] let screenHeight:Float = screenSizeArr[1] // The up rectangle top left point x axis position. let xPos:Float = 100 // The up rectangle top left point y axis position. let yPos:Float = 200 // The up rectangle width. let rectWidth:Float = screenWidth - 2 * xPos // The up rectangle height. let rectHeight:Float = screenHeight / 2 - yPos // Create and add the up rectangle view. addColorRectView(red: 1, green: 0.5, blue: 0.5, alpha: 0.8, xPos: xPos, yPos: yPos, width: rectWidth, height: rectHeight) // The down image view's top left point y axis position. let yPosImg = yPos + rectHeight // The image name. let imageName:String = "twitter.png" // Create UIView and set the image as background. addImageView(yPos: yPosImg, screenWidth: screenWidth, imageName: imageName) } /* This function will calculate and return the screen width and height value in an array. */ func calculateScreenSize() -> Array<Float>{ var ret:Array<Float> = Array<Float>() // get screen size object. let screenSize: CGRect = UIScreen.main.bounds // get screen width. let screenWidth = screenSize.width // get screen height. let screenHeight = screenSize.height // append screen width and height in the returned array. ret.append(Float(screenWidth)) ret.append(Float(screenHeight)) return ret } /* This function will add a rectangle view and set a customize color as it's background color. */ func addColorRectView(red:Float, green:Float, blue:Float, alpha: Float, xPos:Float, yPos:Float, width:Float, height:Float) -> Void { // Create a CGRect object which is used to render a rectangle. let rectFrame: CGRect = CGRect(x:CGFloat(xPos), y:CGFloat(yPos), width:CGFloat(width), height:CGFloat(height)) // Create a UIView object which use above CGRect object. let customView = UIView(frame: rectFrame) // Create a UIColor object which presents the above view's background color. let backgroundColor = UIColor(red:CGFloat(red), green:CGFloat(green), blue:CGFloat(blue), alpha:CGFloat(alpha)) // Set UIView background color. customView.backgroundColor = backgroundColor // Add the above UIView object as a subview in the iOS app screen. self.view.addSubview(customView) } /* This function will create a UIView object beneath the above UIView object, and set the image as the UIView object's background. */ func addImageView(yPos:Float, screenWidth:Float, imageName:String) -> Void{ // Create an UIImage object variable. let uiImage = UIImage(named: imageName) // Get image width and height. let imageWidth:CGFloat = uiImage!.size.width let imageHeight:CGFloat = uiImage!.size.height // Calculate the image view's top-left point's x-axis position value. let xPos = (screenWidth - Float(imageWidth))/2 // Create a CGRect object to render the image. let imageFrame: CGRect = CGRect(x:CGFloat(xPos), y:CGFloat(yPos), width:imageWidth, height:imageHeight) // Create a UIView object which use above CGRect object. let imageView = UIView(frame: imageFrame) // Create a UIColor object which use above UIImage object. let backgroundColor = UIColor(patternImage: uiImage!) // Set above image as UIView's background. imageView.backgroundColor = backgroundColor // Add above UIView object as the main view's subview. self.view.addSubview(imageView) } }