1. Why Manual Renaming Under C:\Users Is Dangerous
Many Windows users run into compatibility issues when their user profile folder name contains Chinese characters. Some command-line tools, development runtimes and third-party applications cannot handle non-ASCII paths correctly, which makes users want to rename the profile folder under `C:\Users`. A common bad habit is to open File Explorer and rename the folder directly. This action appears to succeed at first glance, but it breaks critical system mappings.
Windows stores the absolute path of each user profile in the registry entry `ProfileImagePath`. If you rename the folder without updating this registry value, the operating system cannot match the user SID with the physical folder. When you try to log back into that account, Windows will fall back to a temporary TEMP profile. All new files you create in this session will be saved in the temporary folder and disappear once you sign out.
This guide covers a custom windows utility: Windows User Profile Directory Renamer. It automates registry sync, creates registry backups and optional junction links, eliminating temporary profile failures. We will walk you through three core workflows: create a local offline account on Windows 11, activate the built-in Administrator account, safely rename user profile folders, plus rollback instructions. If you already know how to set up local accounts, you may skip ahead to the utility tutorial.
2. Step-by-Step Guide: Create a Local Windows 11 Account Without Microsoft Account
A local account is tied only to your local machine, no mandatory Microsoft account login required. One critical rule: Windows will not generate the matching profile folder under `C:\Users` until the first login. Without this folder, you cannot perform later renaming operations.
- Open the Start Menu and launch the Settings app, then select Accounts from the left sidebar.
- Locate Other users on the right panel, expand the section and click Add account.
- When the Microsoft account sign-in popup appears, click I don’t have this person’s sign-in information.
- Select the option labeled Add a user without a Microsoft account.
- Fill in the username, login password and security recovery questions, then click Next.
- After creation, click Change account type to switch the role between Administrator or Standard User. We use Standard User for this demo.
- Switch accounts: open the Start Menu, click your current profile icon, pick the newly created local account and sign in with password.
- Open File Explorer and navigate to `C:\Users`, verify the profile folder with the same name as your account exists.
3. Activate The Built-in Administrator Account On Windows 11 Via Command Line
Windows 11 disables the default Administrator account out of the box. This built-in account has full system privileges, which is required for many low-level system modifications. Just like regular local accounts, you need to log into Administrator once to generate its profile folder under `C:\Users`.
- Search for `cmd` in Windows search, right-click Command Prompt and choose Run as administrator.
- Paste this command into the console and press Enter: `net user administrator /active:yes`.
- A success message confirms the built-in admin account is now enabled.
- Return to Start Menu, click your profile icon and select Administrator to log in.
- After logging in, open `C:\Users` again, you will see the Administrator profile folder created.
- Note: Run the same command with `no` replacing `yes` to disable this account when you no longer need it.
4. Known Pitfall: What Happens If You Rename User Folder Manually
Many users switch to another admin account and force rename the folder inside `C:\Users`. Even though File Explorer allows renaming, the registry path `ProfileImagePath` stays unchanged. The mapping between user SID and folder path is broken.
- After manual renaming, sign back into the target account, Windows throws an account loading error.
- The system spawns a temporary TEMP profile automatically for this login session.
- All new documents and setting changes are stored inside `C:\Users\TEMP`, isolated from the original profile folder.
- Once you sign out, all changes inside the temporary profile get discarded, and app configurations are lost.
- To sum up: Renaming the folder alone without synchronizing the registry entry will definitely trigger a temporary profile. This approach is not safe and should never be used.
5. The Tool’s Screenshots
5.1 English UI
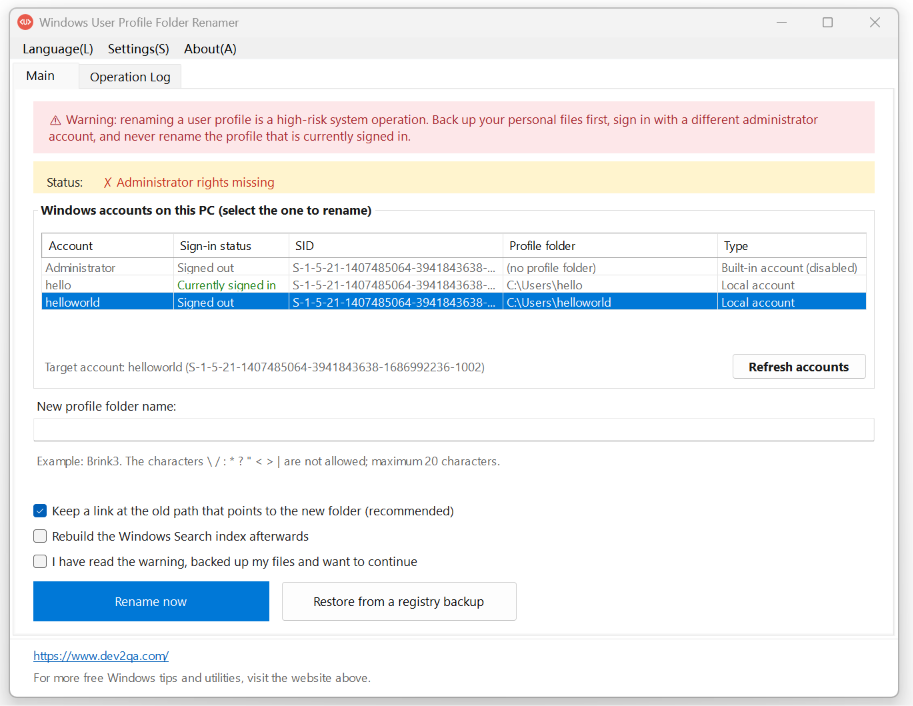
6. Main Workflow: Rename User Profile Folder With The Helper Utility
The core design of this custom tool is simple: check account login status first, only allow renaming when the target account is fully signed out. It automatically updates registry entries, creates registry backups and creates optional junction links pointing to the new folder, so the renamed account can log in normally without temporary profile issues.
- Sign in with a separate administrator account, confirm the target account you want to rename is completely signed out.
- Double-click the Windows User Profile Directory Renamer to launch it. The main panel lists all local accounts and their current login status.
- Select the target account from the list, enter your preferred new folder name (ASCII letters and hyphens are recommended, avoid Chinese characters).
- Check all available checkboxes, then click Rename now button.
- If elevated admin rights are required, confirm the prompt, the app will restart itself as administrator.
- Re-select the account, fill the new name again and trigger the rename function. A confirmation dialog pops up.
- The dialog shows original path, new path and user SID. Confirm the account is logged out and your important files are backed up, then confirm to proceed.
- The tool runs the renaming task, showing real-time progress and elapsed time. Once finished, the alert tells you the folder has been renamed and `ProfileImagePath` registry entry synchronized.
- You will be asked whether you want to remove the old junction link. Select No to keep it for compatibility with legacy programs that reference the old path.
- Reboot your PC. After rebooting, go to `C:\Users`, you will see the newly renamed folder and a junction link pointing to it.
- Log into the renamed account, create a test file on desktop. The file saves correctly into the new profile folder, no TEMP profile appears.
7. Rollback Guide: Restore Original Folder Name From Registry Backup
Every rename operation triggers an automatic backup. Backup files are stored inside the `backups` subfolder under the program directory. Two files are generated for each task: a registry backup file and a plain text operation log. Important reminder: this backup only saves registry path information, it does NOT back up your personal files inside the user profile folder. Always back up your data manually.
- Sign in with an administrator account, reopen the renamer utility and switch to Rollback From Registry Backup tab.
- Pick the registry backup record created during your rename task from the backup list.
- Click Restore Selected Backup. If permission is denied, confirm and restart the tool with administrator privileges.
- Select the backup entry again and click restore. The popup shows the original and target folder name.
- Do NOT close the program or reboot your PC during rollback. Confirm the prompt, the rollback completes quickly.
- After rollback, the folder name under `C:\Users` reverts to its original name, and the registry path is restored.
8. Extra Features & Usage Notes
This utility has two main tabs: the main operation tab and the runtime log tab. The runtime log records every operation, validation status and user SID for troubleshooting. Additional options are available in the menu bar.
- Language Switch: Switch UI between Simplified Chinese, Traditional Chinese and English from the language menu.
- Desktop Shortcut: Generate a desktop shortcut for quick launch.
- Tray Minimize: Enable minimize to system tray, closing the window will not exit the program.
- Auto Start: Toggle auto-launch on Windows boot.
Feedback: If you encounter bugs or have feature requests, leave your feedback, this tool will keep receiving updates.
9. Demo Video
You can watch the following demo video by select the subtitle to your preferred subtitle language.