This example will tell you how to use STS ( Spring Tool Suite based on Eclipse ) to create a spring project use XML configuration.
1. Create Spring Maven Project Use STS.
- Open STS, click File —> New —> Others menu item. Input the keyword Spring in the popup dialog search text box and select Spring —> Spring Legacy Project item.
- Click the Next button, input the Project name, select the Location directory, then select Simple Projects —> Simple Spring Maven template in the next Spring Legacy Project dialog. Click the Finish button, now the spring maven project has been created.
2. Create Java Bean And Spring Bean Configuration XML File.
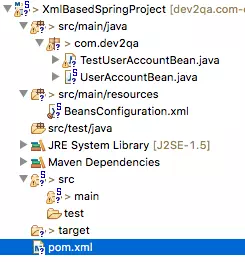
- Now the legacy spring maven project has been created, below are the project files structures, we will introduce them one by one.
2.1 Edit Pom.xml
- First, edit the pom.xml file with the below code.
<project xmlns="http://maven.apache.org/POM/4.0.0" xmlns:xsi="http://www.w3.org/2001/XMLSchema-instance" xsi:schemaLocation="http://maven.apache.org/POM/4.0.0 http://maven.apache.org/xsd/maven-4.0.0.xsd">
  <modelVersion>4.0.0</modelVersion>
  <groupId>org.springframework.samples</groupId>
  <artifactId>XmlBasedSpringProject</artifactId>
  <version>0.0.1-SNAPSHOT</version>

  <!-- Spring framework used constants variable  -->
  <properties>
     <spring.version>5.0.0.BUILD-SNAPSHOT</spring.version>
     <servlet.api.version>3.1.0</servlet.api.version>
  </properties>

  <repositories>
    <!-- This repository is where the spring framework dependencies jar file download. -->
    <repository>
      <id>spring-snapshots</id>
      <name>Spring Snapshots</name>
      <url>https://repo.spring.io/libs-snapshot</url>
      <snapshots>
        <enabled>true</enabled>
      </snapshots>
     </repository>
  </repositories>

  <dependencies>
     <!-- Below are the basic spring container dependencies library. -->
     <dependency>
        <groupId>org.springframework</groupId>
        <artifactId>spring-context</artifactId>
        <version>${spring.version}</version>
     </dependency>

     <dependency>
        <groupId>org.springframework</groupId>
        <artifactId>spring-beans</artifactId>
        <version>${spring.version}</version>
     </dependency>

     <dependency>
        <groupId>org.springframework</groupId>
        <artifactId>spring-core</artifactId>
        <version>${spring.version}</version>
     </dependency>

  </dependencies>
</project>
2.2 Create Java Class UserAccountBean In Package com.dev2qa
- UserAccountBean.java
package com.dev2qa;

public class UserAccountBean {

   private String userName;
   private String password;
   private String email;

   public String getUserName() {
      return userName;
   }

   public void setUserName(String userName) {
      this.userName = userName;
   }

   public String getPassword() {
      return password;
   }

   public void setPassword(String password) {
      this.password = password;
   }

   public String getEmail() {
      return email;
   }

   public void setEmail(String email) {
      this.email = email;
   }

   public UserAccountBean(String userName) {
      super();
      this.userName = userName;
   }

   public String sayHello(){
       String ret = "Hello " + userName + ", Password is " + password + ", Email is " + email;
       return ret;
   }
}
2.3 Create Bean Configuration XML File in Class Path ( src/main/resources folder).
- Right-click src/main/resources folder.
- Click New —> Others menu item to open the Create a new Spring Bean Configuration File window, input the keyword Spring in the search text box. Select Spring —> Spring Bean Configuration File item, click the Next button will open the Create a new Spring Bean Definition file dialog window.
- Input XmlBasedSpringProject/src/main/resources in the parent folder text box, and input the text BeansConfiguration in the bean configuration File name text box, click the Next button.
- Select beans XML namespace in the next dialog, then click the Next button.
- Click the Next and Finish button to complete the wizard.
3. Add Java Beans In Bean Configuration Xml File.
- We have created both a java bean class and the spring bean configuration XML file in step 2. Now we will add the java bean to the bean configuration file to manage it with the spring container.
- Double click the BeansConfiguration.xml file to open it in the right panel.
- Click the beans tab at the right panel bottom area.
- Click the New Bean button to open the Create New Bean window to add an existing java bean as the spring container-managed java bean.
- In the Create New Bean window, input the bean Id (UserAccountBean), Name (UserAccountBean), and browse the bean Class(com.dev2qa.UserAccountBean).
- Click the Next button to go to the spring bean Properties and Constructor Parameters edit dialog to edit the Spring bean’s properties.
- Click the Finish button, now the spring container-managed java bean has been created.
4. Invoke Spring Container-Managed Java Bean.
- Now create a java class com.dev2qa.TestUserAccountBean and write below code in it.
package com.dev2qa;

   import org.springframework.context.ApplicationContext;
   import org.springframework.context.support.ClassPathXmlApplicationContext;

   public class TestUserAccountBean {

      public static void main(String[] args) {

      // Initialize spring beans from bean configuration xml file.
      ApplicationContext context = new ClassPathXmlApplicationContext("BeansConfiguration.xml");
      // Get user accout bean.
      UserAccountBean userAccountBean = (UserAccountBean)context.getBean("UserAccountBean");

      // Invoke spring managed bean method
      String ret = userAccountBean.sayHello();
      System.out.println(ret);

      // Change spring bing property valu.
      userAccountBean.setUserName("Richard");
      userAccountBean.setEmail("[email protected]");
      userAccountBean.setPassword("111111");
      ret = userAccountBean.sayHello();
      System.out.println(ret);
   }
}
5. Run Example.
- Right-click the TestUserAccount.java file, click Run As —> Java Application. You can get the below results.
Jul 28, 2018 8:34:36 PM org.springframework.context.support.AbstractApplicationContext prepareRefresh
INFO: Refreshing org.springframework.context.support.ClassPathXmlApplicationContext@45ff54e6: startup date [Sat Jul 28 20:34:36 CST 2018]; root of context hierarchy
Jul 28, 2018 8:34:36 PM org.springframework.beans.factory.xml.XmlBeanDefinitionReader loadBeanDefinitions
INFO: Loading XML bean definitions from class path resource [BeansConfiguration.xml]
Hello Jerry, Password is 666666, Email is [email protected]
Hello Richard, Password is 111111, Email is [email protected]