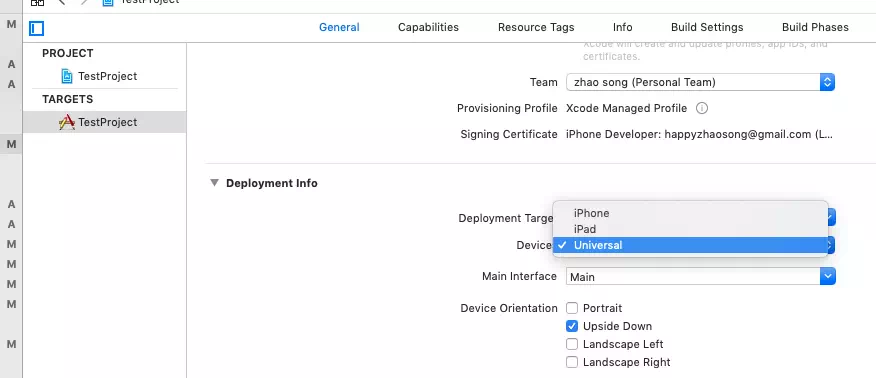
When you develop an iOS app, you may want your app to support iPhone, iPad only, or support both of them. And in some cases, if your UI layout is very complex, you can make your iOS app layout fixed by showing the app only in one orientation ( for example Portrait or Landscape orientation only ) so that it can reduce your coding effort.
All these settings can be achieved in the Xcode project target configuration, as you know each target will be built to one iOS app product. And you can also configure it programmatically in swift source code. This article will tell you how to do it.
1. Configure iOS App Supported Devices In Xcode Target Steps.
- First, create an iOS project in Xcode.
- Click the Xcode project name in the left project navigator panel.
- Then click one target under the TARGETS list in the Xcode center editor panel.
- Click the General tab in one target detail information pane, and scroll down to the Deployment Info section. Then you can change the iOS app supported iOS device in the drop-down list.
- You can select either iPhone, iPad, or Universal item in the Devices drop-down list. Universal means it supports both iPhone and iPad.

2. Configure iOS App Supported Orientation In Xcode Target Steps.
- You can configure which device orientation does your iOS app support in the Xcode target —> General —> Deployment Info section also. Just check the checkbox in the Deployment Info —> Device Orientation section. Below is the explanation of each orientation meaning, you can check multiple checkboxes.
- Portrait: If you check this checkbox only, it means the iOS app support Portrait orientation only. So that whatever direction your iOS device turns to, the app will only display in Portrait orientation. The app will not change its orientation to fit the device’s orientation change. You can see the effect in the below video. You can press
Command + Arrow Keyto change the iOS simulator screen orientation. You can see this step demo video on URL https://youtu.be/A7iLU44UJpE. - Upside Down: This orientation means you change the orientation of your iOS device 180 degrees. But if you check this checkbox only, you will get the below error message when you run the app. So this checkbox should be used with other orientations such as Portrait or Landscape.
2019-09-18 10:36:13.815948+0800 TestProject[4709:145912] *** Terminating app due to uncaught exception 'UIApplicationInvalidInterfaceOrientation', reason: 'Supported orientations has no common orientation with the application, and [TestProject.ViewController shouldAutorotate] is returning YES'
- Landscape Left: When you check this checkbox only, it will display the iOS app in the landscape left orientation, whether you change your iOS device’s orientation or not, the app’s orientation will not change. You can see this step demo video on URL https://youtu.be/zODuFpd01PU.
- Landscape Right: This is similar to Landscape Left, the only difference is that it will display the iOS app UI components in landscape orientation right side.

3. How To Set iOS App Supported Orientation Programmatically.
- Besides configuring the iOS app-supported orientation in Xcode target —> General —> Deployment Info —> Device Orientation section, you can also configure it in swift source code programmatically. What you need to do is to override the below function in the Xcode project AppDelegate.swift file.
func application(_ application: UIApplication, supportedInterfaceOrientationsFor window: UIWindow?) -> UIInterfaceOrientationMask
- Then add the below swift source code in your Xcode project’s AppDelegate.swift file.
func application(_ application: UIApplication, supportedInterfaceOrientationsFor window: UIWindow?) -> UIInterfaceOrientationMask {

    // Support only one orientation value.
    //return UIInterfaceOrientationMask.portrait

    // Support multiple orientation values.
    return ( UIInterfaceOrientationMask(rawValue: UIInterfaceOrientationMask.portrait.rawValue | UIInterfaceOrientationMask.landscape.rawValue | UIInterfaceOrientationMask.portraitUpsideDown.rawValue) )
}