Recently when I install VMware Fusion on macOS, I meet the error “Could not open /dev/vmmon: No such file or directory” during the installation process. When I investigate this error, I found this error happened not only on macOS, but also when you start VMWare on Linux, this article will tell you how to fix it.
1. The Steps To Reproduce & How To Fix The Error On macOS.
1.1 Download And Install VMware Fusion For Mac.
- Click here to download the VMware Fusion MacOS version.
- Double click the dmg file to install it correctly.
1.2 Create Windows 7 Virtual Machine.
- Click Finder in the desktop dock.
- Click Go —> Applications in Finder app top menu bar. Double click the VMware Fusion app in the right panel to start it.
- Click File —> New in VMware Fusion top menu bar to open the Select the Installation Method dialog. Select the Create a custom virtual machine item in the right panel.
- Click the Continue button and select Windows 7 x64 in the virtual machine list. Click the Continue button again. And select Create a new virtual disk option then click Finish.
- If you meet error messages such as “Could not open /dev/vmmon: No such file or directory.”, You can follow the below steps to fix it.
Could not open /dev/vmmon: No such file or directory.

Please make sure that the kernel module ‘vmmon‘ is loaded.

                                            OK
1.3 Fix Could Not Open /dev/vmmon Error During Virtual Machine Creation.
- Click Apple start menu —> System Preferences… menu item.
- Click Security & Privacy in the System Preferences popup dialog.
- Click the Allow button after the text System software from developer “VMware, Inc.” was blocked from loading to enable VMware to create the virtual machine.
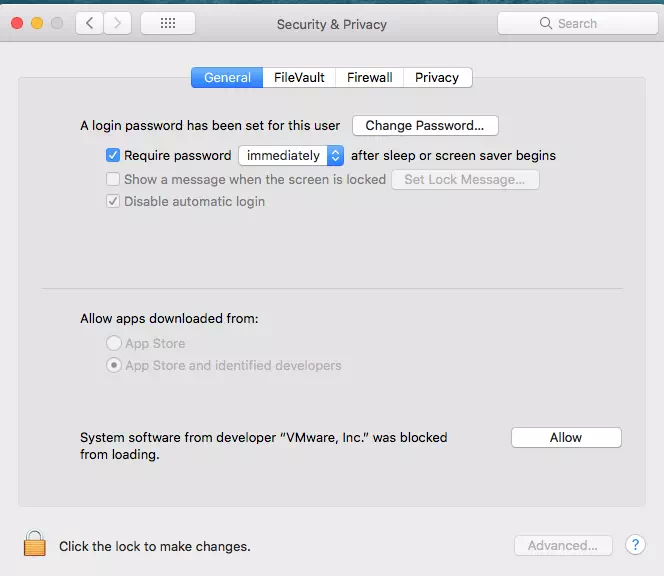
- If you can not see the Allow button, you can read the article How To Install Programs From Unidentified Developers In Mac OS.
- Also, make sure to select the radio button App Store and identified developers in the section Allow apps downloaded from. If you can not change it, click the bottom left lock icon to make the radio button clickable.
- Now click VMware Fusion app to go back to VMware Fusion screen, click File —> Open in the top menu bar, and select the created Windows 7 x 64 virtual machine file.
- Click Virtual Machines —> CD / DVD (SATA) —> Choose Disc or Disc Image… menu item. Select the Windows 7 iso file and click the triangle button to start the image in the virtual machine window to start windows 7 installation. The installation process is the same as installing Windows 7 on a physical machine.
2. The Steps To Reproduce & How To Fix This Error On Linux.
2.1 Download & Install VMWare WorkStation For Linux.
- Go to VMWare’s official website home page, and download the VMWare workstation trial version which you can use for evaluation.
- The VMWare Linux installer is a file like VMware-Workstation-Full-16.2.1-18811642.x86_64.bundle.
- To run the installer file, you need to add the execute permission to the above file like below.
- Open a terminal and run the command $ chmod +x VMware-Workstation-Full-16.2.1-18811642.x86_64.bundle to add the execute permission to it.
- After that, you can run the command $ sudo ./VMware-Workstation-Full-16.2.1-18811642.x86_64.bundle to extract the downloaded file.
$ sudo ./VMware-Workstation-Full-16.2.1-18811642.x86_64.bundle Extracting VMware Installer...done. Installing VMware Workstation 16.2.1 Configuring... [######################################################################] 100% Installation was successful. - Now you can click the VMware workstation icon to start it, if this is the first time you run the VMWare workstation, it will prompt you to install GCC.
2.2 The Steps To Raise This Error.
- When I create a virtual machine in the VMware workstation, the below error will appear.
-
Could not open /dev/vmmon: No such file or directory. Please make sure that the kernel module `vmmon' is loaded
- It also said the virtual machine initialization failed. So I try to run the below commands to fix it.
- So I try to run the below command to fix it.
$sudo vmware-modconfig --console --install-all [AppLoader] Use shipped Linux kernel AIO access library. An up-to-date "libaio" or "libaio1" package from your system is preferred. [AppLoader] GLib does not have GSettings support. $ sudo openssl req -new -x509 -newkey rsa:2048 -keyout VMWARE.priv -outform DER -out VMWARE.der -nodes -days 36500 -subj "/CN=VMWARE/" Generating a RSA private key .........+++++ ..........+++++ writing new private key to 'VMWARE.priv' ----- $ sudo /usr/src/linux-headers-$(uname -r)/scripts/sign-file sha256 ./VMWARE.priv ./VMWARE.der $(modinfo -n vboxdrv) modinfo: ERROR: Module vboxdrv not found. Usage: scripts/sign-file [-dp] <hash algo> <key> <x509> <module> [<dest>] scripts/sign-file -s <raw sig> <hash algo> <x509> <module> [<dest>] $ tail $(modinfo -n vboxdrv) | grep "Module signature appended" modinfo: ERROR: Module vboxdrv not found. - Now I run the command sudo mokutil –import VMWARE.der in a new terminal tab and get the below output.
$ sudo mokutil --import VMWARE.der
sudo: mokutil: command not found

$ sudo apt install mokutil
Reading package lists... Done
Building dependency tree
Reading state information... Done
The following NEW packages will be installed:
  mokutil
0 upgraded, 1 newly installed, 0 to remove and 191 not upgraded.
Need to get 22.6 kB of archives.
After this operation, 71.7 kB of additional disk space will be used.
Get:1 http://cn.archive.ubuntu.com/ubuntu focal/main amd64 mokutil amd64 0.3.0+1538710437.fb6250f-1 [22.6 kB]
Fetched 22.6 kB in 1s (28.4 kB/s)
Selecting previously unselected package mokutil.
(Reading database ... 150971 files and directories currently installed.)
Preparing to unpack .../mokutil_0.3.0+1538710437.fb6250f-1_amd64.deb ...
Unpacking mokutil (0.3.0+1538710437.fb6250f-1) ...
Setting up mokutil (0.3.0+1538710437.fb6250f-1) ...
Processing triggers for man-db (2.9.1-1) ...
- When I run the command $ sudo mokutil –import VMWARE.der again, I got the below error.
$ sudo mokutil --import VMWARE.der
[sudo] password for jerry:
EFI variables are not supported on this system
2.3 How To Fix The Error.
- In most cases, when you secure boot a virtual machine, it will need a trusted certificate to load the kernel modules.
- So you should first create a trusted key and then use the trusted key to sign the modules vmmon, vmnet that you just compiled.
- You can follow the below steps to fix it.
- Open a terminal and run the command sudo vmware-modconfig –console –install-all after you install the VMWare.
$ sudo vmware-modconfig --console --install-all
[sudo] password for jerry:
[AppLoader] Use shipped Linux kernel AIO access library.
An up-to-date "libaio" or "libaio1" package from your system is preferred.
[AppLoader] GLib does not have GSettings support.
- Run the OpenSSL command to generate a trusted key.
$ openssl req -new -x509 -newkey rsa:2048 -keyout VMWARE15.priv -outform DER -out VMWARE15.der -nodes -days 36500 -subj "/CN=VMWARE/"
Generating a RSA private key
.........+++++
.......................+++++
writing new private key to 'VMWARE15.priv'
-----
- Sign the 2 kernel modules vmmon, vmnet with the generated key above.
$ sudo /usr/src/linux-headers-$(uname -r)/scripts/sign-file sha256 ./VMWARE15.priv ./VMWARE15.der $(modinfo -n vmmon)
$ sudo /usr/src/linux-headers-$(uname -r)/scripts/sign-file sha256 ./VMWARE15.priv ./VMWARE15.der $(modinfo -n vmnet)
$
- Run the tail command to verify that you have applied the signatures successfully.
$ tail $(modinfo -n vmmon) | grep "Module signature appended"
Binary file (standard input) matches
- The next step is to import the key to the management system of the machine owner key (MOK). During the process, it will let you input a password.
$ sudo mokutil --import VMWARE15.der
- You should run the above command in a physical machine, if you run the command in a virtual machine, you will get the error EFI variables are not supported on this system. This is because the virtual machines disable the secure boot.
- Restart the virtual machine. In the process of the restart, it will prompt a menu, you need to input the key and the password that you created.
- After reboot, you can run the command mokutil –test-key VMWARE15.der to test whether the driver or module has been installed successfully.
$ mokutil --test-key VMWARE15.der
VMWARE15.der is already enrolled
One of the most straightforward explanations of the steps to perform. Great job.
Still, I have a question 🙂 because I could not solve the problem.
What key?
I was not sure and just typed in my password.
Or is this the key?
………+++++
…………………..+++++