V2ray is similar but better than ShadowSocks. This article will tell you how to install v2ray on an Ubuntu Linux server. It also tells you how to use the v2ray client to access the v2ray server. Before starting, you should know that v2ray has strict requirements on time. It is required that the absolute value of the time difference between the server and the client cannot exceed 2 minutes, so you must ensure that the time is accurate enough. Fortunately, v2ray does not require consistent time zones on server and client.
1. Update Linux Server Date Time.
- Get Linux server current date-time.
$ date
Thu Feb 27 11:48:59 UTC 2020
- Change Linux date time and time zone.
date --set="Fri Jun 28 15:05:15 CST 2020"
2. Install V2ray On Ubuntu Linux Server.
- First, you should install unzip manually. Otherwise, the v2ray installation will fail.
$ sudo apt install unzip
- Change to the root user.
$ sudo su

root@ip-189-31-99-179:/home/ubuntu#
- Install v2ray on the Linux server.
# bash <(curl -L -s https://install.direct/go.sh) Installing V2Ray v4.22.1 on x86_64 Downloading V2Ray: https://github.com/v2ray/v2ray-core/releases/download/v4.22.1/v2ray-linux-64.zip % Total % Received % Xferd Average Speed Time Time Time Current Dload Upload Total Spent Left Speed 100 608 100 608 0 0 2068 0 --:--:-- --:--:-- --:--:-- 2068 100 11.6M 100 11.6M 0 0 3171k 0 0:00:03 0:00:03 --:--:-- 3619k Archive: /tmp/v2ray/v2ray.zip inflating: /usr/bin/v2ray/geoip.dat inflating: /usr/bin/v2ray/geosite.dat inflating: /usr/bin/v2ray/v2ctl inflating: /usr/bin/v2ray/v2ray PORT:28922 UUID:f8fa304d-2c38-4941-ad6e-442a925d74d5 Archive: /tmp/v2ray/v2ray.zip inflating: /etc/systemd/system/v2ray.service Created symlink /etc/systemd/system/multi-user.target.wants/v2ray.service → /etc/systemd/system/v2ray.service. V2Ray v4.22.1 is installed. - If you meet the below error when running the above shell script, then you need to browse https://github.com/v2fly/fhs-install-v2ray to see the new v2ray install method.
# bash <(curl -L -s https://install.direct/go.sh)
ERROR: This script has been DISCARDED, please switch to fhs-install-v2ray project.
HOW TO USE: https://github.com/v2fly/fhs-install-v2ray
TO MIGRATE: https://github.com/v2fly/fhs-install-v2ray/wiki/Migrate-from-the-old-script-to-this
- Below are the new v2ray install steps.
# first install curl
# apt update
# apt install curl

# download v2ray install shell script file.
# curl -O https://raw.githubusercontent.com/v2fly/fhs-install-v2ray/master/install-release.sh
# curl -O https://raw.githubusercontent.com/v2fly/fhs-install-v2ray/master/install-dat-release.sh

# install v2ray.
# bash install-release.sh

# install geoip.dat, geosite.dat
# bash install-dat-release.sh

# if you want to remove v2ray
# bash install-release.sh --remove
- (Update 2021/02/12 ) The new v2ray installation shell script has been changed to bash <(curl -L https://raw.githubusercontent.com/v2fly/fhs-install-v2ray/master/install-release.sh). You should execute the above command in a terminal to install v2ray. From the below command output, we can see the new v2ray configuration file is located at ExecStart=/usr/local/bin/v2ray -config /usr/local/etc/v2ray/config.json. And v2ray has been created as a Linux service daemon, which means it will be auto-started when the Linux OS startup. You can see the v2ray.service file in /etc/systemd/system directory.
# bash <(curl -L https://raw.githubusercontent.com/v2fly/fhs-install-v2ray/master/install-release.sh)
......
......
warning: The following are the actual parameters for the v2ray service startup.
warning: Please make sure the configuration file path is correctly set.
~~~~~~~~~~~~~~~~
[Unit]
Description=V2Ray Service
Documentation=https://www.v2fly.org/
After=network.target nss-lookup.target

[Service]
User=nobody
CapabilityBoundingSet=CAP_NET_ADMIN CAP_NET_BIND_SERVICE
AmbientCapabilities=CAP_NET_ADMIN CAP_NET_BIND_SERVICE
NoNewPrivileges=true
ExecStart=/usr/local/bin/v2ray -config /usr/local/etc/v2ray/config.json
Restart=on-failure
RestartPreventExitStatus=23

[Install]
WantedBy=multi-user.target
# In case you have a good reason to do so, duplicate this file in the same directory and make your customizes there.
# Or all changes you made will be lost!  # Refer: https://www.freedesktop.org/software/systemd/man/systemd.unit.html
[Service]
ExecStart=
ExecStart=/usr/local/bin/v2ray -config /usr/local/etc/v2ray/config.json
~~~~~~~~~~~~~~~~
warning: The systemd version on the current operating system is too low.
warning: Please consider to upgrade the systemd or the operating system.

installed: /usr/local/bin/v2ray
installed: /usr/local/bin/v2ctl
installed: /usr/local/share/v2ray/geoip.dat
installed: /usr/local/share/v2ray/geosite.dat
installed: /usr/local/etc/v2ray/config.json
installed: /var/log/v2ray/
installed: /var/log/v2ray/access.log
installed: /var/log/v2ray/error.log
installed: /etc/systemd/system/v2ray.service
installed: /etc/systemd/system/[email protected]
removed: /tmp/tmp.GjBcqyHO19
info: V2Ray v4.34.0 is installed.
info: V2Ray v4.34.0 is installed.
You may need to execute a command to remove dependent software: apt purge curl unzip
Please execute the command: systemctl enable v2ray; systemctl start v2ray

# apt purge curl unzip
# systemctl enable v2ray; systemctl start v2ray
Created symlink /etc/systemd/system/multi-user.target.wants/v2ray.service → /etc/systemd/system/v2ray.service.

# ps -ef|grep v2ray
nobody    2643     1  0 02:43 ?        00:00:00 /usr/local/bin/v2ray -config /usr/local/etc/v2ray/config.json
root      2659  2113  0 02:44 pts/1    00:00:00 grep --color=auto v2ray
- Use vim to edit the v2ray configuration file. The file path is /etc/v2ray/config.json or /usr/local/etc/v2ray/config.json.
# vim /etc/v2ray/config.json

or

# vim /usr/local/etc/v2ray/config.json
- Go to https://www.uuidgenerator.net to generate a new unique id and replace it in the above config.json file inbounds —> settings —> clients —> id value. The port number is also decided by yourself. For more configuration settings, please read the article V2ray Configuration Overview.
{ "inbounds": [{ "port": 10086, "protocol": "vmess", "settings": { "clients": [ { "id": "10fdwe3c8-uyer3-df343-t256-df89f7df8", "level": 1, "alterId": 64 } ] } }], "outbounds": [{ "protocol": "freedom", "settings": {} },{ "protocol": "blackhole", "settings": {}, "tag": "blocked" }], "routing": { "rules": [ { "type": "field", "ip": ["geoip:private"], "outboundTag": "blocked" } ] } } - Enable v2ray auto-start when OS starts.
# systemctl enable v2ray
- Run command systemctl start v2ray to start v2ray service.
# systemctl start | stop | restart v2ray
3. Install And Configure V2ray Client.
- You can go to the official v2ray client download page to get the v2ray client which matches your needs.
- I use macOS & Windows, so I will tell you how to use V2RayX on macOS and how to use v2rayN-Core on Windows.
3.1 How to configure v2ray command-line client that can be used cross-platform.
- Go to the website www.v2ray.com and go to the page https://www.v2ray.com/chapter_00/install.html.
- Click the link https://github.com/v2ray/dist/ to go to the v2ray-core binary file download page.
- Click the link that matches your computer operating system. In this example, I use the version v2ray-macos-64.zip as an example.
- After downloading, unzip it to a local folder, then you can get the below file structure.
$ pwd
/Users/songzhao/Documents/WorkSpace/Tools/v2ray-macos-64
$ tree ./
./
├── config.json
├── geoip-only-cn-private.dat
├── geoip.dat
├── geosite.dat
├── v2ctl
├── v2ray
├── vpoint_socks_vmess.json
└── vpoint_vmess_freedom.json
- Edit the config.json file and copy the below content to it, use your v2ray server UUID to replace the value in the section outbounds —> settings —> vnext —> users —> id. If you can not remember the below JSON file content, you can install any v2ray GUI client, and the GUI client can help you to generate the below content.
{ "routing" : { "name" : "all_to_main", "domainStrategy" : "AsIs", "rules" : [ { "type" : "field", "outboundTag" : "amazon ec2", "port" : "0-65535" } ] }, "inbounds" : [ { "listen" : "127.0.0.1", "protocol" : "socks", "settings" : { "ip" : "127.0.0.1", "auth" : "noauth", "udp" : false }, "tag" : "socksinbound", "port" : 1081 }, { "listen" : "127.0.0.1", "protocol" : "http", "settings" : { "timeout" : 0 }, "tag" : "httpinbound", "port" : 8001 } ], "dns" : { "servers" : [ "localhost" ] }, "log" : { "error" : "\/var\/folders\/qr\/mrbn885s649ckh9tm8rzllrc0000gn\/T\/cenmrev.v2rayx.log\/error.log", "loglevel" : "none", "access" : "\/var\/folders\/qr\/mrbn885s649ckh9tm8rzllrc0000gn\/T\/cenmrev.v2rayx.log\/access.log" }, "outbounds" : [ { "sendThrough" : "0.0.0.0", "mux" : { "enabled" : false, "concurrency" : 8 }, "protocol" : "vmess", "settings" : { "vnext" : [ { "address" : "health-is-easy.com", "users" : [ { "id" : "v2ray-server-side-used-uuid", "alterId" : 0, "security" : "auto", "level" : 0 } ], "port" : 443 } ] }, "tag" : "amazon ec2", "streamSettings" : { "wsSettings" : { "path" : "\/MicroCode", "headers" : { "Host" : "health-is-easy.com" } }, "quicSettings" : { "key" : "", "security" : "none", "header" : { "type" : "none" } }, "tlsSettings" : { "allowInsecure" : false, "alpn" : [ "http\/1.1" ], "serverName" : "health-is-easy.com", "allowInsecureCiphers" : false }, "httpSettings" : { "path" : "" }, "kcpSettings" : { "header" : { "type" : "none" }, "mtu" : 1350, "congestion" : false, "tti" : 20, "uplinkCapacity" : 5, "writeBufferSize" : 1, "readBufferSize" : 1, "downlinkCapacity" : 20 }, "tcpSettings" : { "header" : { "type" : "none" } }, "security" : "tls", "network" : "ws" } } ] } - Save the above config.json file and run the command ./v2ray -config=config.json in the terminal to start the v2ray proxy server.
$ ./v2ray -config=config.json
V2Ray 4.44.0 (V2Fly, a community-driven edition of V2Ray.) Custom (go1.17.3 darwin/amd64)
A unified platform for anti-censorship.
2022/03/12 19:32:35 [Info] main/jsonem: Reading config: config.json
Failed to start app/proxyman/inbound: failed to listen TCP on 1081 > transport/internet: failed to listen on address: 127.0.0.1:1081 > transport/internet/tcp: failed to listen TCP on 127.0.0.1:1081 > listen tcp 127.0.0.1:1081: bind: address already in use
(base) songs-MacBook-Pro:v2ray-macos-64 songzhao$ ./v2ray -config=config.json
V2Ray 4.44.0 (V2Fly, a community-driven edition of V2Ray.) Custom (go1.17.3 darwin/amd64)
A unified platform for anti-censorship.
2022/03/12 19:33:01 [Info] main/jsonem: Reading config: config.json
- You can configure and run the v2ray client on Linux and Windows similar.
- After that, you can configure your web browser to use the v2ray proxy server to browse the internet, you can read the article How To Configure Socks Proxy Server On Web Browsers Such As Firefox, Google Chrome, and Opera to learn more.
3.2 How to configure v2ray client V2RayX on macOS.
- Below are the steps about how to use V2RayX on macOS
- Download, install and start V2RayX.
- Click the V2RayX icon on Mac’s top menu bar, then click Configure… menu item.

- Input v2ray server ip address ( or domain name ), server port number, User ID in the red line input box, input a name in the Tag input box, and click the OK button to save it. Do not need to modify other fields.
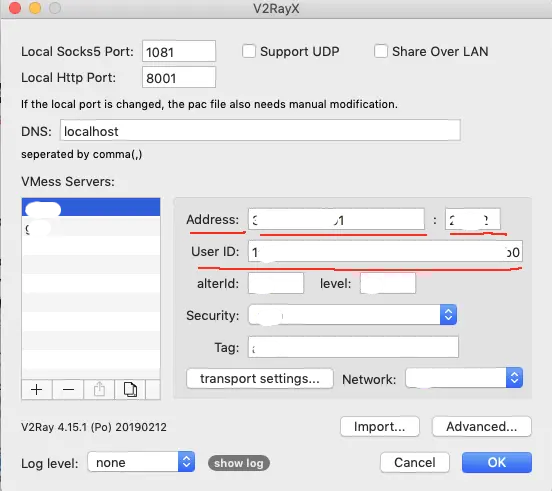
- Now this newly added v2ray server will be shown in V2RayX —> Server list, check it.
- Check the V2RayX —> Global Mode menu item.
- You can add multiple v2ray servers, if you do not want to use it, you can click V2RayX —> Unload core. If you want to use it again, you can first select it in V2RayX —> Server list, then click V2RayX —> Load core menu.
- For more v2ray configuration, please go to V2ray Configuration Overview. The client and server use the same configuration file. But the v2ray client’s inbounds settings should map to server outbounds settings and vice versa.
3.3 How to configure v2ray client v2rayN-Core on Windows.
- Download the newest v2rayN version from the GitHub website.
- Just download the v2rayN-Core.zip file, do not need to download the v2rayN.zip file.
- Unzip the v2rayN-Core.zip file to a local folder.
- Double click the file v2rayN-Core / v2rayN.exe to run it, then it will open the VMess server list window.
- Click the menu item Servers —> Add [VMess] Server to open the Edit Or Add[VMess] Server window.
- Input the server domain name/IP in the address input textbox.
- Input the server listening port number (443 for HTTPS) in the port input textbox.
- Input the v2ray server UUID in the id input textbox.
- Input the v2ray server alterId in the alterId input textbox.
- Select auto from the security drop-down list.
- Select ws from the transport —> network drop-down list.
- Select none from the transport —> type drop-down list.
- Input the server domain name in the transport —> host input text area.
- Input the v2ray server path in the transport —> path input text area. The path value should not start with /, if you meet any error, you can add the / in front of the path value. You should get the path value from the v2ray server configuration.
- Select tls from the transport —> tls drop-down list.
- Select false from the transport —> allowInsecure drop-down list.
- Click the OK button to save the VMess server configuration.
- To use the created VMess server in v2rayN-Core, you can right-click it and click the menu item Set As Activate Server(Enter) in the popup menu list.
- To use the VMess server as a proxy server, you can right-click the v2rayN icon on the windows tray icon area, then click System Proxy —> Auto Config System Proxy menu item.
- To use your local network, you can right-click the v2rayN icon on the windows tray icon area, then click System Proxy —> Remove System Proxy menu item.
- You can see the above process demo video from the URL How To Use V2Ray Windows Client V2RayN To Access V2Ray Server.
4. Add V2ray Server Port Number In Amazon Or Google Cloud Firewall.
- If you use Amazon AWS or google cloud Linux VPS server, generally, your v2ray server port number should be blocked by amazon or google cloud firewall by default.
- So you should add the port number in amazon AWS or google cloud firewall to allow it.
4.1 Amazon AWS.
- Please refer to section 5. Edit EC2 Linux Instance Used Security Group. in the article How To Install ShadowSocks Server On Amazon EC2 Linux
4.2 Google Cloud.
- Please refer to section 1. Create A Firewall Rule In Google Cloud. in the article How To Install ShadowSocks On Google Cloud Linux
5. Video Demo For This Article.
- You can watch the video demo for this article below.
How To Install V2ray On Amazon EC2 And Google Cloud Ubuntu Linux.
How To Use V2Ray Windows Client V2RayN To Access V2Ray Server.