When your JavaScript application needs a lot of images, you may find it will cost so much time to download all those images. Downloading each image will create an HTTP request to your web server, and this will reduce your server performance very much for large HTTP requests. This example will tell you how to fix this issue using a sprite sheet image and implement image animation using JavaScript & CSS.
1. What Is Sprite Sheet Image?
- A sprite sheet image is one image that contains all the single images by rows used in your web application.
- When you want to use one single image, what you need to do is to locate the single image in the sprite sheet image and use it.
- In this way, you only need to download the sprite sheet image once when the application startup instead to download every single image when you need it.
- This results in fewer HTTP requests especially when your application contains a lot of images. This can improve your server performance.
- This can also reduce the size of the total images because using one single sprite sheet image can avoid repeated image header information for each request.
- Because of fewer HTTP server requests and smaller image file sizes, then your web application will run faster than ever.
- Below is a sprite sheet image example, and you will use it in this article example source code.
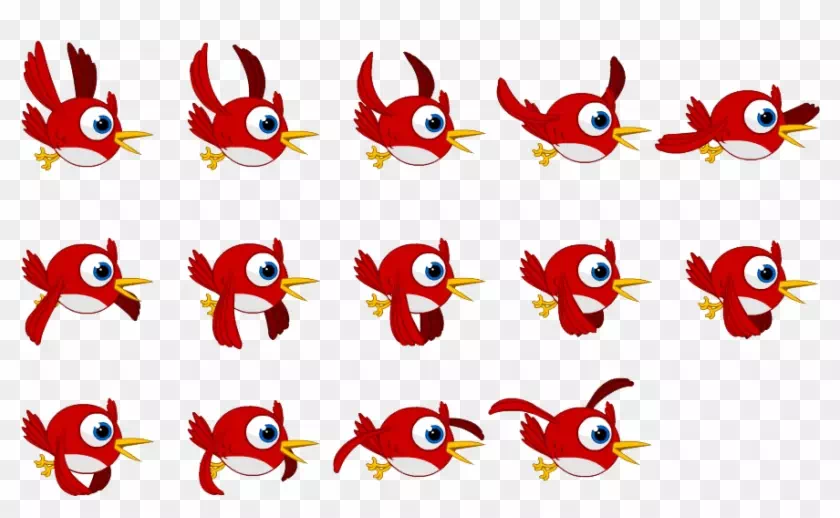
- There are 3 rows in the above sprite sheet image, each row contains 5 single bird images, and all the images will implement a flying bird effect.
2. Implement Sprite Sheet Image Animation Using Javascript Example.
- This example will show you how to animate a sprite sheet image using javascript. It will use the above image to animate a flying bird.
- The example source file name is using-javascript-css.html, below is the file source code.
<!DOCTYPE html>
<html>
<head>
<meta charset="ISO-8859-1">
<title>Sprite Sheet Animation Using JavaScript & CSS Example</title>
<style>
.sprite-sheet-image-div-class {
  height: 172px;
  width: 169px;
  /*background: url("D:\\Work\\dev2qa.com-example-code\\PythonExampleProject\\html\\canvas\\image\\sprite-sheet-image\\sprite-sheet-image-flying-bird.png")*/
  /* the below code will work both in chrome and firefox, the above code will not work in firefox. */
  background: url("sprite-sheet-image-flying-bird.png")
    15px -20px;
}
</style>

<script type="text/javascript">
var animationInterval;

var widthOfSpriteSheet = 840;

var widthOfEachSprite = 169;

var heightOfEachSprite = 172;

var divBackgroundImageStartX = 15;

var divBackgroundImageStartY = -20;

function stopAnimation() {
  clearInterval(animationInterval);
}

function startAnimation() {
  var spriteSheetDiv = document.getElementById("sprite-sheet-image-div");

  var currDivBackImageX = widthOfEachSprite + divBackgroundImageStartX; //start position for the image

  var currentDivBackImgY = divBackgroundImageStartY;

  const speed = 100; //in millisecond(ms)

  const diff = widthOfEachSprite; //difference between two sprites

  var currentRow = 1;

  animationInterval = setInterval(() => {
    spriteSheetDiv.style.backgroundPosition = `${currDivBackImageX}px ${currentDivBackImgY}px`;

    if (currDivBackImageX < widthOfSpriteSheet) {
      currDivBackImageX += diff;
    } else {

      //increment the position by the width of each sprite each time
      currDivBackImageX = widthOfEachSprite + divBackgroundImageStartX;

      currentRow++;

      if(currentRow>3){
          currentDivBackImgY = divBackgroundImageStartY;
          currentRow = 1;
      }else{
          currentDivBackImgY = 0 - 172 + divBackgroundImageStartY;
      }

    }
    //reset the position to show first sprite after the last one
  }, speed);
}

</script>
</head>
<body onload="startAnimation()">
<h3>Sprite Sheet Animation Using JavaScript & CSS Example.</h3>
<div id="sprite-container">
  <div id="sprite-sheet-image-div" class="sprite-sheet-image-div-class">
  </div>
</div>
</body>
</html>
3. Implement Sprite Sheet Image Animation Using Pure CSS Example.
- Besides using JavaScript, you can use pure CSS to animate a sprite sheet image.
- The example file name is using-pure-css.html, below is the example file source code.
<!DOCTYPE html>
<html>
<head>
<meta charset="ISO-8859-1">
<title>Sprite Sheet Animation Using Pure CSS Example</title>
<style>
.sprite-sheet-image-div-class {

  height: 172px;

  width: 169px;

  /*background: url("D:\\Work\\dev2qa.com-example-code\\PythonExampleProject\\html\\canvas\\image\\sprite-sheet-image\\sprite-sheet-image-flying-bird.png")*/
  /* the below code will work both in chrome and firefox, the above code will not work in firefox. */
  background: url("sprite-sheet-image-flying-bird.png")
    30px -30px;

  animation-name: play-animation;

  animation-duration: 1s;

  animation-timing-function: steps(5);

  animation-iteration-count: infinite;

  position: relative;

}

@keyframes play-animation {

  100% { background-position: -840px 10%; }

}
</style>
</head>
<body>
<h3>Sprite Sheet Animation Using Pure CSS Example.</h3>
<div id="sprite-container">
  <div id="sprite-sheet-image-div" class="sprite-sheet-image-div-class">
  </div>
</div>
</body>
</html>
4. The Example Source Code Tips.
- When you read the source code, you may need to get the image size in pixels, you can read the article How To Get Image Pixel Size In Windows to learn how to do it.
- You may also want to know how to use CSS @keyframes to implement animation, you can read the article How To Use Keyframe Animation In CSS to learn more.
5. Example Demo Video.
- You can see this example demo video on URL https://youtu.be/RZO3NNfX8Io.