When I run an android studio on mac os for the first time after installing it, it popup a dialog with the error message Unable To Access Android Sdk Add-on List. This article will tell you how to fix this issue.
1. Fix Unable To Access Android SDK Add-On List Error Steps.
- Click the Cancel button in the above popup dialog. Then it will show you the Missing SDK window in the Android Studio Setup Wizard. The title is No Android SDK found, the detailed message is Before continuing, you must download the necessary components or select an existing SDK.
- Just click the Next button in the above wizard window then it will popup the android SDK Component Setup window. In this window, you should check the components ( android SDK platform ) which you want to update/install.
- Select the android SDK component in the left list panel. By default, it will list the most recent Android SDK version. Then click the Next button, Then it will download the android SDK component that you select.
- But if you can not see the above popup window, maybe your java version is not suitable for the android studio. So you need to change your default java version to such as java 8. You can find the related articles in the references section at the end of this article.
- When the download is complete, click the Finish button, then it will open the android studio welcome page.
2. Add Other Android SDK Platform In Android Studio.
- If you want to use other android SDK platforms when you run an android studio, you can follow the below steps. Below android studio is run on mac os x.
- Open android studio.
- Click Android Studio —> Preferences… menu item on the top left corner in macOS.
- Then it will open the android studio preferences window. Click Appearance & Behavior —> System Settings —> Android SDK menu item in the left panel, it will show all the available android SDK platform lists in the right panel.
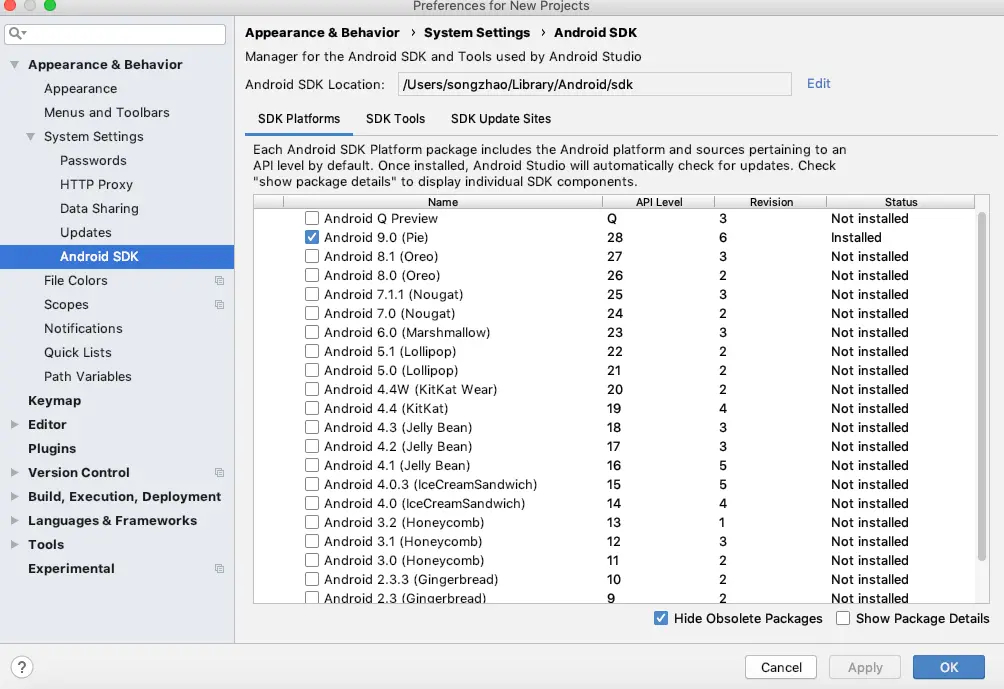
- Select the android SDK platform you want to install and click the OK button, then it will popup a Confirm Change window, click the OK button to confirm the changes.
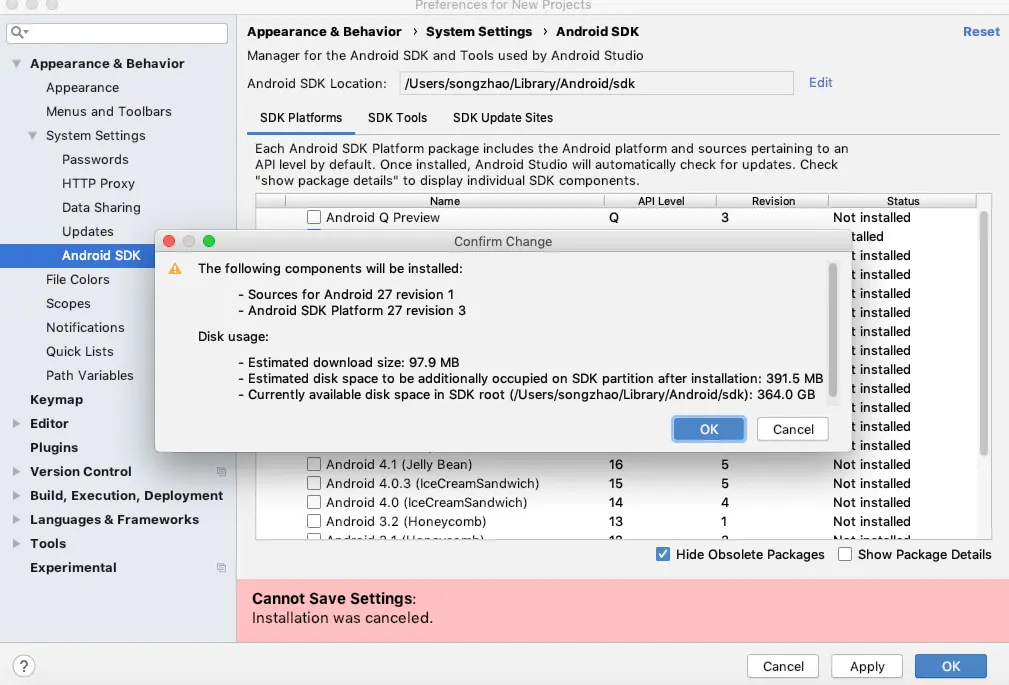
- Now the License Agreement window will popup, select Accept radio button, then click the Next button to start the download and install the selected android SDK platform. After downloading, click the Finish button. Now go to the android studio —> preferences —> Android SDK panel to check the new SDK has been checked.
3. Unable to access Android SDK add-on list after reinstalling android studio.
3.1 Question(2022/05/18).
- I reinstalled my Android Studio these days, and when I run it for the first time after reinstalling. I encounter the error message Unable to access Android SDK add-on list.
- Following the instructions, I configured the proxy settings by clicking Setup proxy and checking the Auto-detect proxy, and all the connection is successful.
- But when I click the OK button, it still shows the Unable to access Android SDK add-on list error. My OS is windows. How can I fix this?
3.2 Answer1.
- Maybe this is because of your firewall, you can turn your firewall off and add the
android.batfile to the windows firewall trusted files, then you can check whether this can fix the error or not. - You can also follow the below steps.
- 1. Make sure you are connecting with the internet.
- 2. Clear all the network adapter or router DNS settings in your network.
- 3. Turn your firewall off entirely.
- 4. Exit all the applications that have heavy internet usage, those applications may slow down your network connection.
- 5. Exit android studio, and run android SDK Manager to make sure all the components that require updates are updated.
- 6. Run the android studio again.
3.3 Answer2.
- I use the android studio on Ubuntu 18 and meet this issue also.
- Then I set up the proxy in my ubuntu network configuration section, and I can browse the internet with the proxy server.
- I also set up the proxy server in the ubuntu environment variable http_proxy and https_proxy.
- My java version is 1.7, I can check it with the command javac -version.
- And I run the command sudo apt-get install libncurses5:i386 libstdc++6:i386 zlib1g:i386 to install the required libraries because my os is 64 bit Ubuntu OS.
- Then the issue is fixed.
3.4 Answer3.
- You can open the file C:\< Android Studio Install Path >\bin\idea.properties in a text editor.
- Then change the disable.android.first.run value from false to true like below.
disable.android.first.run=true
- Restart your android studio, then the issue will be fixed.
3.5 Answer4.
- If you are using windows, you can configure the windows firewall to allow the android studio to communicate through the Windows firewall as below.
- Click the Windows Settings ( Windows 10 ) icon to open the Windows Settings dialog window.
- Search the keyword firewall in the search box and click the Allow an app through Windows Firewall item in the drop-down list to open the Allowed apps window.
- Click the Change settings button and then check the checkbox before AndroidStudio in the Allowed apps and features list.
- Click the OK button to save the changes. Now restart android studio and you may find the issue has been fixed.
- If you use Windows 7 or other older versions, you can access the above in Control Panel —> System and Security —> Windows Firewall —> Allowed Programs section.
3.6 Answer5.
- I start Android Studio by executing the ./studio.sh file in my Ubuntu version 18.
- Then it tells me that read time out when downloading the file http://dl.google.com/android/repository/addons_list-3.xml.
- I use the system Socks5 proxy.
- I find the below solution can fix this issue.
- Edit the {Android Studio Install Path}/bin/idea.properties file and add the text line disable.android.first.run=true at the end of this file.
- The above code will make android studio bypass the Android SDK checking process when your start it up.
- Now run the ./studio.sh file to start Android Studio again, it can start Android Studio normally.
- But when I click the “new project” item to create a new android project, it will prompt the message No Android SDK is available.
- Then open the Android SDK manager, and select to install Android SDK that you need.
- Then change the text disable.android.first.run=true to disable.android.first.run=false in the {Android Studio Install Path}/bin/idea.properties file.
Thanks for you share