This example will show you how to use Django MySQL library pymysql to connect Django application to MySQL database server in Django project. Then you can use MySQL server as the backend database server to store your Django web application data.
1. Set Django Project Use MySQL As Default Database Server.
- Install Django MySQL library pymysql in your PyCharm Django project ( refer PyCharm Project Add External Library (PyMySQL) Path Example ) or in your operating system use pip command as below.
pip3 install pymysql
- Create a Django project in PyCharm ( refer Hello World Django PyCharm Example ).
- Use MySQL databases settings to replace default SQLite3 database settings in Django project settings.py file like below. In below example, the settings.py file is located in DjangoHelloWorld / DjangoHelloWorld.
DATABASES = {
    'default': {
        # Django MySQL database engine driver class.
        'ENGINE': 'django.db.backends.mysql',
        # MySQL database host ip.
        'HOST': '127.0.0.1',
        # port number.
        'PORT': '3306',
        # database name.
        'NAME': 'dev2qa',
        # user name.
        'USER': 'jerry',
        # password
        'PASSWORD': 'jerry',
        # connect options
        'OPTIONS': {'init_command': "SET sql_mode='STRICT_TRANS_TABLES'",},
    }
}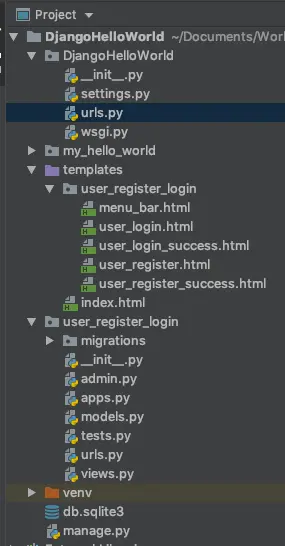
2. Migrate Django Project Apps Database Tables To MySQL.
- Now you can run python3 manage.py migrate command to migrate Django project app database tables to the MySQL database server. You have two methods to do it.
- Method 1: Click Tools —> Run manage.py Tasks menu item in PyCharm, then input migrate in the bottom console.
- Method 2: Open a terminal and cd into Django project root folder ( DjangoHelloWorld ), then run python3 manage.py migrate command.
- But both methods will throw ModuleNotFoundError: No module named ‘MySQLdb’ error.
- To resolve this error, add below code in DjangoHelloWorld / DjangoHelloWorld / __init__.py file.
import pymysql
# install pymysql as mysql database driver.
pymysql.install_as_MySQLdb()
- Now migrate Django project apps database again, then you can see below migrate output.
DjangoHelloWorld > python3 manage.py migrate
  ......
  Applying user_register_login.0001_initial... OK

Process finished with exit code 0
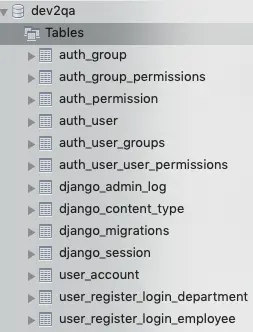
- When the migration process complete successfully, you can see below tables are created in MySQL.
3. Create Django Admin Site Superuser.
Now create the Django project admin site superuser.
- Open terminal and cd into DjangoHelloWorld root folder.
- Then run command python3 manage.py createsuperuser.
- Now start DjangoHelloWorld project web server with the command python3 manage.py runserver.
- Browse http://127.0.0.1:8000/admin/ in a web browser.
- Login to the admin site uses the above user account.
4. How To Fix Error mysqlclient 1.2.13 or newer is required; you have 0.9.3.
- When you run the migration command python3 manage.py migrate you may encounter an error message
mysqlclient 1.2.13 or newer is required; you have 0.9.3. - This is because the Django MySQL library PyMySQL used mysqlclient library (0.9.3) is outdated.
- You can run command pip install mysqlclient in a terminal to update it.
- Edit __init__.py file and remove all the source code in it.
- Now you can run command python3 manage.py migrate successfully.
5. How To Fix Django MySQL Error localhost@ access denied using password YES.
- When you run command such as pythons manage.py makemigrations or python3 manage.py runserver, you may encounter an error like
localhost@ access denied using password YES. - To fix this error, you should first make sure your MySQL server user name and password are correct.
- You also need to make sure the user account has access privileges to the MySQL database server.
- You can open a terminal and run the command mysql -u root -p to login to MySQL manager console.
- Then run SQL statement select host, user from mysql.user; to show all user account.
- Run SQL statement show grants for ‘jerry’@’%’; to show the privileges granted to the user.
- Grant access privilege to the user if you find it has no access privilege, or for test only you can run below command to grant all privileges to the user.
GRANT ALL PRIVILEGES ON *.* TO 'jerry'@'%' WITH GRANT OPTION;
6. How To Fix Django MySQL Error 1049 (42000): Unknown Database.
- This error is because the MySQL database you used does not exist.
- So you should create the MySQL database manually.
- Remember that the Django app will not create the MySQL database, it will only create/migrate DB tables.
- Maybe it is because you input wrong database IP, name, or port number.
- Then you should correct them in Django project settings.py file.
1049 mysql db error in pycharm how to solve
This is because the MySQL DB which you used does not exist, I had written how to fix it at the end of this article.
Hi Jerry Zhao, thanks for hardwork
but, can you please tell me why my command
python manage.py makemigrations
shows the error stating that localhost@ access denied using password YES
I will be waiting for your reply regards,
and if anyone else is interested/they know the ans please give a reply your replies are most welcome…
This is because your MySQL database user account does not has access privilege, so you should check it in your MySQL server side, or maybe you input wrong MySQL username and password. You can see it in the last section of this article.
When I run the migrations I get the following error:
“mysqlclient 1.2.13 or newer is required; you have 0.9.3.”
The version 0.9.3. is the newest version of pymysql.
Am I doing anything wrong?
Hi Janik, the reason for this is that the version of mysqlclient (0.9.3) that comes with PyMySQL is outdated. Simply run “pip install mysqlclient” and delete the code in the __init__.py file. This will allow you to run “python3 manage.py migrate” without a problem.
Was helpful, thanks!