PyCharm is a very popular Python programming IDE. It provides a lot of tools for you to make Python development easy. This article will tell you how to use it to develop Django web application step by step.
The PyCharm IDE is the professional version. If you do not want to buy the professional version, you can read the article How To Make A Website With Python And Django to learn how to create Django project with Eclipse and PyDev ( which is totally free and open-source).
1. Create Django Project In PyCharm.
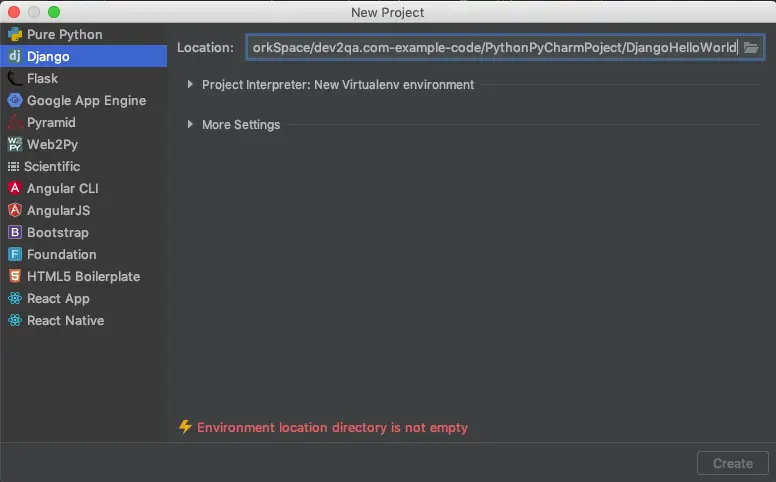
- Open PyCharm, click File —> New Project menu item in the top toolbar.
- Then select Django menu item in left navigation menu list, and select the Django project target directory in right panel, and then click Create button.
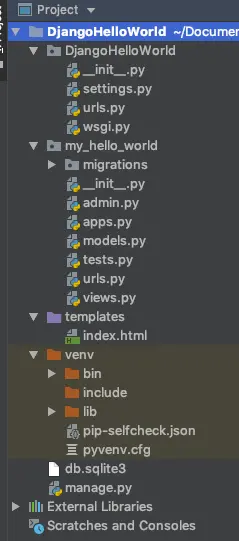
- Now you will find the Django project has been created successfully in the project explorer panel. Below Django project files list contains a Django application my_hello_world which will be created later. Now you should not see it because it has not been created.
2. Create Django Application my_hello_world.
As you know, one Django project can contain multiple Django applications, now we will run $ python manage.py startapp my_hello_world command in PyCharm to create the my_hello_world application.
- Click Tools —> Run manage.py Tasks… menu item to open the python command window at bottom of PyCharm.
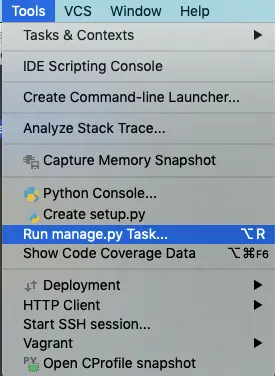
- Then input Django command
startapp my_hello_worldin the bottom console window and click enter key, you will find the my_hello_world application has been created in the project files list.

3. Coding The Django Hello World Example.
- Edit
DjangoHelloWorld / DjangoHelloWorld / settings.pyfile and add my_hello_world app at the end of INSTALLED_APPS section.INSTALLED_APPS = [ 'django.contrib.admin', 'django.contrib.auth', 'django.contrib.contenttypes', 'django.contrib.sessions', 'django.contrib.messages', 'django.contrib.staticfiles', 'my_hello_world', ] - Edit
DjangoHelloWorld / DjangoHelloWorld / urls.pyfile and add a new URL pattern.from django.contrib import admin from django.urls import path, include urlpatterns = [ path('admin/', admin.site.urls), # when client request http://127.0.0.1:8000/index/, the project will find the mapped process method in my_hello_world app's urls.py file. path('index/', include('my_hello_world.urls')) ] - Create urls.py file in DjangoHelloWorld / my_hello_world folder and add below Python code in it.
from django.urls import path # import views from local directory. from . import views urlpatterns = [ # When user request home page http://localhost:8000/my_hello_world, it will invoke the home function defined in views.py. path('', views.index_page, name='index'), ] - Add index_page view function in DjangoHelloWorld / my_hello_world / views.py file. This view function will return an Html template file index.html back to the client browser
from django.shortcuts import render # Create your views here. # This function will return and render the home page when url is http://localhost:8000/to_do/. def index_page(request): # Get the index template file absolute path. # index_file_path = PROJECT_PATH + '/pages/home.html' # Return the index file to client. return render(request, 'index.html') - Create index.html in DjangoHelloWorld / templates folder and add the below code in it.
<!DOCTYPE html>
<html lang="en">
<head>
    <meta charset="UTF-8">
    <title>Django Hello World Example</title>
</head>
<body>
<h2>

    Hello Django! :)

</h2>
</body>
</html>
4. Run / Debug Django Hello World Example.
Now all the source code has been created. You need to follow below steps to run or debug it.
- Click Run —> Run ( or Run —> Debug )menu item in PyCharm top tool bar to run it.
- Select DjangoHelloWorld menu item in the popup menu list to run the Django project.

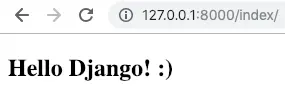
- When the application startup, input url http://127.0.0.1:8000/index/ in the web browser, then you will get below web page.
5. Create Django Project In PyCharm Community Edition.
If you are familiar with PyCharm community edition, and you want to create Django project in it, you can follow below steps.
- Install Django in a virtual environment, you can read article How To Install Python Django In Virtual Environment.
- Create Django project in command line, you can read article How To Make A Website With Python And Django.
- Create Django application in command line, you can read article How To Create / Remove Django Project Application.
- Import the Django project into PyCharm community edition, you can read article How To Import Existing Django Project And Enable Django Support In PyCharm.
- You just use pycharm to edit source code, and run / debug the Django project application in command line.
it was pretty much helpful, thanks a lot dev2qa.com