When you create a Django project and start the project built-in web server successfully, it also contains an admin website in this project. This admin website is the result of django.contrib.admin and django.contrib.auth Django applications.
The Django project installed some default applications in the project settings.py file when you create it. You can find them in the INSTALLED_APPS section in the settings.py file like below.
And this is why you should run command python manage.py makemigrations and python manage.py migrate to create those applications models mapped tables in the backend database.
# Application definition

INSTALLED_APPS = [
    'django.contrib.admin',
    'django.contrib.auth',
    'django.contrib.contenttypes',
    'django.contrib.sessions',
    'django.contrib.messages',
    'django.contrib.staticfiles',
]
1. Login To Django Project Admin WebSite To Manage Model Objects.
- The Django project admin website provides a lot of functions, and the most important one is the ability to manage model objects ( add, delete, search and update ), these actions will also operate data records in backend database tables.
- To manage model objects, login to the admin site with URL http://127.0.0.1:8000/admin/, and provide the correct admin username and password( please refer to the article How To Create / Remove Django Project Application).
- Then you will see a page that lists all installed applications and models in it.
- From the above list page, we can see that each table title is the application name, and the table content is the models used in those applications.
- The Groups and Users are models used by the default added django.contrib.admin and django.contrib.auth applications.
- The Departments and Employees are models used in my own Django application USER_REGISTER_LOGIN.
- When you click the models’ link, then you can operate the model ( add, delete, update, search ) on the model list page.
2. Add Custom Django App Models In Admin Site.
- By default, there will not show custom app models in the above list.
- If you want to manage your custom app models object in the admin site, follow the below steps.
- Register your Django application in project settings.py file ( DjangoHelloWorld / DjangoHelloWorld / settings.py ) INSTALLED_APPS section.
- This example installed bootstrap3 and dept_emp applications in it. bootstrap3 app is a third-party library that integrates bootstrap in the application, you can read the article Django Bootstrap3 Example.
INSTALLED_APPS = [ 'django.contrib.admin', 'django.contrib.auth', 'django.contrib.contenttypes', 'django.contrib.sessions', 'django.contrib.messages', 'django.contrib.staticfiles', 'bootstrap3', 'dept_emp', ] - Then define model class in app_name (dept_emp) / models.py file like below.
from django.db import models class Department(models.Model): # define department name and description columns, the id column will be added automatically. dept_name = models.CharField(max_length=1000) dept_desc = models.CharField(max_length=1000) # this is a inner class which is used to define unique index columns. You can specify multiple columns in a list or tuple. class Meta: unique_together = ['dept_name'] - Register above model class with admin.site.register function in app_name (dept_emp) / admin.py file.
from django.contrib import admin

# the module name is app_name.models
from dept_emp.models import Department

# Register your models to admin site, then you can add, edit, delete and search your models in Django admin site.
admin.site.register(Department)
- Then go to the admin website, and click the Departments link ( for example http://127.0.0.1:8000/admin/dept_emp/department/), now you will get the Departments list page, but you will find the department name column is not user-friendly, the DEPARTMENT column’s value is something like Department object(1), etc.
3. How To Make Custom Model Object Name User Friendly.
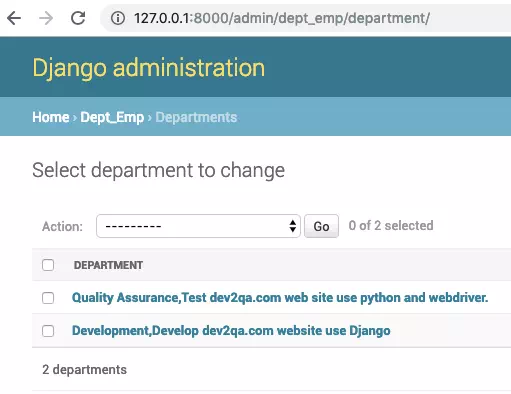
- To resolve the model object name not user-friendly issue, you can change the model class definition in the dept_emp / models.py file. Add __str__(self) function to each model class definition.
from django.db import models class Department(models.Model): # define department name and description columns, the id column will be added automatically. dept_name = models.CharField(max_length=1000) dept_desc = models.CharField(max_length=1000) # this function will be invoked when this model object is foreign key of other model(for example Employee model.). def __str__(self): ret = self.dept_name + ',' + self.dept_desc return ret # this is a inner class which is used to define unique index columns. You can specify multiple columns in a list or tuple. class Meta: unique_together = ['dept_name'] - Save the file and refresh the Departments list page again, now each department column name will contain department_name and department_desc value.
Hey hi, How to write the unit test cases for Add/delete/edit Models To Django Admin Site?
my model.py class name Contact not showing in admin page.help