Django framework provides built-in user management and authorization feature. You can use it to add a user group and user account to the Django project admin web page. You can also use the module django.contrib.auth to integrate the user authorization feature in your python source code. This article will tell you how to use it to implement a user registration and login example. This example is based on Django Cookie Session Example
1. Create Django Authorization Module Super User.
Before you can use the Django authorization module, you need to create a superuser for the module follow the below steps.
- Open a terminal and go to your Django project root folder then execute the below code.
> python3 manage.py createsuperuser
- If you use PyCharm to develop this example, click Tools —> Run manage.py Tasks… menu item in PyCharm. Then input the command createsuperuser in the bottom console window. You should provide the super user name, email, and password during the creation process.
manage.py@DjangoHelloWorld > createsuperuser
bash -cl "/Users/zhaosong/Documents/WorkSpace/dev2qa.com-example-code/PythonPyCharmPoject/DjangoHelloWorld/venv/bin/python /Applications/PyCharm.app/Contents/helpers/pycharm/django_manage.py createsuperuser /Users/zhaosong/Documents/WorkSpace/dev2qa.com-example-code/PythonPyCharmPoject/DjangoHelloWorld"
Tracking file by folder pattern:  migrations
System check identified some issues:

WARNINGS:
?: (urls.W001) Your URL pattern '^$' uses include with a route ending with a '$'. Remove the dollar from the route to avoid problems including URLs.
Username (leave blank to use 'zhaosong'):  admin
Email address:  [email protected]
Warning: Password input may be echoed.
Password:  888888
Warning: Password input may be echoed.
Password (again):  888888
Bypass password validation and create user anyway? [y/N]: This password is too short. It must contain at least 8 characters.
This password is too common.
This password is entirely numeric.
 y
Superuser created successfully.

Process finished with exit code 0
2. Login Django Admin System And Create User Account.
- After you create the superuser successfully in section one, start the Django project and open a web browser and browse url address http://127.0.0.1:8000/admin/.
- Input the super user name and password on the admin login page.
- Then click the Add link on the admin page to add a user account.
- After adding a user account, you should click Users —> <your user account name> to edit the user account properties, do not forget to check the Staff status checkbox to enable the user account.
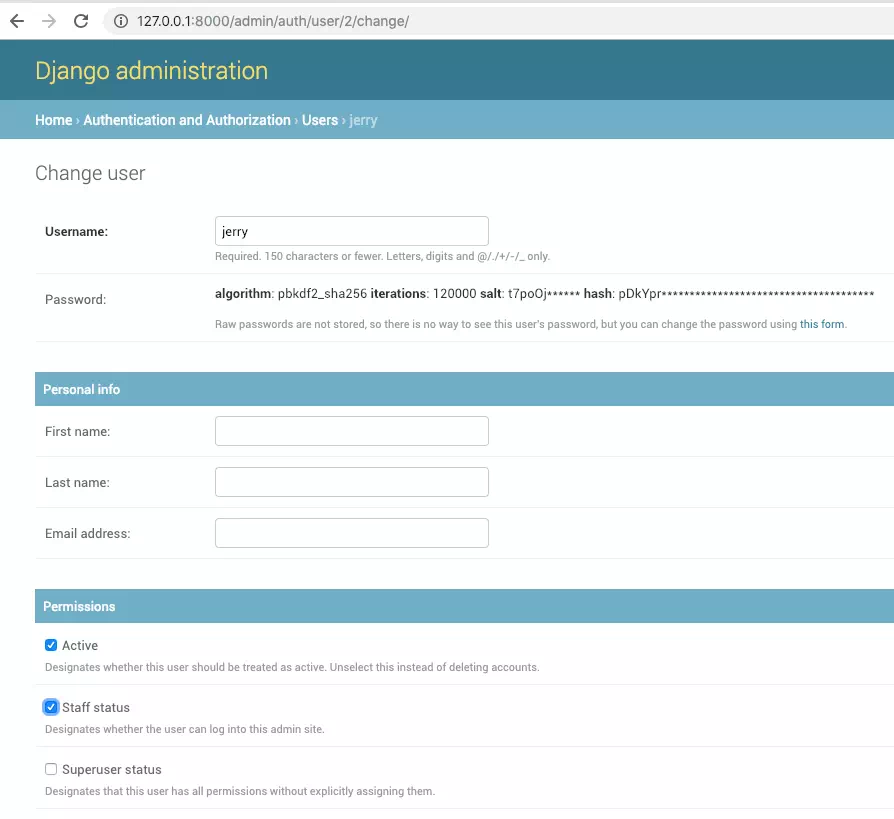
- If you do not check the Staff status checkbox, you can not log in to the admin system with the user account. When you log in to the admin system, you will get the below error messages.
Please enter the correct username and password for a staff account. Note that both fields may be case-sensitive. - You can also use SQLiteStudio to browse the auth_user table is_staff column value, now the value should be 1.
3. Use Django Built-in Authentication To Implement Register/Login In Python Source Code.
If you want to use the Django built-in authentication function in your python source code, you should import django.contrib.authand django.contrib.auth.get_user_model modules. This example is based on Django Cookie Session Example, so you should edit the source code below based on that project.
3.1 Implement User Login Use Django Built-in Authentication.
- Import
django.contrib.authand change the do_login method in the DjangoHelloWorld / user_register_login / views.py file like below.from django.contrib import auth def do_login(request): request_method = request.method print('request_method = ' + request_method) if request_method == 'POST': user_name = request.POST.get('user_name','') user_password = request.POST.get('user_password', '') # authenticate user account. user = auth.authenticate(request, username=user_name, password=user_password) if user is not None: # login user account. auth.login(request, user) response = HttpResponseRedirect('/user/login_success/') # set cookie to transfer user name to login success page. response.set_cookie('user_name', user_name, 3600) return response else: error_json = {'error_message': 'User name or password is not correct.'} return render(request, 'user_register_login/user_login.html', error_json) else: return render(request, 'user_register_login/user_login.html')
3.2 Implement User Register Use Django Built-in Authentication.
- Import
django.contrib.auth.get_user_modeland then use it in do_register method to register new user in db. The do_register method is in DjangoHelloWorld / user_register_login / views.py file also.from django.contrib.auth import get_user_model def do_register(request): request_method = request.method print('request_method = ' + request_method) if request_method == 'POST': user_name = request.POST.get('user_name', '') user_password = request.POST.get('user_password', '') user_email = request.POST.get('user_email', '') if len(user_name) > 0 and len(user_password) > 0 and len(user_email) > 0: # check whether user account exist or not. user = auth.authenticate(request, username=user_name, password=user_password) # if user account do not exist. if user is None: # create user account and return the user object. user = get_user_model().objects.create_user(username=user_name, password=user_password, email=user_email) # update user object staff field value and save to db. if user is not None: user.is_staff = True # save user properties in sqlite auth_user table. user.save() # redirect web page to register success page. response = HttpResponseRedirect('/user/register_success/') # set user name, pasword and email value in session. request.session['user_name'] = user_name request.session['user_password'] = user_password request.session['user_email'] = user_email return response else: error_json = {'error_message': 'User account exist, please register another one.'} return render(request, 'user_register_login/user_register.html', error_json) else: error_json = {'error_message': 'User name, password and email can not be empty.'} return render(request, 'user_register_login/user_register.html', error_json) else: return render(request, 'user_register_login/user_register.html') - Now run the DjangoHelloWorld example project again, you can register and log in to the system use Django built-in authorization module as the backend user account data source.