Cloudflare is a famous CDN ( content delivery network ) provider in the world. A lot of companies use their service. The amazing service they provide can make your website very fast and more secure if you use it correctly. And it provides a free plan for you to use. It is the only provider who can let you use it without cost.
1. Cloudflare Overview.
1.1 Why Cloudflare Is Fast?
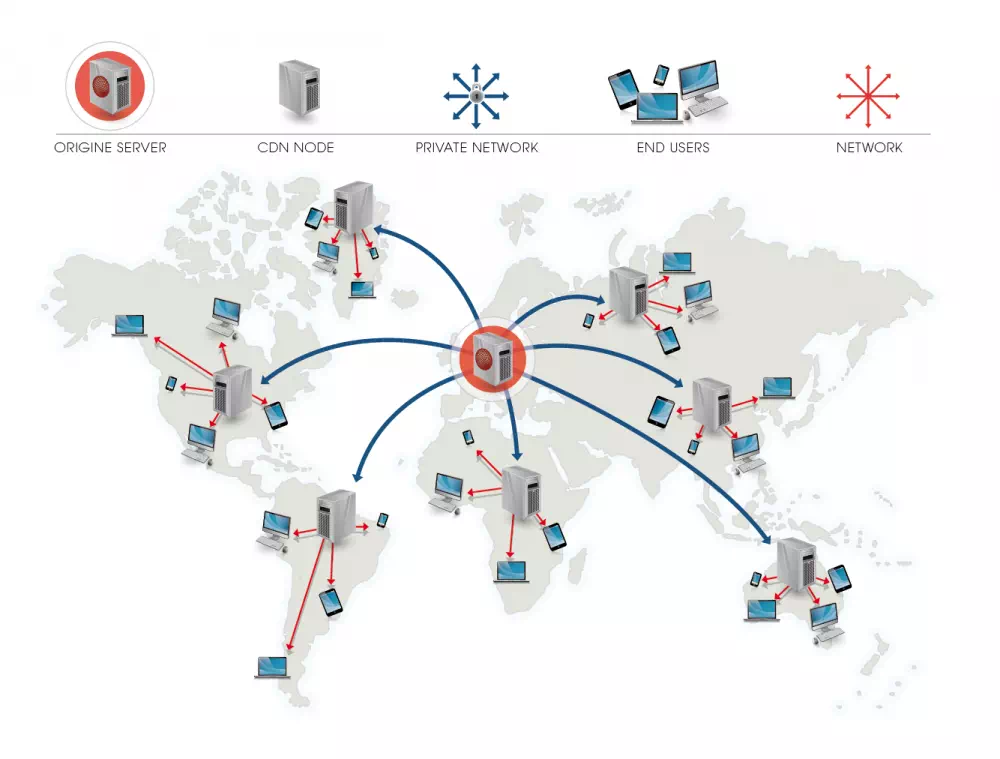
- From the above picture, we can see that because Cloudflare has CDN nodes all over the world, so if your webserver use that network, your web content will be cached in all those CDN nodes servers.
- So when a user browses your domain, Cloudflare will provide the cached content from the nearest node to the client user, this can increase response speed and decrease original web server pressure.
1.2 Why Cloudflare Is Secure?
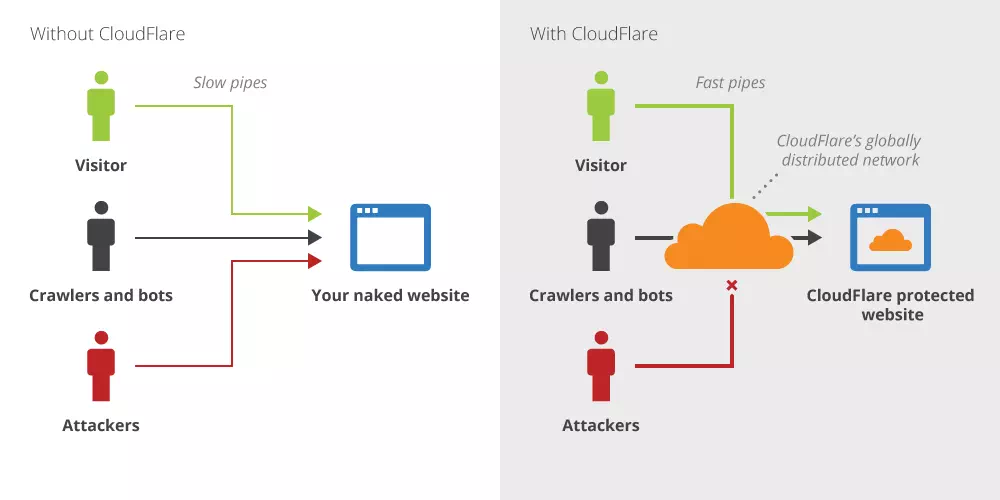
- Without Cloudflare, the client users can access your web server directly. This exposes your web server IP to all the clients. It is dangerous because hackers can attack your web server at any time.
- With Cloudflare, client users do not know your server IP because your domain will be resolved by the Cloudflare DNS server, and Cloudflare will choose a dynamic node to serve the request, so the IP address is also changed dynamically.
2. How To Use Cloudflare With WordPress?
- Register a Cloudflare account follow this link. https://support.cloudflare.com/hc/en-us/categories/200275218-Getting-Started.
- Install Cloudflare WordPress plugin follow instructions on this page. https://support.cloudflare.com/hc/en-us/articles/227634427-Using-CloudFlare-with-WordPress
- Then after about one day or less, your website will be cached by Cloudflare, you can use https://gtmetrix.com/ to test the page speed. You can see the page speed is improved.
3. How To Use Cloudflare SSL To Make Website More Secure.
- HTTPS is a security protocol above HTTP. Google has announced that it will rank an HTTPS website a little higher than HTTP. So change your website to support HTTPS is a very good way to improve page SEO.
- Cloudflare provides three kinds of SSL modes. You can find a detailed introduction on page https://www.cloudflare.com/ssl/
- Flexible SSL: Use HTTPS between client user and Cloudflare, but use HTTP between Cloudflare and your web server.
- Full SSL: Use HTTPS between both client users, Cloudflare, and your web server. You can install either Certificate Authority signed or Cloudflare signed or self-signed certificate in your web server.
- Origin CA: Like Full SSL, but this mode uses a Cloudflare-issued SSL certificate only.
- No matter which mode you use, Cloudflare provides a public certificate that is used between client users and Cloudflare.
3.1 Steps To Enable Cloudflare SSL.
- Login Cloudflare dashboard.
- Click the Crypto icon at the top area, in this page, you can choose which SSL mode to use. For simplicity, we just select Flexible mode from the SSL drop-down list.
- Then turn on the Always use HTTPS and Automatic HTTPS Rewrites option at the bottom.
- Now when you input HTTP URL (http://www.dev2qa.com) in a web browser, you can find the browser will change it to a secure HTTPS URL (https://www.dev2qa.com).
3.2 Fix HTTPS Mixed Content Error.
- When you browse a web page using HTTPS, if you find an image is not shown, CSS or js is missing on the HTTPS page, you can right-click the web page in chrome and click Inspect menu item to see the error messages in the inspector console. You may find below error messages.
Mixed Content: The page at ... was loaded over HTTPS, but request ... This request has been blocked; the content must be served over HTTPS.
- This error message means the page contains some url that starts with HTTP but does not start with HTTPS, you can use the below method to resolve this.
- Use Cloudflare Full SSL mode. This needs to install the certificate in your web server and change the original webserver to support HTTPS. You can use a WordPress plugin Really Simple SSL to implement this.
- Use another WordPress plugin SSL Insecure Content Fixer on your website. This plugin will replace all HTTP to HTTPS in your page before they send the web page back from the webserver to Cloudflare.
- If the error still exists, you should check whether you had installed any WordPress cache plugin like wp super cache. You should reactive, or delete those cache plugins may resolve the error. If you use Cloudflare, I think you had better not use the wp super cache, sometimes it will throw confusing issues.
3.3 Make Yoast Generated Sitemap Url Use HTTPS.
- After the above configuration, you can see that when you input url like http://dev2qa.com in a web browser, it will be changed to https://dev2qa.com.
- But if you use SEO tools ( such as Yoast ) to generate sitemap XML, and when you use http://dev2qa.com/robots.txt to see the sitemap content, you will find that all sitemap XML content url still use http:// as the prefix.
- You need to follow the below steps to make the Yoast generated sitemap XML url to use https:// prefix instead of http://.
- Login WordPress admin console as an administrator.
- Click Settings —> General menu item in the left navigation panel.
- Change both WordPress Address ( URL ) and Site Address ( URL ) value start with https:// prefix and save the settings.
- Then after a while, you can see the Yoast SEO tool generated sitemap XML url all start with https:// also.