If you have read the article Android Alert Dialog Example, you must know how to create and use AlertDialog basically. This article will show you two advanced examples about how to add custom list items and custom view objects in android Alert Dialog.
1. Example Overview.
If you can not watch the above video, you can see it on the youtube URL https://youtu.be/x7PtcLS53Hs
- activity_alert_dialog_custom_view.xml
- This is the example layout XML file that is saved in app/res/layout folder.
<LinearLayout android:layout_width="match_parent" android:layout_height="wrap_content" android:orientation="vertical"> <Button android:id="@+id/alertDialogCustomAdapterButton" android:layout_width="match_parent" android:layout_height="wrap_content" android:text="Simple Adapter Alert Dialog" /> <Button android:id="@+id/alertDialogCustomViewButton" android:layout_width="match_parent" android:layout_height="wrap_content" android:text="Custom View Alert Dialog" /> <TextView android:id="@+id/alertDialogTextView" android:layout_width="match_parent" android:layout_height="wrap_content" android:textSize="20dp"/> </LinearLayout> - AlertDialogCustomViewActivity.java
package com.dev2qa.example;

import android.app.AlertDialog;
import android.content.DialogInterface;
import android.os.Bundle;
import android.support.v7.app.AppCompatActivity;
import android.view.View;
import android.widget.Button;
import android.widget.EditText;
import android.widget.SimpleAdapter;
import android.widget.TextView;

import java.util.ArrayList;
import java.util.HashMap;
import java.util.List;
import java.util.Map;

public class AlertDialogCustomViewActivity extends AppCompatActivity {

    @Override
    protected void onCreate(Bundle savedInstanceState) {
        super.onCreate(savedInstanceState);
        setContentView(R.layout.activity_alert_dialog_custom_view);

        setTitle("dev2qa.com --- Custom View Alert Dialog");

        TextView textView = (TextView)findViewById(R.id.alertDialogTextView);

        this.showSimpleAdapterAlertDialog(textView);

        this.showCustomViewAlertDialog(textView);
    }

}
2. Use SimpleAdapter To Custom List Items In Alert Dialog.
- The below image is the first example app screenshot.
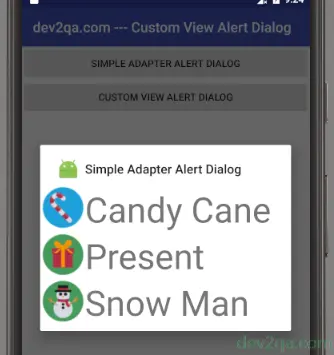
- Create a SimpleAdapter object.
- Call AlertDialog.Builder‘s setAdapter() method to set the data adapter.
// Show how to use SimpleAdapter to customize list item in android alert dialog. private void showSimpleAdapterAlertDialog(TextView textView) { final TextView textViewTmp = textView; Button alertDialogButton = (Button)findViewById(R.id.alertDialogCustomAdapterButton); alertDialogButton.setOnClickListener(new View.OnClickListener() { // Each image in array will be displayed at each item beginning. private int[] imageIdArr = {R.drawable.if_candy_cane, R.drawable.if_present, R.drawable.if_snowman}; // Each item text. private String[] listItemArr = {"Candy Cane", "Present", "Snow Man"}; // Image and text item data's key. private final String CUSTOM_ADAPTER_IMAGE = "image"; private final String CUSTOM_ADAPTER_TEXT = "text"; @Override public void onClick(View view) { // Create a alert dialog builder. AlertDialog.Builder builder = new AlertDialog.Builder(AlertDialogCustomViewActivity.this); // Set icon value. builder.setIcon(R.mipmap.ic_launcher); // Set title value. builder.setTitle("Simple Adapter Alert Dialog"); // Create SimpleAdapter list data. List<Map<String, Object>> dialogItemList = new ArrayList<Map<String, Object>>(); int listItemLen = listItemArr.length; for(int i=0;i<listItemLen;i++) { Map<String, Object> itemMap = new HashMap<String, Object>(); itemMap.put(CUSTOM_ADAPTER_IMAGE, imageIdArr[i]); itemMap.put(CUSTOM_ADAPTER_TEXT, listItemArr[i]); dialogItemList.add(itemMap); } // Create SimpleAdapter object. SimpleAdapter simpleAdapter = new SimpleAdapter(AlertDialogCustomViewActivity.this, dialogItemList, R.layout.activity_alert_dialog_simple_adapter_row, new String[]{CUSTOM_ADAPTER_IMAGE, CUSTOM_ADAPTER_TEXT}, new int[]{R.id.alertDialogItemImageView,R.id.alertDialogItemTextView}); // Set the data adapter. builder.setAdapter(simpleAdapter, new DialogInterface.OnClickListener() { @Override public void onClick(DialogInterface dialogInterface, int itemIndex) { textViewTmp.setText("You choose item " + listItemArr[itemIndex]); } }); builder.setCancelable(false); builder.create(); builder.show(); } }); } - activity_alert_dialog_simple_adapter_row.xml, this layout XML file is used to represent one list item. It is used by SimpleAdapter. It is saved in the app/res/layout folder.
<LinearLayout xmlns:android="http://schemas.android.com/apk/res/android"
    xmlns:app="http://schemas.android.com/apk/res-auto"
    android:orientation="horizontal"
    android:layout_width="match_parent"
    android:layout_height="match_parent">


    <ImageView
        android:id="@+id/alertDialogItemImageView"
        android:layout_width="wrap_content"
        android:layout_height="wrap_content" />

    <TextView
        android:id="@+id/alertDialogItemTextView"
        android:layout_width="wrap_content"
        android:layout_height="wrap_content"
        android:textSize="50dp"/>

</LinearLayout>
3. Custom View In Alert Dialog.
- The below image is the second example screenshot.
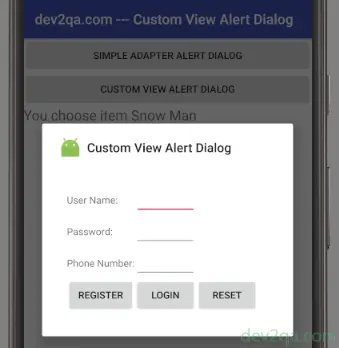
- Define a custom view object use a layout XML file.
- Call LayoutInflater().inflate() method to get the custom view in java code.
- Call AlertDialog.Builder‘s setView() method to set above custom view.
- activity_alert_dialog_custom_view_login_form.xml, this is the custom view layout XML file. It is saved in the app/res/layout folder.
<LinearLayout xmlns:android="http://schemas.android.com/apk/res/android" android:orientation="vertical" android:layout_width="match_parent" android:layout_height="match_parent"> <TableLayout android:id="@+id/alertDialogLoginForm" android:layout_width="match_parent" android:layout_height="match_parent" android:orientation="vertical" android:padding="35dp"> <!-- User name row. --> <TableRow android:layout_width="match_parent" android:layout_height="match_parent" > <TextView android:layout_width="wrap_content" android:layout_height="wrap_content" android:text="User Name:" /> <EditText android:id="@+id/loginFormUserName" android:lines="1" android:maxLines="1" android:maxLength="25" /> </TableRow> <!-- Password row. --> <TableRow android:layout_width="match_parent" android:layout_height="match_parent" > <TextView android:layout_width="wrap_content" android:layout_height="wrap_content" android:text="Password:"/> <EditText android:id="@+id/loginFormPassword" android:password="true" android:lines="1" android:maxLines="1" android:maxLength="15"/> </TableRow> <!-- Phone number row. --> <TableRow android:layout_width="match_parent" android:layout_height="match_parent" > <TextView android:layout_width="wrap_content" android:layout_height="wrap_content" android:text="Phone Number:"/> <EditText android:id="@+id/loginFormPhoneNumber" android:phoneNumber="true" android:lines="1" android:maxLines="1" android:maxLength="18"/> </TableRow> <!-- Buttons row. --> <TableRow android:layout_width="match_parent" android:layout_height="match_parent" > <Button android:id="@+id/loginFormRegisterButton" android:text="Register"/> <Button android:id="@+id/loginFormLoginButton" android:text="Login"/> <Button android:id="@+id/loginFormResetButton" android:text="Reset"/> </TableRow> </TableLayout> </LinearLayout> - Below is java code that implements custom view in an android alert dialog.
// Show how to add custom view in android alert dialog.
private void showCustomViewAlertDialog(TextView textView)
{
    final TextView textViewTmp = textView;

    Button alertDialogButton = (Button)findViewById(R.id.alertDialogCustomViewButton);

    alertDialogButton.setOnClickListener(new View.OnClickListener() {

        // Store the created AlertDialog instance.
        // Because only AlertDialog has cancel method.
        private AlertDialog alertDialog = null;

        @Override
        public void onClick(View view) {
            // Create a alert dialog builder.
            final AlertDialog.Builder builder = new AlertDialog.Builder(AlertDialogCustomViewActivity.this);
            // Set icon value.
            builder.setIcon(R.mipmap.ic_launcher);
            // Set title value.
            builder.setTitle("Custom View Alert Dialog");

            // Get custom login form view.
            final View loginFormView = getLayoutInflater().inflate(R.layout.activity_alert_dialog_custom_view_login_form, null);
            // Set above view in alert dialog.
            builder.setView(loginFormView);

            // Register button click listener.
            Button registerButton = (Button)loginFormView.findViewById(R.id.loginFormRegisterButton);
            registerButton.setOnClickListener(new View.OnClickListener() {
                @Override
                public void onClick(View view) {
                    try {
                        // Close Alert Dialog.
                        alertDialog.cancel();
                        textViewTmp.setText("Register success.");
                    }catch(Exception ex)
                    {
                        ex.printStackTrace();
                    }
                }
            });

            // Login button click listener.
            Button loginButton = (Button)loginFormView.findViewById(R.id.loginFormLoginButton);
            loginButton.setOnClickListener(new View.OnClickListener() {
                @Override
                public void onClick(View view) {
                    try {
                        // Close Alert Dialog.
                        alertDialog.cancel();
                        textViewTmp.setText("Login success.");
                    }catch(Exception ex)
                    {
                        ex.printStackTrace();
                    }
                }
            });

            // Reset button click listener.
            Button resetButton = (Button)loginFormView.findViewById(R.id.loginFormResetButton);
            resetButton.setOnClickListener(new View.OnClickListener() {
                @Override
                public void onClick(View view) {
                    try {
                        EditText loginUserName = (EditText)loginFormView.findViewById(R.id.loginFormUserName);
                        EditText loginPassword = (EditText)loginFormView.findViewById(R.id.loginFormPassword);
                        EditText loginPhoneNumber = (EditText)loginFormView.findViewById(R.id.loginFormPhoneNumber);

                        loginUserName.setText("");
                        loginPassword.setText("");
                        loginPhoneNumber.setText("");
                    }catch(Exception ex)
                    {
                        ex.printStackTrace();
                    }
                }
            });

            builder.setCancelable(true);
            alertDialog = builder.create();
            alertDialog.show();
        }
    });
}