When working with Pandas DataFrames, you might encounter scenarios where you need to apply a custom styling function that involves values from multiple columns. In this tutorial, we’ll explore how to use Pandas Styler’s apply and map function to apply a custom condition based on one column value or concatenation of two or more columns in a data frame. Specifically, we’ll look at an example where rows are colored based on a condition that checks the concatenation of `level` and `title` against a predefined set.
1. Understanding the `Styler.apply` Function.
- The `Styler.apply` function is part of the `Styler` class within the `pandas.io.formats.style` module.
- This function allows users to apply a custom styling function to individual elements ( single element, row, column, and entire dataset) of a DataFrame, offering fine-grained control over the visual representation of data.
1.1 Function Definition.
- Function syntax.
Styler.apply(func, axis=0, subset=None, **kwargs)
1.2 Parameters.
- func: User-defined function or callable. This function is applied to each element of the DataFrame ( single element, row, column, and entire dataset ), and it should return a string or a list of string ( axis=0 or axis=1) containing CSS styles for each cell in a row or each cell in a column. It takes the values of DataFrame elements or rows (axis=1), columns(axis=0) as its parameters.
- axis: {0 or ‘index’, 1 or ‘columns’, None}, default: 0. The axis along which the `func` will be applied. If `axis=0`, the function is applied to each column; if `axis=1`, it is applied to each row.
- subset: Index or column labels, optional. Specifies the subset of elements on which the `func` should be applied. If not specified, the function is applied to all elements.
- kwargs: Additional keyword arguments. Extra keyword arguments that are passed to the `func` function.
1.3 Return Value.
- `Styler` object: The function returns a Styler object representing the styled DataFrame.
- You can further chain other styling methods like `highlight` or `background_gradient` to this object to add more visual enhancements.
2. Understanding the `Styler.map` Function.
2.1 Function Definition.
- Definition.
pandas.io.formats.style.Styler.map(func, subset=None, **kwargs)
2.2 Parameters.
- func (callable): This is the core function that defines how you want to style the cells based on their values. It should take a single argument, which is the value of the cell being styled. This argument can be of any type, including numeric, string, boolean, etc. The function should return a string containing CSS styles to be applied to the cell.
- subset (optional): This parameter specifies which subset of the DataFrame to apply the styling to. It can be a valid 2D input to `DataFrame.loc[<subset>]`, an array-like object, or an IndexSlice object. You can use slicing by rows/columns, boolean masks, or specific labels to target specific data.
- **kwargs (optional): You can pass additional keyword arguments to the `func` function along with the cell value. This can be useful for providing extra context or parameters to your custom styling logic.
2.3 Return Value.
- `Styler` object: The function returns a Styler object representing the styled DataFrame.
- You can further chain other styling methods like `highlight` or `background_gradient` to this object to add more visual enhancements.
3. Styler.map Function Examples.
3.1 Styler.map Function Apply to All DataFrame Element.
- Source code.
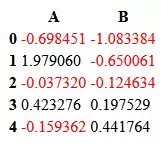
import pandas as pd import numpy as np # This function is called when the code sdf.to_html() is called. # the v parameter is the dataframe element value. # the color parameter is passed in when the code sdf = df.style.map(color_negative, color='red') is invoked. def color_negative(v, color): ret = None; if v < 0: ret = f"color: {color};" else: ret = None # print out current value in dataframe and the return string based on the above condition. print('current value:', v, 'return css string:', ret) return ret def styler_map_apply_to_all_single_elements(): # define a data set using Numpy library, the data set contains 5 rows and 2 columns. df = pd.DataFrame(np.random.randn(5, 2), columns=["A", "B"]) print(df) # map the color_negative function to change all the data set element's style in df one by one. sdf = df.style.map(color_negative, color='red') # print out the changed data set html content. # when this code is invoked, it will trigger the color_negative function for each element in the dataframe. print(sdf.to_html()) if __name__ == "__main__": styler_map_apply_to_all_single_elements() - In the above source code, we use the code sdf = df.style.map(color_negative, color=’red’) to use the function color_negative to change all the element’s style in df one by one.
- We just pass a color parameter to the color_negative function.
- The code line sdf.to_html() will trigger the color_negative function to iterate all the df elements to calculate and apply the new CSS style to the element.
- When you run the above code, you will get the below output.
A B 0 -0.698451 -1.083384 1 1.979060 -0.650061 2 -0.037320 -0.124634 3 0.423276 0.197529 4 -0.159362 0.441764 current value: -0.6984514771806153 return css string: color: red; current value: 1.9790600734039037 return css string: None current value: -0.037320298189217956 return css string: color: red; current value: 0.4232761040926021 return css string: None current value: -0.1593621561817386 return css string: color: red; current value: -1.0833843976025548 return css string: color: red; current value: -0.650061171338876 return css string: color: red; current value: -0.1246344079742758 return css string: color: red; current value: 0.1975291792846968 return css string: None current value: 0.4417638898350143 return css string: None <style type="text/css"> #T_2ccb6_row0_col0, #T_2ccb6_row0_col1, #T_2ccb6_row1_col1, #T_2ccb6_row2_col0, #T_2ccb6_row2_col1, #T_2ccb6_row4_col0 { color: red; } </style> <table id="T_2ccb6"> <thead> <tr> <th class="blank level0" > </th> <th id="T_2ccb6_level0_col0" class="col_heading level0 col0" >A</th> <th id="T_2ccb6_level0_col1" class="col_heading level0 col1" >B</th> </tr> </thead> <tbody> <tr> <th id="T_2ccb6_level0_row0" class="row_heading level0 row0" >0</th> <td id="T_2ccb6_row0_col0" class="data row0 col0" >-0.698451</td> <td id="T_2ccb6_row0_col1" class="data row0 col1" >-1.083384</td> </tr> <tr> <th id="T_2ccb6_level0_row1" class="row_heading level0 row1" >1</th> <td id="T_2ccb6_row1_col0" class="data row1 col0" >1.979060</td> <td id="T_2ccb6_row1_col1" class="data row1 col1" >-0.650061</td> </tr> <tr> <th id="T_2ccb6_level0_row2" class="row_heading level0 row2" >2</th> <td id="T_2ccb6_row2_col0" class="data row2 col0" >-0.037320</td> <td id="T_2ccb6_row2_col1" class="data row2 col1" >-0.124634</td> </tr> <tr> <th id="T_2ccb6_level0_row3" class="row_heading level0 row3" >3</th> <td id="T_2ccb6_row3_col0" class="data row3 col0" >0.423276</td> <td id="T_2ccb6_row3_col1" class="data row3 col1" >0.197529</td> </tr> <tr> <th id="T_2ccb6_level0_row4" class="row_heading level0 row4" >4</th> <td id="T_2ccb6_row4_col0" class="data row4 col0" >-0.159362</td> <td id="T_2ccb6_row4_col1" class="data row4 col1" >0.441764</td> </tr> </tbody> </table> - The HTML content in the above output is generated by the sdf.to_html() function, you can see it defines some CSS style classes at the beginning of the content.
- When you save the above HTML content to an HTML file and browse it in a web browser, you will get a web page like below. You can see all the negative number has a red color which is defined by the CSS style calculated by the color_negative function.
3.2 Styler.map Function Apply to Subset of DataFrame Element.
- In the above example, the Styler map invoked function ( color_negative ) will be triggered to all the DataFrame elements one by one.
- But sometimes you just need to apply the function to some part of the DataFrame elements, then you can use the subset parameter of the Styler.map function.
- Source code.
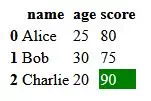
import pandas as pd def highlight_high_scores(score): print('score = ', score) if score >= 85: return "background-color: green; color: white;" else: return "" def styler_map_apply_to_subset_elements(): data = {'name': ['Alice', 'Bob', 'Charlie'], 'age': [25, 30, 20], 'score': [80, 75, 90]} df = pd.DataFrame(data) # pass the subset parameter to tell the highlight_high_scores funtion only iterate the score column data. styled_df = df.style.map(highlight_high_scores, subset='score') print(styled_df.to_html()) if __name__ == "__main__": styler_map_apply_to_subset_elements() - Output.
score = 80 score = 75 score = 90 <style type="text/css"> #T_3e399_row2_col2 { background-color: green; color: white; } </style> <table id="T_3e399"> <thead> <tr> <th class="blank level0" > </th> <th id="T_3e399_level0_col0" class="col_heading level0 col0" >name</th> <th id="T_3e399_level0_col1" class="col_heading level0 col1" >age</th> <th id="T_3e399_level0_col2" class="col_heading level0 col2" >score</th> </tr> </thead> <tbody> <tr> <th id="T_3e399_level0_row0" class="row_heading level0 row0" >0</th> <td id="T_3e399_row0_col0" class="data row0 col0" >Alice</td> <td id="T_3e399_row0_col1" class="data row0 col1" >25</td> <td id="T_3e399_row0_col2" class="data row0 col2" >80</td> </tr> <tr> <th id="T_3e399_level0_row1" class="row_heading level0 row1" >1</th> <td id="T_3e399_row1_col0" class="data row1 col0" >Bob</td> <td id="T_3e399_row1_col1" class="data row1 col1" >30</td> <td id="T_3e399_row1_col2" class="data row1 col2" >75</td> </tr> <tr> <th id="T_3e399_level0_row2" class="row_heading level0 row2" >2</th> <td id="T_3e399_row2_col0" class="data row2 col0" >Charlie</td> <td id="T_3e399_row2_col1" class="data row2 col1" >20</td> <td id="T_3e399_row2_col2" class="data row2 col2" >90</td> </tr> </tbody> </table> - The code line styled_df = df.style.map(highlight_high_scores, subset=’score’) tells the styler to use the highlight_high_scores function to evaluate the element style and only iterate the score column data one by one (subset=’score’).
- You can pass multiple column names in the subset parameter such as subset = [‘age’, ‘score’], then the function highlight_high_scores will iterate two columns’ data values one by one.
- Below is the HTML content page, you can see the high score 90 has a green background.
3.3 Styler.map Function Apply to Multiple Columns Concatenation of DataFrame Element.
- When working with Pandas DataFrames, you might encounter scenarios where you need to apply a custom styling function that involves values from multiple columns.
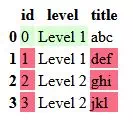
- Consider a DataFrame with two columns: level and title. You want to color the rows based on a condition that involves the concatenation of these two columns.
- Below is the example source code.
import pandas as pd my_set = set(["Level 1abc"]) def color_condition(id_value, data_frame): # print out the current value in the id column. print(id_value) # get the level and title value in the current row, the current row is decided by the id_value. level = data_frame.iat[id_value, 1] title = data_frame.iat[id_value, 2] print(level, title) # if level + title (level and title column value concatenation ) in my_set. if level + title in my_set: print(level, title, 'in myset') return "background-color: #daffd5" else: return "background-color: #fa6b84" def style_map_color_rows_by_two_columns_concatenation(): # Sample DataFrame, it contains 3 columns id, level, title. data = {'id': [0,1,2,3], 'level': ['Level 1', 'Level 1', 'Level 2', 'Level 2'], 'title': ['abc', 'def', 'ghi', 'jkl']} df = pd.DataFrame(data) print(df) # apply the color_condition function to the id column data in the df dataframe. # pass the current dataframe object df to the function as the parameter. styled_df = df.style.map(color_condition, data_frame = df, subset=['id']) print(styled_df.to_html()) if __name__ == "__main__": style_map_color_rows_by_two_columns_concatenation() - Output.
id level title 0 0 Level 1 abc 1 1 Level 1 def 2 2 Level 2 ghi 3 3 Level 2 jkl 0 Level 1 abc Level 1 abc in myset 1 Level 1 def 2 Level 2 ghi 3 Level 2 jkl <style type="text/css"> #T_4d1a5_row0_col0 { background-color: #daffd5; } #T_4d1a5_row1_col0, #T_4d1a5_row2_col0, #T_4d1a5_row3_col0 { background-color: #fa6b84; } </style> <table id="T_4d1a5"> <thead> <tr> <th class="blank level0" > </th> <th id="T_4d1a5_level0_col0" class="col_heading level0 col0" >id</th> <th id="T_4d1a5_level0_col1" class="col_heading level0 col1" >level</th> <th id="T_4d1a5_level0_col2" class="col_heading level0 col2" >title</th> </tr> </thead> <tbody> <tr> <th id="T_4d1a5_level0_row0" class="row_heading level0 row0" >0</th> <td id="T_4d1a5_row0_col0" class="data row0 col0" >0</td> <td id="T_4d1a5_row0_col1" class="data row0 col1" >Level 1</td> <td id="T_4d1a5_row0_col2" class="data row0 col2" >abc</td> </tr> <tr> <th id="T_4d1a5_level0_row1" class="row_heading level0 row1" >1</th> <td id="T_4d1a5_row1_col0" class="data row1 col0" >1</td> <td id="T_4d1a5_row1_col1" class="data row1 col1" >Level 1</td> <td id="T_4d1a5_row1_col2" class="data row1 col2" >def</td> </tr> <tr> <th id="T_4d1a5_level0_row2" class="row_heading level0 row2" >2</th> <td id="T_4d1a5_row2_col0" class="data row2 col0" >2</td> <td id="T_4d1a5_row2_col1" class="data row2 col1" >Level 2</td> <td id="T_4d1a5_row2_col2" class="data row2 col2" >ghi</td> </tr> <tr> <th id="T_4d1a5_level0_row3" class="row_heading level0 row3" >3</th> <td id="T_4d1a5_row3_col0" class="data row3 col0" >3</td> <td id="T_4d1a5_row3_col1" class="data row3 col1" >Level 2</td> <td id="T_4d1a5_row3_col2" class="data row3 col2" >jkl</td> </tr> </tbody> </table> - The web page of the above HTML content.
4. Styler.apply Function Examples.
- In example 3.3, the Styler.map function can iterate through only one element at a time.
- The Styler.apply function can iterate through rows or columns in a DataFrame dataset.
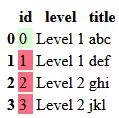
- The below example uses the Styler.apply function to implement the example 3.3.
import pandas as pd my_set = set(["Level 1abc"]) # this function will be triggered when the styled dataframe to_html() function is invoked. # because we use the Styler.apply function to apply this function and set axis = 1 # so this function will iterate through each row in the dataframe. # the function should return a string list, the list size should be same as the colume or row size. def color_condition_by_row(row_value): print(row_value) print("======================================================") level = row_value['level'] title = row_value['title'] print(level, title) print("======================================================") if level + title in my_set: print(level, title, 'in myset') # because one row in the dataframe has 3 columns, so the return list should contain 3 elements. # each element set the CSS style for the related column. return ["background-color: #daffd5", "background-color: #daffd5", None] else: return ["background-color: #fa6b84", None, "background-color: #fa6b84"] def style_apply_color_rows_by_two_columns_concatenation(): # Sample DataFrame data = {'id': [0,1,2,3], 'level': ['Level 1', 'Level 1', 'Level 2', 'Level 2'], 'title': ['abc', 'def', 'ghi', 'jkl']} df = pd.DataFrame(data) print(df) # set axis to 1 means iterate through the rows one by one. styled_df = df.style.apply(color_condition_by_row, axis=1) print(styled_df.to_html()) if __name__ == "__main__": style_apply_color_rows_by_two_columns_concatenation() - Output.
id level title 0 0 Level 1 abc 1 1 Level 1 def 2 2 Level 2 ghi 3 3 Level 2 jkl id 0 level Level 1 title abc Name: 0, dtype: object ====================================================== Level 1 abc ====================================================== Level 1 abc in myset id 1 level Level 1 title def Name: 1, dtype: object ====================================================== Level 1 def ====================================================== id 2 level Level 2 title ghi Name: 2, dtype: object ====================================================== Level 2 ghi ====================================================== id 3 level Level 2 title jkl Name: 3, dtype: object ====================================================== Level 2 jkl ====================================================== <style type="text/css"> #T_84b2b_row0_col0, #T_84b2b_row0_col1 { background-color: #daffd5; } #T_84b2b_row1_col0, #T_84b2b_row1_col2, #T_84b2b_row2_col0, #T_84b2b_row2_col2, #T_84b2b_row3_col0, #T_84b2b_row3_col2 { background-color: #fa6b84; } </style> <table id="T_84b2b"> <thead> <tr> <th class="blank level0" > </th> <th id="T_84b2b_level0_col0" class="col_heading level0 col0" >id</th> <th id="T_84b2b_level0_col1" class="col_heading level0 col1" >level</th> <th id="T_84b2b_level0_col2" class="col_heading level0 col2" >title</th> </tr> </thead> <tbody> <tr> <th id="T_84b2b_level0_row0" class="row_heading level0 row0" >0</th> <td id="T_84b2b_row0_col0" class="data row0 col0" >0</td> <td id="T_84b2b_row0_col1" class="data row0 col1" >Level 1</td> <td id="T_84b2b_row0_col2" class="data row0 col2" >abc</td> </tr> <tr> <th id="T_84b2b_level0_row1" class="row_heading level0 row1" >1</th> <td id="T_84b2b_row1_col0" class="data row1 col0" >1</td> <td id="T_84b2b_row1_col1" class="data row1 col1" >Level 1</td> <td id="T_84b2b_row1_col2" class="data row1 col2" >def</td> </tr> <tr> <th id="T_84b2b_level0_row2" class="row_heading level0 row2" >2</th> <td id="T_84b2b_row2_col0" class="data row2 col0" >2</td> <td id="T_84b2b_row2_col1" class="data row2 col1" >Level 2</td> <td id="T_84b2b_row2_col2" class="data row2 col2" >ghi</td> </tr> <tr> <th id="T_84b2b_level0_row3" class="row_heading level0 row3" >3</th> <td id="T_84b2b_row3_col0" class="data row3 col0" >3</td> <td id="T_84b2b_row3_col1" class="data row3 col1" >Level 2</td> <td id="T_84b2b_row3_col2" class="data row3 col2" >jkl</td> </tr> </tbody> </table> - Below is the above HTML content web page.