Stacks is a useful feature on the Mac operating system that allows users to organize their cluttered desktops. It automatically groups files of the same type into neat, organized stacks, making it easier to find what you need quickly.
In this article, we will explore various aspects of Stacks on Mac, including how to stack files on your Mac desktop, how to undo stacks, and how to move them around. We’ll also tell you how to configure the Stacks feature default behavior. So, let’s dive in and learn more about this helpful tool!
1. What is Stacks on Mac?
- Stacks is a feature in Mac OS that allows users to organize their desktop by automatically grouping related files into folders that can be quickly accessed with one click.
- The idea behind stacks is to help users keep their desktops clean and clutter-free by organizing files into neat little bundles that are easy to access.
- When you enable stacks on your Mac, it creates a folder on your desktop that will contain all the files that meet the condition you specified.
- For example, if you choose to stack files based on the creation date or file type, then all files that match that condition will be automatically added to the stack.
- This makes it very easy for users to find files that they need without having to spend time searching through their entire desktop.
2. How To Stack Files On Mac Desktop?
- Enabling stacks on Mac OS is a straightforward process. To create a stack, follow these simple steps.
- First, right-click on your desktop and select “Use Stacks” from the pop-up menu.
- Then you will find all the files on the desktop have been grouped by the default settings.
- You can right-click the desktop again, then click the Group Stacks By menu item in the popup menu, and then you can choose how you want to sort the stack.
- You can either select “Kind“, “Date Last Opened“, “Date Added“, “Date Modified“, “Date Created“, or “Tag” Depending on your preference, pick the one that suits you best.
- To add tags to files, control-click on a file and select “Tags“. You can then add a custom tag or choose from the existing tags.
- After selecting your preferred sorting method, your Mac will regroup all matching files into different stack folders.
- You can now customize your stack by dragging and dropping other files onto it.
- When you click the stack folder, it will expand and show all the files contained in the stack folder.
- And the stack folder is changed to a down arrow picture, when you click the down arrow picture, it will close the stack folder.
3. How to Undo Stacks on Mac?
- To undo a stack on your Mac, follow these simple steps.
- You can expand a stack folder by clicking it, then it will display all the files in the stack folder.
- Click to select the files that you do not want to be stacked in this folder.
- And then drag the selected files from the stacked folder to a new Finder folder.
- This will extract those files from the stacked folder.
- If you want to unstack all the files on the desktop, you can just right-click the desktop and then click to uncheck the item Use Stacks.
- It will unstack all the files on the desktop.
4. How to Move Stacks on Mac?
- To move stacks on your Mac, follow these simple steps.
- Click the stack folder icon to select it.
- Drag the stack folder to the desired location in your Finder window.
- When you release the mouse key, it will move all the files in the stack folder to the target folder in the Finder window.
- And the stack folder on the desktop will also be removed.
5. How To Configure the Stacks Feature Default Behavior?
- Once you have grouped your stacks, you can further customize them by selecting “Show View Options” from the “View” menu.
- But you should make sure you activate the macOS desktop first, otherwise, it will not show the Show View Options item.
- You can confirm this by clicking anywhere on the macOS desktop.
- And then you can see the top menu bar of the desktop will change to the Finder menu bar.
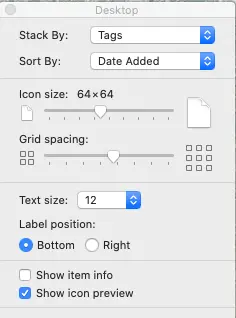
- When you click the Show View Options menu item, it will pop up the Desktop dialog.
- Here you can choose the default settings for the Stacks feature, such as stack by, sort by, icon size, grid spacing, text size, label position, show item info, and show icon preview as in the below picture.
- And the Show View Options menu item will also change to the Hide View Options menu item.
- You can click the Hide View Options menu item to hide the Desktop dialog window.