This article will tell you how to create a WordPress website on BlueHost. And how to reinstall the WordPress website if you encounter errors.
1. Register A Domain.
- First, you need to register a domain on BlueHost or another domain registrar.
- If your domain is registered on another domain registrar, then you need to change the domain DNS ( domain name server ) record to ns1.bluehost.com and ns2.bluehost.com on the domain registrar DNS dashboard. The domain name server change needs 24 – 48 hours to propagate.
2. Assign The Domain To Your BlueHost Account.
When the domain propagates completely, you should assign it to your BlueHost account follow the below steps.
- Login to your BlueHost manager dashboard.
- Click domains —> assign menu item on the dashboard top menu bar. You can access the page directly by access url https://my.bluehost.com/cgi/hosting/assign.
- Input the domain name in the assign page Domain text box, then BlueHost will verify the domain ownership.
- When the domain ownership has been verified, you should select the Addon Domain radio button in step3.
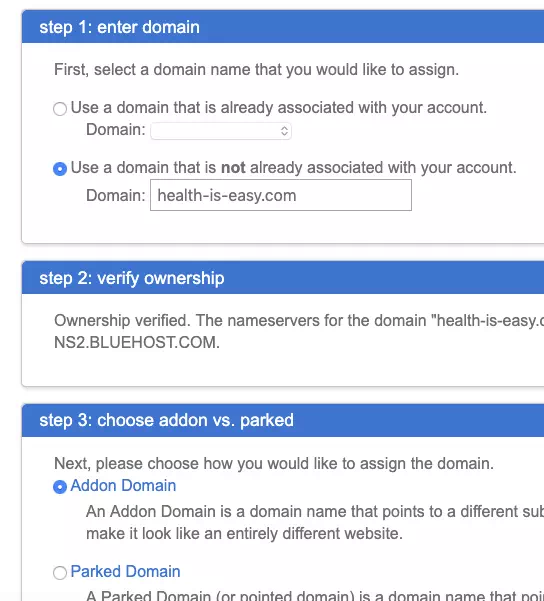
- Input a directory name in step 4: choose addon directory and sub-domain, all WordPress website files will be saved in this directory ( public_html/health-is-easy ). The sub-domain name will be generated automatically.
- Click the assign this domain button to assign it. When the above process is complete, you can click domains —> domain list menu item to see the addon domains.
3. Install WordPress WebSite On BlueHost.
- Click hosting —> cpanel menu item in BlueHost admin website top menu list.
- Click the Install WordPress icon in the website area to install the WordPress website.
- Select WordPress installation domain in the drop-down list, the target installation directory should be left empty, otherwise, the WordPress website will not be installed correctly.
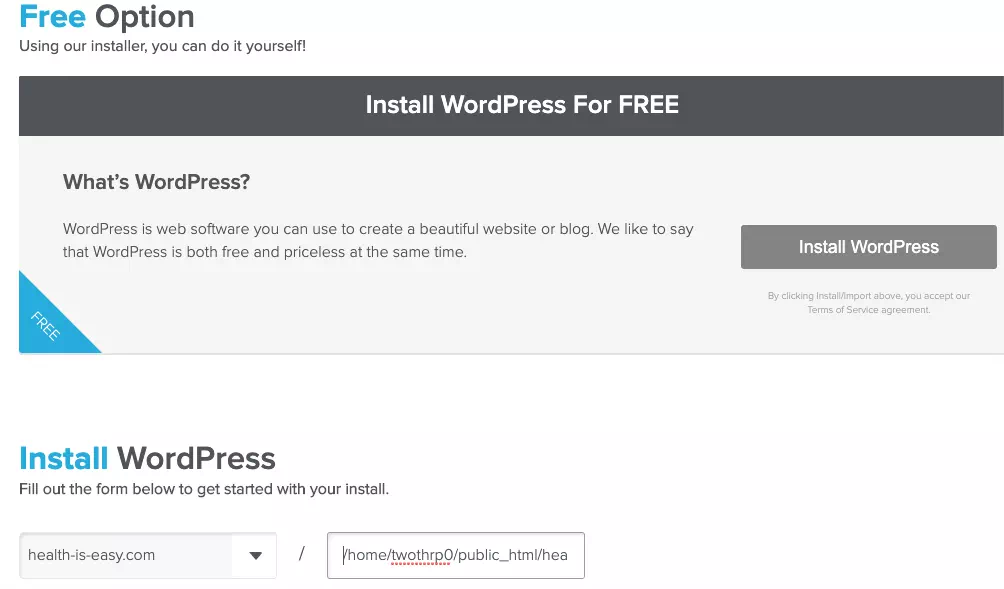
- Click the Install WordPress button to install it, when the installation process complete successfully. The WordPress website files will be installed in public_html / health-is-easy directory.
- Now the WordPress website has been installed successfully, you can access it with your domain name. The website manager url is http://< your_domain_name >/wp-admin.
4. How To Resolve Error When Install WordPress On Incorrect Directory.
- If you do not leave the directory path empty behind the domain drop-down list, but input an installation directory path such as /home/……/public_html/health-is-easy in the input text box, then the WordPress files will be saved in the wrong directory.
- After you install it, you can not access the website. You will get an error page when access the WordPress admin website, the error page said This site can’t be reached.
- To resolve this error, you need to follow two steps.
- Delete all folder and files in /home/……/public_html/health-is-easy/ directory.
- Login to your BlueHost admin website, and click hosting —> cpanel menu item, then go to the database tools section, click phpMyAdmin icon.
- In the below code, the domain website’s MySql database name is twothrp0_wrdp2, but you can not delete the database directly here.
twothrp0_wrdp2 New wp_commentmeta wp_comments wp_links wp_options wp_postmeta wp_posts wp_termmeta wp_terms wp_term_relationships wp_term_taxonomy wp_usermeta wp_users - To delete the database, click the database tools —> MySQL Databases icon to go to the MySQL Database management page.
- Click the delete link at the end of the database row. You can also rename it to another one by clicking the rename link.
- Do not forget to delete the database user in the database user row also. Below database user is not for the above database, the above database user name generally should be twothrp0_wrdp2.
5. How To Reinstall WordPress WebSite.
There are two methods to reinstall the WordPress WebSite.
- Click the Install WordPress icon in BlueHost dashboard hosting —> cpanel —> website section.
- If you find the above method can not install the WordPress website, then you can reinstall it by browsing the below url. If you encounter an error in the result page, it is a known bug and will not stop the WordPress website installation. https://my.bluehost.com/hosting/wordpress_tools/install.
6. How To Remove BlueHost Coming Soon Page.
- When you browse your website domain in a web browser just after WordPress is installed on BlueHost, you will see the Bluehost coming soon page.
- You can follow the below steps to remove the Bluehost coming soon page.
- Login Bluehost admin website.
- Click Settings —> General menu item in the left navigation panel, then choose Off radio button after Enable option in Bluehost Coming Soon Page section.
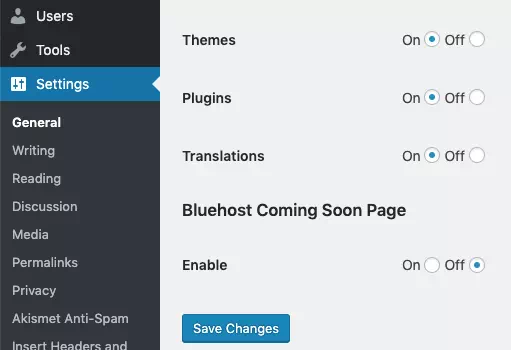
- Click the Save Changes button to save the changes. Now the website will display your theme page instead of the Bluehost coming soon page.
7. Build WordPress SEO Friendly URL.
- Login to the WordPress admin website.
- Click Settings —> Permalinks menu item in left, then select Post name radio button on the right web page, click Save Changes button to make the changes take effect.
8. Upload WebSite Favicon Icon Image.
Website favicon is an icon image file that has the .ico extension, every website has an icon image to display on the browser title to make your website more beautiful and visualized. To add a website favicon icon image, please follow the below steps.
- Find an icon file that can represent your website’s meanings.
- If you do not have an icon file, you can convert your png file to .ico format file use online tools.
- Please note the icon file name should be favicon.ico exactly. If you use other file names, it will not work correctly.
- Upload the favicon.ico file to the WordPress website root folder.
..
.qidb
.well-known
cgi-bin
wp-admin
wp-content
wp-includes
.htaccess
error_log
favicon.ico
- Reload the webpage, then you can see the website icon at the browser title.