After you installed android studio, you still need to configure some android SDK environment variables then you can use them easily. This article will tell you how to correctly configure Android SDK environment variables such as ANDROID_HOME, PATH on both Windows and macOS.
1. Configure Android SDK Variable In Windows.
1.1 Get Android SDK Install Directory Path.
- Before you can configure it, you should first get the android SDK install directory following the steps below.
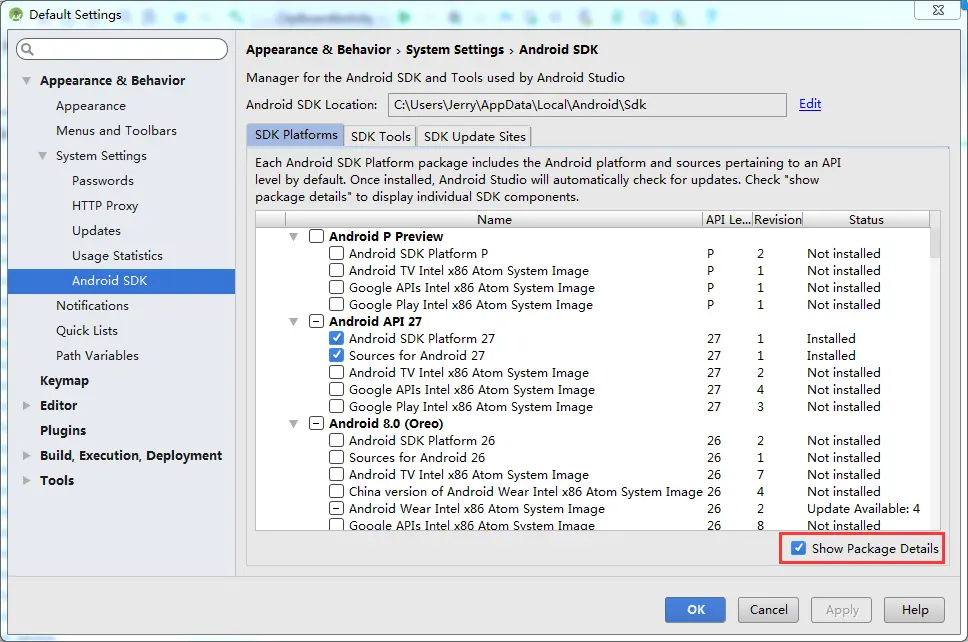
- Open android studio, click File —> Settings menu item in the top menu bar.
- Expand Appearance & Behavior —> System Settings —> Android SDK menu item on the left side of the popup window. Then you can find the Android SDK Location directory path on the right side ( in this example, the Android SDK location path is C:\Users\Jerry\AppData\Local\Android\Sdk ), remember it.
1.2 Set %ANDROID_HOME% and %Path% System Environment Variable.
- Right-click the computer icon in Windows file explorer left side, click Properties menu item in the popup menu list. This will open the windows system configuration window.
- Click the Advanced system settings link on the left panel, it will popup the System Properties window, click the Environment Variables button to open the Environment Variables window.
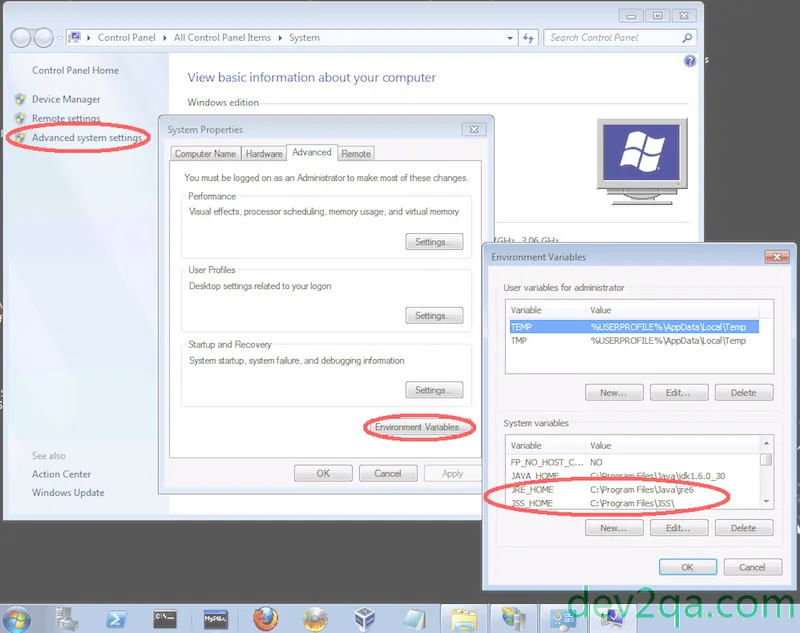
- Click the New… button to add a new system variable, input ANDROID_HOME as the variable name, and input the Android SDK location directory path ( such as C:\Users\Administrator\AppData\Local\Android\Sdk ) as the variable value.

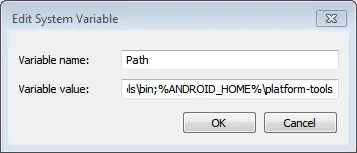
- Select variable Path and click Edit button and add ;%ANDROID_HOME%\tools;%ANDROID_HOME%\tools\bin;%ANDROID_HOME%\platform-tools at the end of its value. Please note the ; must be English character otherwise, it will not take effect.
- Click OK to close the system environment variables settings window, open a dos window, type command adb in it. If you see output like below that means the android SDK path variable has been configured successfully.
C:\Users\Administrator>adb
Android Debug Bridge version 1.0.39
Version 0.0.1-4500957
Installed as C:\Users\Administrator\AppData\Local\Android\Sdk\platform-tools\adb
.exe
2. Configure Android SDK Variable In macOS.
- Open Android Studio on macOS, then click Android Studio —> Preferences menu item at the left top toolbar.
- Input search keyword sdk in the search box of the popup Preferences dialog window left side.
- It will focus on the Android SDK menu item on the left side, and you can get the Android SDK Location directory path value on the right side Android SDK Location text box.
- Generally, the Android SDK is installed in the /Users/user-name/Library/Android/sdk folder on macOS.
- If you can not find the above folder in macOS finder or terminal, this is because the Library folder is a hidden folder by default, you should make the hidden folder visible by executing the command
$ defaults write com.apple.finder AppleShowAllFiles TRUEin a macOS terminal window ( please read article How To Show Hidden Files In Mac OS Finder And Select Hidden Files In Html Upload File Form ). - You can also see the hidden Library folder by opening a macOS Finder window, then click Go —> Go to Folder… menu item, and input ~/Library in the popup dialog input text box, then click Go button.
- This is also another method to show the hidden Library folder, open a macOS Finder window, click Go —> Home menu item. Right-click the home folder, then click the Show View Options menu item in the popup menu list. Check the Show Library Folder checkbox.
- Use nano to create or edit user bash profile in user home directory.
$ nano .bash_profile.
- Add ANDROID_HOME and PATH environment variable in user bash profile.
export ANDROID_HOME=/Users/Jerry/Library/Android/sdk
export PATH=$PATH:$ANDROID_HOME/tools
export PATH=$PATH:$ANDROID_HOME/tools/bin
export PATH=$PATH/:$ANDROID_HOME/platform-tools
- Make the added system environment take effect.
$ source .bash_profile
- Now open a terminal and run adb, you should also see something output like in windows.
3. How To Download And Install Android SDK Command Line Tool Manually.
- If you do not need Android Studio, and you just want to use android SDK command-line tools only, it is very easy also.
- Go to the android SDK command-line tools download page and download the related zip files.
- Unzip the zip file to a local folder for example C:\android-sdk.
- Now when you start the Android Studio for the next time, it will let you select the android SDK location folder, just select the above folder.
- You can also change the android SDK location folder in the Android Studio Settings dialog.
- For Windows, start Android Studio, then click File —> Settings menu item.
- For macOS, start Android Studio, then click Android Studio —> Preferences menu item.
- Select Appearance & Behavior —> System Settings —> Android SDK menu item in the popup window left side.
- On the window right side, click the Edit link after the Android SDK Location text box, it will open the SDK Setup dialog.
- At the bottom of the SDK Setup dialog, there is an Android SDK Location text box, you can browse the new Android SDK folder to use it.
Thank you for the detailed guide! I struggled for a while trying to set the Android SDK path, but your step-by-step instructions made it so much easier. I appreciate the tips for both Windows and Mac!
Thanks for the detailed guide! It was really helpful in setting up my Android SDK path. The step-by-step instructions made it easy to follow. Great job!
Great post! I was struggling with setting up the Android SDK path on my Windows machine, but your step-by-step guide made it super easy. Thanks for breaking it down so clearly!
Great guide! I struggled with setting up the Android SDK path on my Windows machine, but your step-by-step instructions made it a breeze. Thanks for sharing!
Great post! I found the step-by-step instructions really helpful for setting up my Android SDK path. The screenshots made it easy to follow along. Thanks for sharing!
Great post! I found the step-by-step guide really helpful for setting up my Android SDK path. The screenshots made it much easier to follow along. Thanks for sharing these tips!
Great tutorial! The step-by-step instructions made it so easy to set the Android SDK path on my Windows machine. I especially appreciated the screenshots; they were really helpful. Thanks for sharing!
Thank you for this clear guide! I struggled to set up my Android SDK path on Windows, but your step-by-step instructions made it so much easier. I appreciate the screenshots too; they really helped clarify the process. Looking forward to trying out my first app!
Great post! Setting up the Android SDK path can be tricky, but your step-by-step instructions really helped clarify the process. Thanks for sharing these tips for both Windows and Mac users!
Great article! The step-by-step instructions for setting the Android SDK path on both Windows and Mac were super clear. I really appreciate the visuals you included; they helped a lot in following along. Thank you for sharing this useful guide!
Great post! I found your step-by-step guide on setting the Android SDK path super helpful. The screenshots made it much easier to follow along. Thanks for sharing these Windows tricks!
Great post! The step-by-step instructions were very clear and easy to follow. I finally managed to set up my Android SDK path correctly on Windows. Thanks for sharing these helpful tips!
Great post! Thanks for the clear instructions on setting the Android SDK path on both Windows and Mac. I had been struggling with it for a while, but your step-by-step guide made it so much easier. Keep up the good work!
Thanks for the detailed guide! It made setting up the Android SDK path so much easier on both Windows and Mac. I especially appreciated the step-by-step instructions for the environment variables. Keep up the great work!
mera masla ni solve ho raha sdk path e set ni ho raha macbook mai kindly koi help kr day
Resolve hujaega bro File> Setting > Apperence SDK m jakar install karo hujayega set
Thanks
Thanks for sharing. This has really solved my problem.
in the terminal window do this.
1. Open command prompt
2.
> echo export “ANDROID_SDK=/Users//Library/Android/sdk” >> ~/.bash_profile
Thats’s it.
3.
Close your terminal.
4.
Open it again.
5. Type – echo $ANDROID_HOME to check if the home is set.
Thanks for sharing commands to add Android Studio to mac os x path environment variables; at least ‘adb’ is up and running.
Configure Android SDK Variable In MacOS.
Added path configuration, now ‘adb’ is up & running.
Great job in sharing it.