XAMPP is a software package that is a bundle of apache, MySQL, and FTP packages. You always need to use it when you develop a PHP + MySQL application. It is easy to use on Windows, but when I use it on Mac OS, I meet some errors, this article will tell you how to install, start, stop XAMPP on Mac OS and fix all these errors.
1. How To Install, Start, Stop XAMPP On Mac OS.
- First, you should download the XAMPP installer for Mac OS. If you find the XAMPP official website https://www.apachefriends.org/ can not be accessed, you can search the keyword XAMPP at https://sourceforge.net. and download it there.
- After you download the XAMPP mac os version, double clicks it to install it. After install, you can start it by clicking the XAMPP icon in the Finder /Applications folder.
- After clicking the XAMPP icon, it will display the below popup window. Click the Start button to start both Apache, MySQL, and FTP server as services. Click the Stop button to stop it.
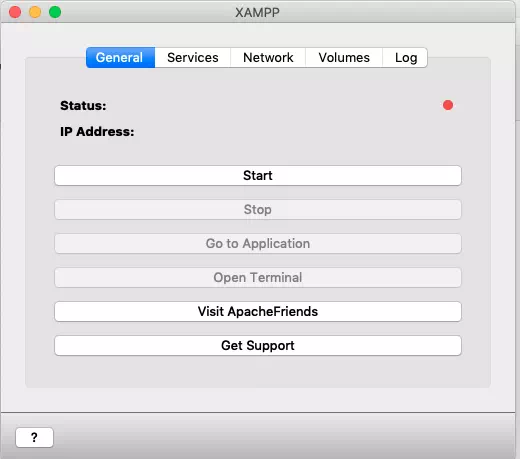
- After clicking the Start button, you can see the server status and server IP Address at the top area of the above XAMPP window. Please remember the IP address. The server is running in an embedded Linux server, and the server IP is just the IP address.
- Click the Go to Application button will show you the XAMPP dashboard in a popup web browser. Click the Open Terminal button will open a terminal and login to the embedded Linux server with the root user.
- If you want to know where the XAMPP files are installed, you can click the Volumes tab in the above XAMPP manager window, then click the Mount button to mount the /opt/lampp directory on the XAMPP Linux server to local Mac OS, then click Explore button to open XAMPP install folder in popup local Mac Finder window. You can copy your WordPress website source files into the htdocs folder to browse the WordPress website in a web browser.
2.How To Fix Can Not Access XAMPP Apache Dashboard Use Localhost Error.
- In the past, after start XAMPP, we usually access its dashboard web page use the URL http://localhost/dashboard/.
- But when I use the above URL, it can not open the page. This is because we are not running a web browser in XAMPP embed Linux server, we access it in Mac OS.
- To access the XAMPP apache dashboard, you should use the XAMPP embed Linux server’s IP to replace localhost like this, http://192.168.64.2/dashboard/.
3.How To Fix Can Not Connect To MySQL Server With Root User Error.
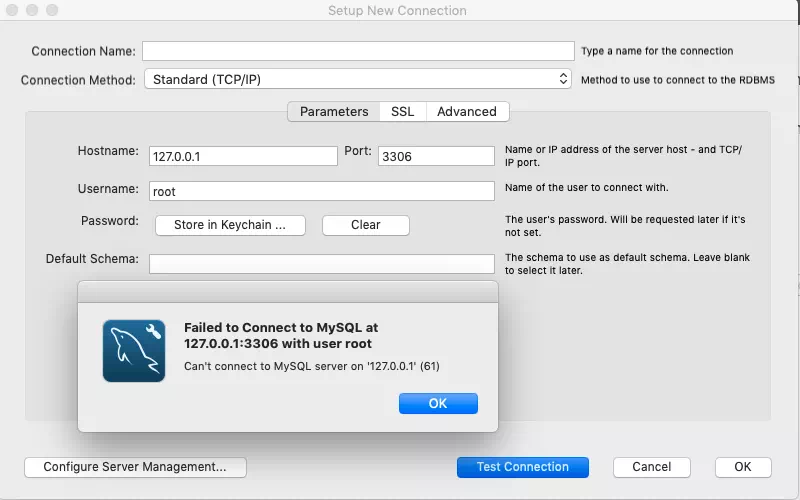
- To manage the XAMPP MySQL server, you can use MySQL workbench. If you use the root user with an empty password ( the root user’s password is empty by default ), it will pop up the error message Failed to Connect to MySQL at 127.0.0.1:3306 with user root.
- This error is because the MySQL server’s Hostname is wrong, the MySQL server Hostname should be the running XAMPP Linux server’s IP address, which is 192.168.64.2 in this example.
- But when you use the XAMPP Linux server’s IP ( for example 192.168.64.2) as the Hostname and use the root user with an empty password, it will popup another error dialog which said Failed to Connect to MySQL at 192.168.64.2:3306 with user root, Access denied for user ‘root’@’192.168.64.1’ (using password: NO). You can read the article How To Resolve Access Denied For User ‘root’@’localhost’ (using Password: Yes) When Connect MySQL Database to fix this, but we had also listed the short steps about how to fix it as below.
- To fix this error, you should click the Open Terminal button in the XAMPP manager window, then follow the below steps to resolve it.
- Connect to MySQL server in command line with root user, the default root user’s password is empty.
root@debian:/# mysql -u root -p
Enter password:
Welcome to the MariaDB monitor.  Commands end with ; or \g.
Your MariaDB connection id is 9
Server version: 10.3.16-MariaDB Source distribution

Copyright (c) 2000, 2018, Oracle, MariaDB Corporation Ab and others.

Type 'help;' or '\h' for help. Type '\c' to clear the current input statement.

MariaDB [(none)]>
- Run the SQL select command
select host, user from mysql.user;to show all hosts and users from the table mysql.user like below. We can see that the root user can only connect to the embedded MySQL server on localhost, and the localhost is the XAMPP embedded Linux server, but MySQL workbench is running on the Mac OS. So you should grant root user access permission to the MySQL server from any machine with ‘%’ as the host value.MariaDB [(none)]> select host, user from mysql.user; +-----------+-------+ | host | user | +-----------+-------+ | 127.0.0.1 | root | | ::1 | root | | localhost | | | localhost | pma | | localhost | root | +-----------+-------+ 6 rows in set (0.001 sec)
- But generally, allow the root user to access the MySQL server from any machine is not safety, so we had better create another MySQL user account and make it to connect to MySQL server from any machine remotely.
- Create a new MySQL server user account with provided username and password use MySQL CREATE USER command. Please note @’%’ means jerry can connect to the MySQL server remotely from any machine.
CREATE USER 'jerry'@'%' IDENTIFIED BY 'jerry';
- Grant all privileges to the user account ‘jerry’@’%’.
GRANT ALL PRIVILEGES ON *.* TO 'jerry'@'%' WITH GRANT OPTION;
- Now you can use the above newly created user account to connect to the MySQL server in MySQL Workbench. Please note the Hostname should be the MySQL server IP address ( the embedded Linux server IP address displayed in the XAMPP manager window top area ).
- When you connect to the MySQL server successfully, you will get the below successful message dialog.
Successfully made the MySQL connection

Information related to this connection:
Host: 192.168.64.2
Port: 3306
User: jerry
SSL: not enabled
A successful MySQL connection was made with
the parameters defined for this connection.

                                     OK
Outstanding!
After 2days of searching everywhere on the internet, you saved me. Thanks you.
I usually don’t reply to help post…But you’ve saved couple of days of mine…thank you so much ?
after 24 hours of search, I was able to stumble upon your blog thanks so much, it save me so much headache. I can rest a little now.. Thanks.
I never reply to these things…but i’ve been banging my head trying to figure this out all day. I had everything except for the part where you set % as the host value. Thanks so much man I can go to sleep now
I am very happy to hear that this article can help you. You are welcome:)
thank you so much my friend
Thank you so much my friend. I found it in 3 days. OMG!! thanks for your help.
This is the perfect solution to my problem. I had installed xampp on mac, and was unable to connect to mysql database through laravel. Your solution made sense and it actually worked. Thanks a ton!