Docker is the most popular and open-source platform which can install and execute distributed applications for developers, testers, and system administrators. You can think of it as a lightweight container. It includes all the necessary libraries that your application needs to run. It is something like VM(Virtual Machine), but it is lightweight. It does not need to separate a physical machine’s resource into several pieces for different VM to use. It just runs in the physical machine and uses the entire physical resources of the machine. This can reduce resource cost’s idle time and make the management easier.
1. Docker Advantage.
- Lightweight and easy to manage.
If you want to add a new test environment such as a selenium grid node, you just need to use one command line to download and set up a prepackaged image that includes all the libraries that a selenium grid node needs. Docker’s official website provides a lot of prepackaged images. But with VM you need to install a separate VM image and need to install all of the software you need to run in the VM one by one, it is so complex and inefficient. - Quick startup and less resource cost.
Because start / restart a container does not need to start/restart the operating system, so the start/restart time is short than VM. It is just a container, multiple containers can share resources even libraries with each other in the physical machine, so the resource cost and idle time are low. - Easy to add new node in selenium grid.
If you want to run your selenium test scripts in parallel, and you need a lot of Node servers, with docker adding a new Node is just a line of command. Because it’s official website repository has already packaged all types of Nodes that you need. Such as Chrome Node Image, and Firefox Node Image. - A large number of prepackaged images.
Please click here to go to the package repository page. You can explore and search for the package which you want to use. - The image package size is far smaller than VM.
Because containers can use libraries that physical machine provides, the package does not need to include those library files. This makes package size small, commonly only tens of MB. - It can be installed and run on multiple platforms, including Windows, Mac, Linux, and even in cloud providers such as Amazon AWS and Microsoft Azure.
2. Setup Docker.
- Before use, you need to install it first. You can click here to go to the download page and click the menu “Get Docker” to choose the best one for your operating system.
- If you use windows 10 professional, click the blue button with the text “Get Docker” to download it.
- If you use an older Windows version, you need to click here to get Docker Desktop which can run in other windows except windows 10.
- I just installed Docker Desktop for windows because my os is windows 7, you can click here to get help documents for installation.
- After installation, you need to click the “Quickstart Terminal” shortcut icon on the desktop or windows startup menu to initiate and start the docker-machine in windows.
- When you click the shortcut above, a dos command console will pop up. First, it will create a default docker machine where all the containers run in.
- After starting run “docker info” in the command console to verify the installation and startup success.
- After executing the command “docker info“, it will list all the information about all the containers such as numbers of containers, the status of each container, etc.
3. Startup Issues.
- If you meet the following error when starting it in dos terminal.
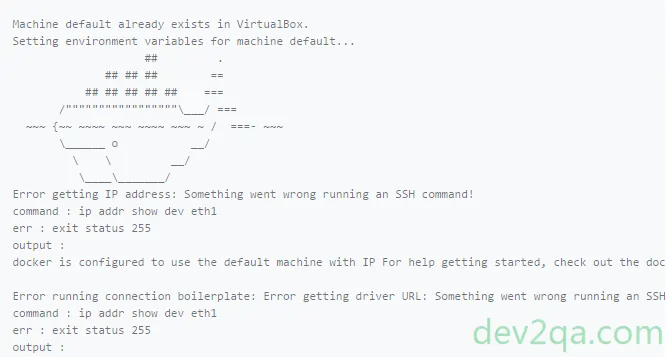
- You need to run the command “docker-machine rm default” in the terminal, this will remove the default docker-machine.
- When you restart the terminal again, it will create a new machine again.
4. Run Containers In Docker Machine.
- Now the docker-machine starts up and running, you can download and install containers in it to run.
4.1 Example: Install a web server container.
- Setup Nginx. Execute the command “docker run -d -p 8088:80 –name webserver nginx” in the terminal to install an Nginx web server.

- -d: This means this container will run in the background as a daemon.
- -p: Map physical machine port to docker container listening port, we all know web server listens on 80 port in the container, but if the physical machine’s 80 port is used by another program, we should use -p to point out a usable port which can be used to access the web server container from physical machine.
- –name: Give the container a name, in this example the name is webserver.
- nginx: is the package name of the container.
- After installation, you can run the command “docker ps -a” to list all the containers installed in this machine. Please see the list in the above picture.
4.2 Browse Nginx Webserver.
- Browse the following URL “http://192.168.99.100:8088/” in a web browser to see the Nginx webserver installation success page.
- Please notice the IP of the URL. It is just the docker machine’s IP. You can see it when you start docker-machine for the first time.
5. Manage Containers Use Kitematic.
- Kitematic is a GUI program that can be used to manage and change containers’ properties.
- Click the Kitematic icon on the desktop or startup menu to start it.
- In the Kitematic manager dashboard, you can see your installed Nginx container listed in the left panel.
- Click it on the left, then the right panel will show it’s detailed info.
- Click the “Settings” tab in the right panel, then click the “Hostname / Ports” tab, then go to the “Configure Ports” area to change the container mapping port.
- You will also see the docker machine’s IP before the port number.
- You can perform a lot of actions to the container in the GUI tool such as stop, restart, remove, and open the power shell to execute commands.
- In the next article, we will show you how to use Docker to easily set up a selenium grid.
- You can see this article demo video on URL https://youtu.be/nC3QfNiudQ4.