If you find the current widget can not fit your needs, you can create a custom widget as you like. The benefits of such action are encapsulation and reuse. This also makes UI component manipulation easy and clear.
You just need to extend an existing view class and then inflate the custom layout XML in the custom widget constructor, then you can use it in any layout XML file.
1. Create Custom Widget Layout XML File.
- First, you need to create this layout XML file which will includes and layout all the view components which construct the custom widget like below.
<LinearLayout
    android:layout_width="match_parent"
    android:layout_height="wrap_content"
    android:orientation="horizontal"
    android:background="@android:color/holo_green_light">

    <Button
        android:id="@+id/widgetPrevButton"
        android:layout_width="0dp"
        android:layout_height="match_parent"
        android:layout_weight="1"
        android:text="Prev"
        android:textSize="20dp"
        android:textAllCaps="false"/>

    <TextView
        android:gravity="center"
        android:layout_width="0dp"
        android:layout_height="match_parent"
        android:layout_weight="3"
        android:text="Custom Widget Example"
        android:textSize="20dp"/>


    <Button
        android:id="@+id/widgetNextButton"
        android:layout_width="0dp"
        android:layout_height="match_parent"
        android:layout_weight="1"
        android:text="Next"
        android:textSize="20dp"
        android:textAllCaps="false"/>
</LinearLayout>
2. Create Custom Widget Class File.
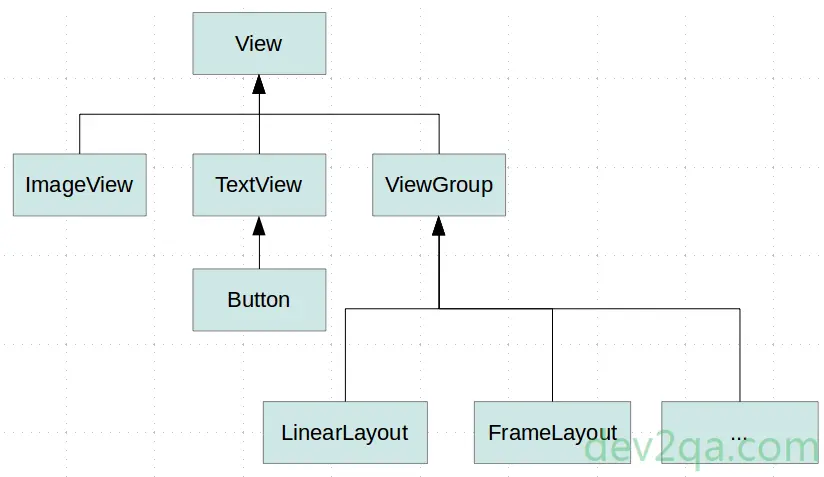
- From the below android view class tree, we can see you can create your custom widget class by extends any view class in it.
- And in the custom widget class constructor, you should inflate the layout XML file created in section 1.
- CustomWidgetTitleLayout.java
package com.dev2qa.example;

import android.support.v7.app.*;
import android.content.Context;
import android.util.AttributeSet;
import android.view.LayoutInflater;
import android.view.View;
import android.widget.Button;
import android.widget.LinearLayout;
public class CustomWidgetTitleLayout extends LinearLayout {

    // This is the custom widget constructor.
    public CustomWidgetTitleLayout(Context context, AttributeSet attributeSet) {
        super(context);
        final Context tmpContext = context;

        // Inflate the custom widget layout xml file.
        LayoutInflater layoutInflater = LayoutInflater.from(context);
        layoutInflater.inflate(R.layout.activity_custom_widget_title_layout, this);

        // Get the previous button to add a click event listener.
        Button prevButton = (Button)findViewById(R.id.widgetPrevButton);
        prevButton.setOnClickListener(new OnClickListener() {
            @Override
            public void onClick(View view) {
                AlertDialog alertDialog = new AlertDialog.Builder(tmpContext).create();
                alertDialog.setMessage("You click Previous button");
                alertDialog.show();
            }
        });

        // Get next button to add a click event listener.
        Button nextButton = (Button)findViewById(R.id.widgetNextButton);
        nextButton.setOnClickListener(new OnClickListener() {
            @Override
            public void onClick(View view) {
                AlertDialog alertDialog = new AlertDialog.Builder(tmpContext).create();
                alertDialog.setMessage("You click Next button");
                alertDialog.show();
            }
        });
    }

}
3. Use The Custom Widget.
- Now you can use the above custom widget in your android app like below.
- Main Layout Xml File. Please note the custom widget class full pathname is the widget XML tag name and it must include the class package path.
<com.dev2qa.example.CustomWidgetTitleLayout android:layout_width="match_parent" android:layout_height="wrap_content" /> - Below is the activity java code. CustomWidgetActivity.java
package com.dev2qa.example;

import android.app.ActionBar;
import android.os.Bundle;
import android.support.v7.app.AppCompatActivity;

public class CustomWidgetActivity extends AppCompatActivity {

    @Override
    protected void onCreate(Bundle savedInstanceState) {
        super.onCreate(savedInstanceState);
        setContentView(R.layout.activity_custom_widget);

        setTitle("dev2qa.com - Android Custom Widget Example");

        // Because our custom widget implements an action bar function.
        // So we need to hide the default app action bar.
        ActionBar actionBar = getActionBar();
        if(actionBar!=null)
        {
            actionBar.hide();
        }
    }
}
If you can not watch the above video, you can see it on the youtube URL https://youtu.be/NTEafGrkn6w