When you execute an Android app after coding, you may always meet bellow errors in the android emulator. The simulator popup a dialog to tell you the android application has been stopped. If you are a newbie of android development, you may become very confused about why this happened, what’s wrong with the code. Do not worry, this article will tell you how to debug the error.
1. Steps To Debug Android Application Error.
- In the android studio, click the ” View —> Tool Windows —> Android Monitor ” menu to make the Android Monitor window displayed.
- Now you can see the Android Monitor is displayed at the bottom. Please make sure you choose the “Warn” and “No Filters” selection in the logcat tab as below.
- Click the Run button in the android studio top toolbar to run the application again, a lot of messages will be shown in the logcat window. You may find there is a java.lang.NullPointerException, you can click the java file link in the logcat window to navigate to the source code where the exception happened.
Caused by: java.lang.NullPointerException: Attempt to invoke virtual method 'void android.widget.Button.setOnClickListener(android.view.View$OnClickListener)' on a null object reference
 at com.dev2qa.example.activity.SwitchScreenActivity1.onCreate(SwitchScreenActivity1.java:26)
- If you feel the logcat window is not big enough, you can click the settings icon at the top right corner in the Android Monitor window, then click ” Resize —> Maximize Tool Window ” to maximize the logcat window.
- After clicking the java file link beside the exception in logcat window, you can go to the error happened source code. Click the column at the beginning of the code line to set a breakpoint.
- Click debug button, the execution will stop at the breakpoint. From the debugger window at the bottom, you can see that the btnToScreen2 object is null in this example. You can also mouse hover the btnToScreen2 object in java source code to find that it is null.
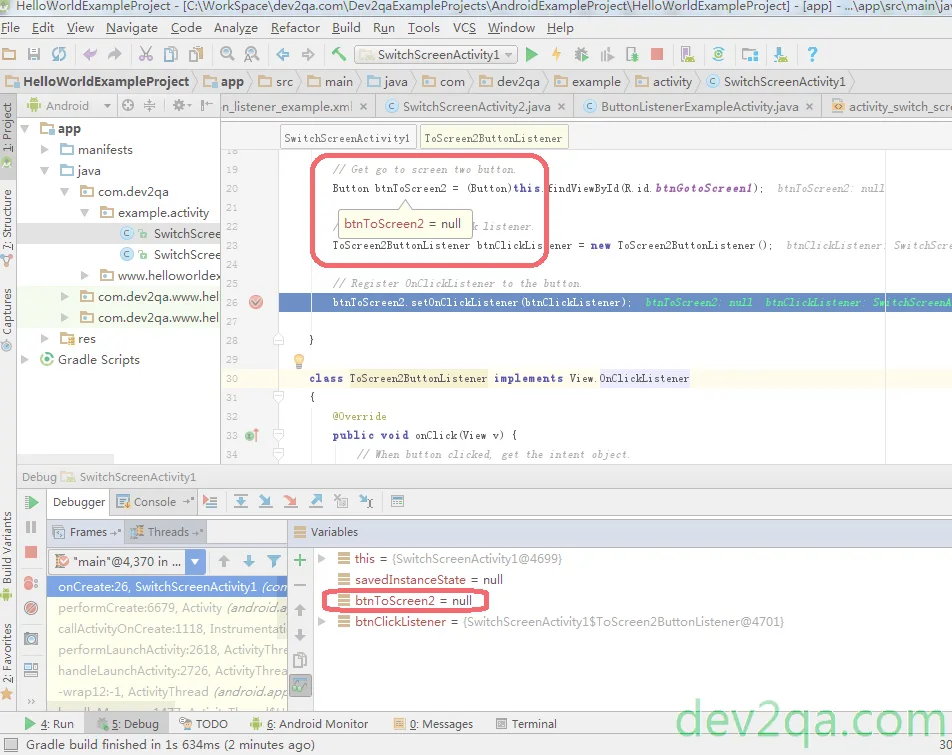
- Now you can find the error reason is wrong button id used, you should use id R.id.btnGotoScreen2 to replace R.id.btnGotoScreen1.
Button btnToScreen2 = (Button)this.findViewById(R.id.btnGotoScreen1);
- Change the java source code and run the application again, it will be started without any error messages.
- You can find the example source code in the article Android Activity Example – Switch Between Screens
2. Can Not Bind To Local 8616 For Debugger.
- If you meet can not bind to local 8616 for debugger error during the android app debug process use android studio, you can run the below shell command to fix it. Then you can debug your android app as normal.
adb kill-server
adb start-server