Bitbucket is a website which is owned by Atlassian company. It provides free private git repository services, your source code will not be exposed to the public when saved in their repository. It also provides a bitbucket server for you when you want to install the repository server on your own machine, but bitbucket server software needs some fees.
The Sourcetree is a free git client tool that is provided by bitbucket. It supports both Mac and Windows. If you want to use the git tool for Linux, you can read the article How To Use SmartGit In Ubuntu. This article will tell you how to set up a git repository in the bitbucket website and how to use Sourcetree to manage it.
1. How To Create Repository In Bitbucket.
- First, you should register a bitbucket account, or you can use a Google account to log in to bitbucket.
- After you log in, click Create ( + ) button in the left panel.
- Then click the Repository menu item in the popup menu list.
- Now it will popup Create a new repository window, input the repository name, check This is a private repository checkbox in the Access level section. Select your Version control system as Git or Mercurial, I select the Git radio button. Click the Advanced settings link to expand the advanced settings area. Select the repository used language from the Language drop-down list.
- Then click Create repository button to create it, after that you will see the new repository dashboard.
2. Install & Setup Source Tree.
- Download and install source tree for mac or windows. This step is very straightforward.
- When you run the source tree tool for the first time, it will show you the popup Registration dialog window. There are 2 option buttons on the Registration window, the Bitbucket Cloud option will let you connect your source tree client to the bitbucket repository that you just created on the bitbucket website. The Bitbucket Server option will let you connect the source tree client to your own bitbucket server.
- Click the Bitbucket Cloud button, it will open a web browser to display the bitbucket login page. You can log in to it with either your own bitbucket account or google account.
- After you log in successfully, you will see the Registration complete! dialog, click the Continue button.
- Then it will jump to the Preferences dialog, just click the Done button in it.
- After some while, it will open a window that lists all your repositories created on the bitbucket website.
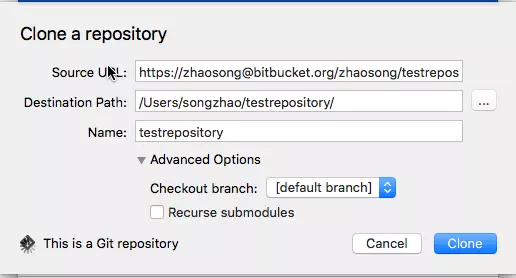
- You can click the Clone button to clone and download the repository data to your local machine directory. When you click the Clone link at the end of each repository line, it will pop up below dialog. The Source URL value should not be changed, you can select a different Destination Path in your local machine. Then click the Clone button to start the clone.
- When the cloning process is complete, you will see the source tree’s main window like below. If you create a new file such as hello in the local repository folder such as /Users/songzhao/testrepository, this folder is also the repository managed local root folder, then you can see there is a commit ready in source tree main window.
- Click the Commit button at the top left corner, input the commit description, and check Push changes immediately to origin/master checkbox, then click the Commit button to commit the changes to the remote bitbucket repository server.
- When the commit process is complete and successful, it will show Completed successfully in the popup committing dialog, otherwise, it will show you the error messages in that popup dialog to tell why the commit fails.