Pass parameters via URL in Django is not as same as java or Php which use a question mark and key-value pairs ( for example http://127.0.0.1:8080/login.jsp?username=jerry&password=12345678). Django uses a more clear, readable, and SEO-friendly way to pass parameters in URL like http://127.0.0.1:8080/login/jerry/12345678. The first section after login is the username, and the section after jerry is the password. This article will show you how to pass parameters through URL in Django.
1. Define Url Pattern In Django App urls.py File.
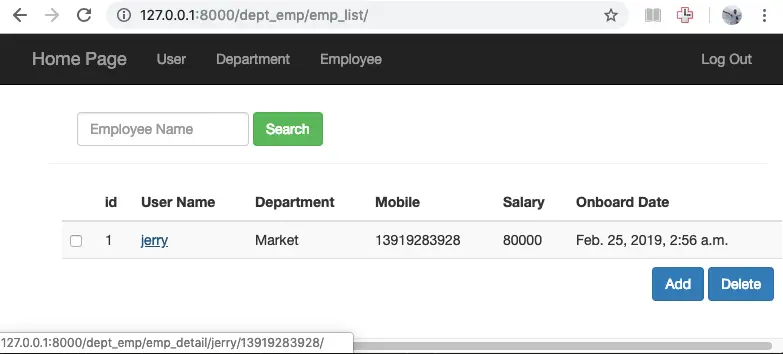
This example is based on Django Bootstrap3 Example, when the code complete, it will add a URL link to the employee name in the employee list page like below. When the user clicks the employee name, it will display the employee detail information page.
So we should add a URL pattern in the DjangoHelloWorld / dept_emp / urls.py file.
url(r'^emp_detail/(?P<user_name>\w+)/(?P<mobile_number>\d{10,18})/$', views.emp_detail, name='emp_detail'),
Above URL pattern means when client request http://……/emp_detail/param1/param2, the request will be processed by views.emp_detail function. And the views.emp_detail function has two additional parameters, one is user_name, the other is mobile_number.
The (?P<user_name>\w+) section means this is a URL parameter (?P), and the parameter value should be passed to views.emp_detail function’s user_name argument. The \w+ is a regular expression which means this URL parameter’s value should be more than one character or digits.
The (?P<mobile_number>\d{10,18}) section means this is a URL parameter (?P), and the parameter value should be passed to views.emp_detail function’s mobile_number argument. The \d{10,18} is a regular expression which means this URL parameter’s value should be digits only and the digit number’s length should between 10 and 18.
With this URL pattern defined in the urls.py file, when the client request http://127.0.0.1:8000/dept_emp/emp_detail/jerry/13901234567/, then the request will be processed by views.emp_detail function, and the user_name parameter’s value is jerry and the mobile_number parameter’s value is 13901234567.
2. Define View Function In Django App views.py File.
Now let us define the emp_detail function in DjangoHelloWorld / dept_emp / views.py file.
''' This function will retrieve employee detail information and return the emp_detail.html page to client.
    This function contains two url parameter user_name and mobile_number.
'''
@login_required()
def emp_detail(request, user_name, mobile_number):

    # define the returned employee object as None.
    emp = None

    # cast the request mobile_number from string to integer type.
    mobile_number_integer = int(mobile_number)

    # filter out the Employee object list with passed in username and mobile number.
    emp_list = Employee.objects.filter(user__username=str(user_name), emp_mobile=mobile_number_integer)

    # if emp_list is empty, then you can use hard coded username and emp_mobile value to test whether the code is correct or not.
    #emp_list = Employee.objects.filter(user__username='jerry', emp_mobile=13901234567)

    # get the returned Employee object.
    if len(emp_list) > 0:
        emp = emp_list[0]
    else:
        emp = None

    # return the emp_detail.html template file to client, and pass the filtered out Employee object.
    return render(request, 'dept_emp/emp_detail.html',
                  {'emp': emp})
3. Define The emp_detail.html Page.
In the above views.py emp_detail function, we redirect the user to dept_emp/emp_detail.html template page. So we should add this HTML template in folder DjangoHelloWorld / templates / dept_emp.
Below is the page content, it will display the employee detail information data in a table. Because this employee may belong to multiple departments, so Employee and Departments object is many to many relationships, so the employee’s department value is retrieved by {{ emp.get_dept_values }}, please read the article How To Get Many To Many Model Field Values In Django View.
<!DOCTYPE html>
<html lang="en">
<head>
    <title>Employee Detail Information Page</title>
</head>
<body>
{% extends "./base.html" %}
{% block content %}

    <div class="container theme-showcase margin-top-navbar" role="main" style="margin-top: 50px">


    <div class="row">
        <div class="col-md-12">
            <table class="table table-striped">


    {% if emp is not None %}

      <!-- employee detail information-->


                <tr>
                    <td>Id:</td><td>{{ emp.id }}</td>
                </tr>

                <tr>
                    <td>User name:</td><td>{{ emp.user.username }}</td>
                </tr>

                <tr>
                    <td>Mobile number:</td><td>{{ emp.emp_mobile }}</td>
                </tr>

                <tr>
                    <td>Salary:</td><td>{{ emp.emp_salary }}</td>
                </tr>

                <tr>
                    <td>Onboard date:</td><td>{{ emp.emp_onboard_date }}</td>
                </tr>

                <tr>
                    <td>Department:</td><td>{{ emp.get_dept_values }}</td>
                </tr>

    {% else %}
        <tr>
            <td>
                No employee data returned.
            </td>
        </tr>

    {% endif %}
            </table>

            </div>
        </div>
    </div>


{% endblock %}
</body>
</html>
4. Use Django url Tag To Generate Url Link In Template Html Page.
Now we need to add the employee name URL link in DjangoHelloWorld / templates / dept_emp / emp_list.html page by editing the below code.
{% for emp in emp_list %}
      <tr>
          <td><input type="checkbox" id="emp_{{ emp.id }}" name="emp_{{ emp.id }}"></td>
          <td>{{ emp.id }}</td>
          <!-- Because you defined the emp_detail view has two parameter in the url, one is user_name, the other is mobile_number.So use Django url tag to render it. -->
          <td><a href="{% url 'dept_emp:emp_detail' user_name=emp.user.username mobile_number=emp.emp_mobile %}">{{ emp.user.username }}</a></td>
          <td>{{ emp.get_dept_values }}</td>
          <td>{{ emp.emp_mobile }}</td>
          <td>{{ emp.emp_salary }}</td>
          <td>{{ emp.emp_onboard_date }}</td>
      </tr>
{% endfor %}
5. Run The Example.
When you run this example, it will show a URL link for the employee name in the employee list page like below.
When you click the employee name, it will show the employee detail information page like below.

How can you pass a parameter that has a slash in it? (ex:
https://www.cnn.com/travel/...) I am trying to do this and it is telling me the URL is invalid as there are too many slashes.Thank you so much! Helped a lot.
I create a website with django. The website template html page has a table, and the table list user accounts data from facebook. When user click the facebook user account name link, it will send the request to my django server and retrieve the facebook user account detail data to show.
Below is the django template page source code.
{% for account in facebook_account_list %}
<tr>
<td><a href=”{% url ‘INI:facebook_pages’ %}”>{{ account.uid }}</a></td>
<td>{{ account.extra_data.first_name }}</td>
<td>{{ account.extra_data.last_name }}</td>
<td>{{ account.extra_data.email }}</td>
</tr>
{% endfor %}
Below is the view method facebook_pages which handle the URL link clicking in the above table.
def facebook_pages(request, fbuser):
# Get request facebook account id.
djuser = request.user.id
……
……
When I add the user account id in the facebook name link URL, it can get the user id in the facebook_pages view method, but I do not want to do like this, because it is not secure to make the user id exposed in the URL. Is there any method to fix this issue? Can I send the facebook user id in post method? Thanks.
I think what you want to do is to hide the Facebook user account id in the request to avoid data leak, am I right? If this is just what you need, you can follow the below methods.
1.Send the user account id with the POST method in a Django form. Then you can get the user account id in your Django project views.py file with the code request.POST.get(‘fb_user_id’).
2.You can also save the Facebook user id in a session with the code request.session[‘fb_uid’] = 123456789, and then get it from the session in views.py file with the code fb_uid = request.session.get[‘fb_uid’].
3.You can encode the Facebook user-id in the URL, and then decode it in your Django project’s views.py file.