This example will tell you how to create a rounded border button in swift. It will also tell you how to align buttons in the iOS app’s main screen, how to set the button background color, how to set button width and height etc.
1. Rounded Border Button Example UI.
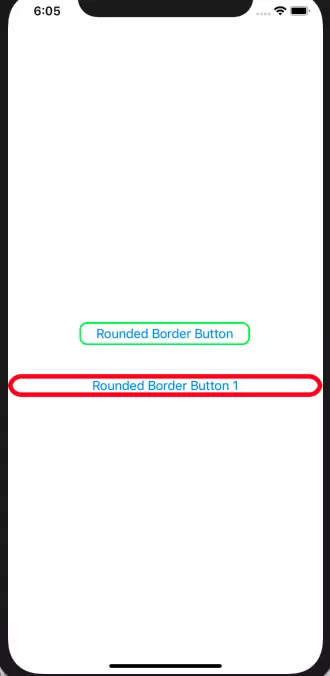
- First, let us look at the example execution screen as below picture.
- When the example code run, it will display two rounded border button.
- One button is located at the screen center ( both horizontal and vertical ), it’s border’s color is green.
- The other button is located below the first button, and it’s border color is red, it’s width fills the screen width horizontally.
- All the two buttons have 4 rounded corners.
2. How To Create The Example Project And Prerequisites.
- First, we should create a new swift Xcode project, you can refer article How To Create A Swift Project In Xcode. The project name is RoundedBorderButton.
- Add two buttons from Xcode Library, you can read the article How To Display Xcode Library, Assistant Editor, Inspectors Window. Double click the button to edit button text.
3. How To Make The First Button Locate At Screen Center.
- Click the first button to make it selected, then click View —> Inspectors —> Show Size Inspector menu item at Xcode top menu bar to display the Xcode Size Inspector panel window.
- Click both Center Horizontally In Container and Center Vertically In Container item in View —> Arrange —> Position View drop-down list. Then you will find the button is located at the screen center both horizontally and vertically.
4. How To Make Button Fill The Screen Width.
- Select the second button, then show the Size Inspector panel window as above.
- Click Fill Container Horizontally item in View —> Arrange —> Position View drop-down list. Then you will find the button to fill the screen width.
5. How To Set Button Rounded Border In Swift Source Code.
- First, we need to show Xcode Assistant Editor, after that we can see both the storyboard window and source code window side by side. You can read the article How To Display Xcode Library, Assistant Editor, Inspectors Window to learn more.
- Then add connections between storyboard and ViewController source code in assistant editor ( you can read article How To Connect Storyboard UI Component To ViewController Class Code ).
- I add two UIButton type outlet variables roundBorderButton and roundBorderButton1, then you can use these two property variables to modify the two button’s attributes.
@IBOutlet weak var roundBorderButton: UIButton!

@IBOutlet weak var roundBorderButton1: UIButton!
- Now you can change the button attribute to make it’s border rounded by override the ViewController‘s viewDidLoad() function.
- Below is the ViewController.swift file’s source code.
//
//  ViewController.swift
//  RoundedBorderButton
//
//  Copyright © 2019 dev2qa.com. All rights reserved.
//

import UIKit

class ViewController: UIViewController {

    /* Declare two IBOutlet variable to refer to the two button in storyboard. */
    @IBOutlet weak var roundBorderButton: UIButton!
    @IBOutlet weak var roundBorderButton1: UIButton!


    override func viewDidLoad() {
        super.viewDidLoad()

        // Clear the first button's background color.
        roundBorderButton.backgroundColor = UIColor.clear

        // Set button corner radius.
        roundBorderButton.layer.cornerRadius = 10

        // Set button border width.
        roundBorderButton.layer.borderWidth = 2

        // Set button border color to green.
        roundBorderButton.layer.borderColor = UIColor.green.cgColor


        // Below is similar settings for the second button.
        roundBorderButton1.backgroundColor = UIColor.clear
        roundBorderButton1.layer.cornerRadius = 18
        roundBorderButton1.layer.borderWidth = 6
        roundBorderButton1.layer.borderColor = UIColor.red.cgColor

    }


}