When you develop an iOS app use swift, if you have some older function wrote by objective-c language, you can use the Objective-C bridging header file to import your objective-c header files to the swift project. And then you can invoke the objective-c class function from your app’s swift code. This article will tell you how to do it with an example.
1. How To Add Objective-C Headers File Into Swift Project Steps.
- First, you should create an Xcode swift project. You can read the article How To Create A Swift Project In Xcode, How To Create Xcode Workspace And Add New / Exist Project Into It if you do not know.
- If you have an old Objective-C file, you should not copy it into the project directly. You had better create a new Objective-C class file and then copy your old Objective-C .h and .m file’s code content into the newly created file accordingly follow the below steps.
- Click File —> New —> File menu item at Xcode top menu bar.
- Then select Cocoa Touch Class template in the iOS tab. This will create both the objective-c .h and .m files, if you want to create the objective-c .h and .m file separately, you can select Objective-C File and Header File template separately. Click the Next button.
- It will show the Choose options for your new file wizard dialog. Input the cocoa touch class name in the Class: input text box in the next wizard dialog window, select the NSObject class in the Subclass of: drop-down list and select Objective-C coding language in the Language: drop-down list. Click the Next button.
- Select the existing swift project folder in the next dialog, check the checkbox before the swift project ( TestProject ) in the Targets list, then click the Create button to create the cocoa touch class.
- If this is the first time you create an Objective-C class file in the swift project, it will pop up a dialog to ask you whether you need to configure an Objective-C Bridging Header file or not, click the Create Bridging Header button in the dialog. Below are the dialog messages.
Would you like to configure an Objective-C bridging header?

Adding this file to TestPro5wift will create a mixed Swift and Objective-C target.
Would you like Xcede to automatically configure a bridging header to enable
classes to be accessed by both languages?

Cancel     Don't Create       Create Bridging Header
- If you do not see the above dialog, that means you had created an objective-c class file before, and it will not create the objective-c bridging header file for you automatically. I will tell you how to add the Objective-C bridging header file and configure it manually in another article.
- Now you can see the objective-c .h and .m file ( TestObjectiveCClass.h & TestObjectiveCClass.m ) is listed at Xcode left navigator panel. It will also create an Objective-C Bridging Header file in the swift project, the file name is <Project Name>-Bridging-Header.h ( TestProject-Bridging-Header.h )
- Now add the below code in TestProject-Bridging-Header.h file to import the objective-c class header file.
#import "TestObjectiveCClass.h"
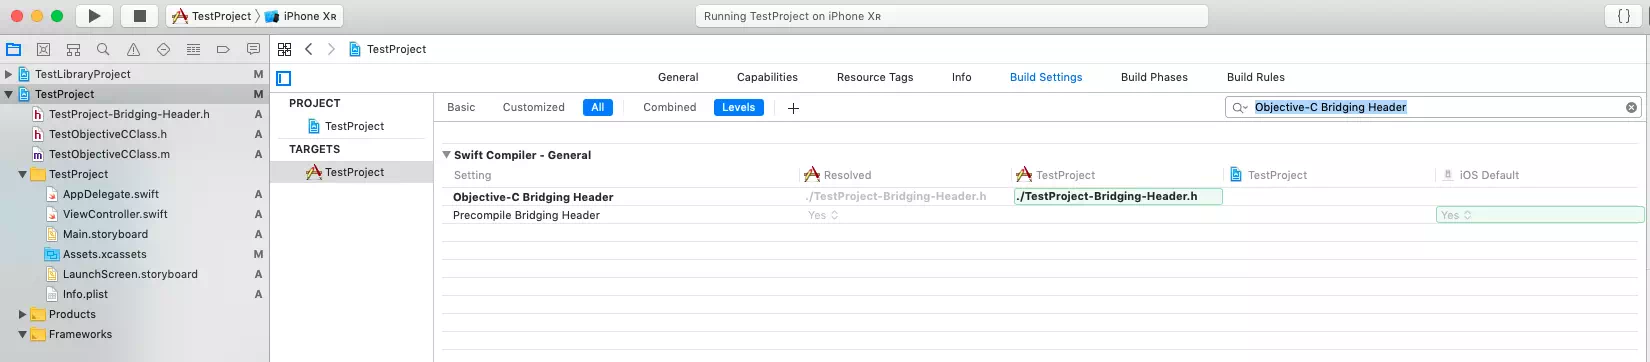
- Now when you click TestProject in Xcode left navigator pane, then click TestProject in the center editor TARGETS list, then click Build Settings tab at the top of target detail panel and search Objective-C Bridging Header in the panel search box, you can see Xcode has already added the Objective-C Bridging Header file path and name in the related item.
2. How To Invoke Objective C Class In Swift Source Code.
- Now add below objective-c source code in TestObjectiveCClass.h and TestObjectiveCClass.m file.
- TestObjectiveCClass.h
//
//  TestObjectiveCClass.h
//  TestProject
//
//  Copyright © 2019 dev2qa.com. All rights reserved.
//

#import <Foundation/Foundation.h>

NS_ASSUME_NONNULL_BEGIN

@interface TestObjectiveCClass : NSObject

// Declare a static class method.
+(void)printHello;

// Declare an instance method.
-(NSString *)sayHello;

@end

NS_ASSUME_NONNULL_END
- TestObjectiveCClass.m
// // TestObjectiveCClass.m // TestProject // // Copyright © 2019 dev2qa.com. All rights reserved. // #import "TestObjectiveCClass.h" @implementation TestObjectiveCClass +(void)printHello{ // Print log message. NSLog(@"Hello from objective-c class."); } // This function will return an NSString object with string messages. -(NSString *)sayHello{ NSString * var; var = @"Hello from objective-c class."; return var; } @end - Add below source code in swift project ViewController.swift file.
ViewController.swift// // ViewController.swift // TestProject // // Copyright © 2019 dev2qa.com. All rights reserved. // import UIKit class ViewController: UIViewController { var message:String = "" override func viewDidLoad() { super.viewDidLoad() // Call objective-c class method directly. TestObjectiveCClass.printHello() // Create an instance of objective-c class. let testObject:TestObjectiveCClass = TestObjectiveCClass() // Invoke the objective-c class's instance method. message = testObject.sayHello() // Print the message in Xcode debug console. print(message) } } - When you run the example, you can see the below output in Xcode debug area activate console.
2019-08-07 22:27:53.410723+0800 TestProject[3082:126700] Hello from objective-c class.
Hello from objective-c class.