LinearLayout is a very important layout in android applications. This layout will align the components it contains in the linear direction. The direction can be vertical or horizontal which is specified by LinearLayout property android: orientation.
1. LinearLayout Orientation.
- android: orientation‘s value can be vertical or horizontal. This value decides the view objects order direction contained in the LinearLayout.
- The android: orientation value is vertical in the below XML code. And the android: layout_width value is match_parent, so you can see the below picture.
<LinearLayout
    android:layout_width="match_parent"
    android:layout_height="wrap_content"
    android:orientation="vertical">

    <Button
        android:layout_width="match_parent"
        android:layout_height="wrap_content"
        android:text="Login"/>

    <Button
        android:layout_width="match_parent"
        android:layout_height="wrap_content"
        android:text="Register"/>

    <Button
        android:layout_width="match_parent"
        android:layout_height="wrap_content"
        android:text="Reset"/>

</LinearLayout>
- When android: orientation value is vertical, the android: layout_height value can not be match_parent, it’s value can only be wrap_content. Otherwise, the first button will overlap the other two buttons.
- If you change the android: orientation value to horizontal in the above XML code. You must change the android: layout_width value to wrap_content also, otherwise the first button will overlap the other two buttons also.
<LinearLayout android:layout_width="match_parent" android:layout_height="wrap_content" android:orientation="horizontal"> <Button android:layout_width="wrap_content" android:layout_height="wrap_content" android:text="Login"/> <Button android:layout_width="wrap_content" android:layout_height="wrap_content" android:text="Register"/> <Button android:layout_width="wrap_content" android:layout_height="wrap_content" android:text="Reset"/> </LinearLayout> - LinearLayout Do Not Support Scroll: If you have a lot of controls in the LinearLayout, you need to wrap the LinearLayout with ScrollView which supports vertical scroll. Or you can use ListView to replace LinearLayout also.
<ScrollView android:layout_width="match_parent" android:layout_height="wrap_content"> <LinearLayout android:layout_width="match_parent" android:layout_height="match_parent" android:orientation="vertical"> <ImageView android:layout_width="match_parent" android:layout_height="wrap_content" android:src="@drawable/img1"/> ............. </LinearLayout> </ScrollView> - For horizontal scroll, you need to wrap the LinearLayout with HorizontalScrollView as below.
<HorizontalScrollView
    android:layout_width="match_parent"
    android:layout_height="wrap_content">
        <LinearLayout
            android:layout_width="match_parent"
            android:layout_height="match_parent"
            android:orientation="horizontal">

            <ImageView
                android:layout_width="wrap_content"
                android:layout_height="wrap_content"
                android:src="@drawable/img1"/>

            .............
        </LinearLayout>
</HorizontalScrollView>
2. Layout Gravity.
- android:layout_gravity is used to specify how the control object is aligned in the layout. android: gravity is used to specify how the text in the control is aligned.
- Please note, when the orientation of the LinearLayout is horizontal, only vertical alignment ( top, center_vertical, bottom ) layout gravity value will take effect, because the length of the horizontal is not fixed.
- Similarly, when the LinearLayout orientation is vertical, only the horizontal alignment ( left, center_horizontal, right) layout gravity value will take effect.
<LinearLayout
    android:layout_width="match_parent"
    android:layout_height="match_parent"
    android:orientation="vertical">

    <Button
        android:layout_width="wrap_content"
        android:layout_height="wrap_content"
        android:layout_gravity="left"
        android:textAllCaps="false"
        android:text="Login"/>

    <Button
        android:layout_width="wrap_content"
        android:layout_height="wrap_content"
        android:layout_gravity="center_horizontal"
        android:textAllCaps="false"
        android:text="Register"/>

    <Button
        android:layout_width="wrap_content"
        android:layout_height="wrap_content"
        android:layout_gravity="right"
        android:text="Reset"/>

</LinearLayout>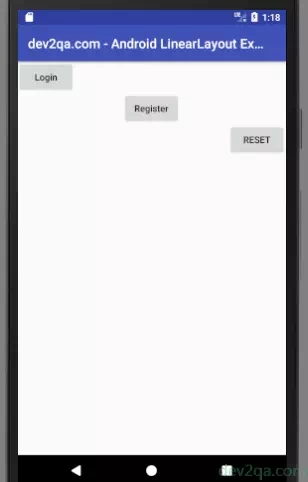
- In this example, the first two button’s text characters are not all upper case, the third button’s text characters are all upper case. This is because we set the android:textAllCaps=”false” for the first two buttons.
3. Layout Weight.
- android:layout_weight allows us to specify the size of the control in a proportional manner. It plays a very important role in the adaptation of mobile phone screens.
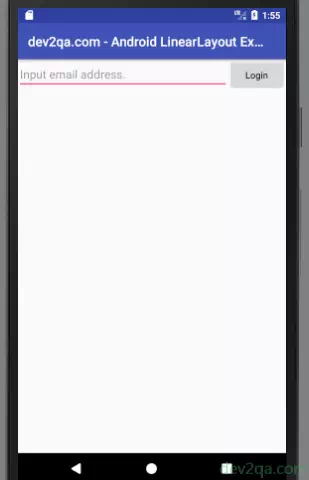
- Below LinearLayout XML contains an input text box and a button. And the LinearLayout orientation is horizontal.
- The android:layout_weight value for each of the controls is 1, this can make the input text box and the button the same width and split the screen width also.
<LinearLayout
    android:layout_width="match_parent"
    android:layout_height="match_parent"
    android:orientation="horizontal">

    <EditText
        android:layout_width="0dp"
        android:layout_height="wrap_content"
        android:layout_weight="1"
        android:hint="Input email address."/>

    <Button
        android:layout_width="0dp"
        android:layout_height="wrap_content"
        android:textAllCaps="false"
        android:layout_weight="1"
        android:text="Login"/>

</LinearLayout>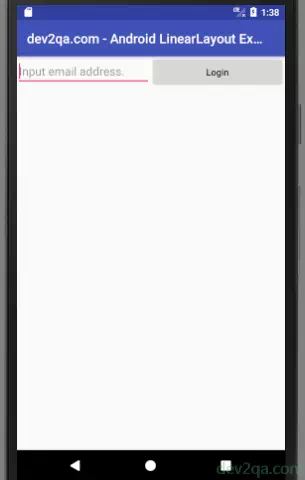
- Please Note The android:layout_width must be 0 dp in the above example, otherwise, the width of each control will not be the same.
- For example, if you set the android:layout_width value to wrap_content for both two controls in the above XML, you will get the below picture.
- Layout_weight Algorithm: The system will first add the layout_weight value specified by all controls in the LinearLayout, and get a total value. Then the size proportion of each control is the amount of layout_weight of that control divided by the total value we just calculated.
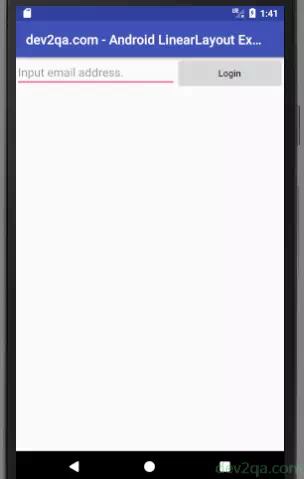
- For this example, we can make the screen better by using the below XML. We only set the EditText android:layout_weight to 1, and set the Button’s android:layout_width value to wrap_content. And do not set the Button’s android:layout_weight.
<LinearLayout
    android:layout_width="match_parent"
    android:layout_height="match_parent"
    android:orientation="horizontal">

    <EditText
        android:layout_width="0dp"
        android:layout_height="wrap_content"
        android:layout_weight="1"
        android:hint="Input email address."/>

    <Button
        android:layout_width="wrap_content"
        android:layout_height="wrap_content"
        android:textAllCaps="false"
        android:text="Login"/>

</LinearLayout>