In this article, I will show you how to install tomcat 9 on windows 10 correctly.
1. Prerequisites.
- The tomcat 9 supports JDK version 8 and later. So you need to install JDK 8 or higher version to run tomcat 9.
- You can open a dos window and run the command java -version to check the current installed JDK version.
> java -version
java version "1.8.0_131"
Java(TM) SE Runtime Environment (build 1.8.0_131-b11)
Java HotSpot(TM) 64-Bit Server VM (build 25.131-b11, mixed mode)
- If your JDK version is less than 8.0, you can click here to download JDK 8 according to your operating system.
2. Install Tomcat And Start It From Command-Line.
- Many web application developers like to run Tomcat from command-line, in most cases, they just run it from eclipse they used. Following are the steps to achieve this.
- Click here to go to the Tomcat 9.0 download page.
- You can find the download link on the above page Binary Distributions/Core area.
- Because I want to demo how to start Tomcat from the command line, so I download the Tomcat zip file, this is a cross-platform version.
- Unzip the zip file into a local folder like D:\Work\Tool\apache-tomcat-9.0.45\.
- Edit the conf\web.xml file under your installation directory. It is D:\Work\Tool\apache-tomcat-9.0.45\conf\web.xml in my Windows 10.
- Search text org.apache.jasper.servlet.JspServlet in web.xml file and add the 2 initial parameters ( compilerSourceVM, compilerTargetVM ) in it like below.
<servlet> <servlet-name>jsp</servlet-name> <servlet-class>org.apache.jasper.servlet.JspServlet</servlet-class> <init-param> <param-name>fork</param-name> <param-value>false</param-value> </init-param> <init-param> <param-name>xpoweredBy</param-name> <param-value>false</param-value> </init-param> <init-param> <param-name>compilerSourceVM</param-name> <param-value>1.8</param-value> </init-param> <init-param> <param-name>compilerTargetVM</param-name> <param-value>1.8</param-value> </init-param> <load-on-startup>3</load-on-startup> </servlet> - Now the Tomcat will compile JSP files with language features provided by Java SE 8 after adding the above 2 servlets init parameters.
- Before you can start it up, you need to set JAVA_HOME system environment variable’s value to the JDK 8 ‘s home you just installed. You can read the article How To Set Java Environment Variable JAVA_HOME, CLASSPATH, PATH to learn more.
- If you do not set the JAVA_HOME environment variable, when you start Tomcat it will display an error message like below.
D:\Work\Tool\apache-tomcat-9.0.45\bin> .\startup.bat
Neither the JAVA_HOME nor the JRE_HOME environment variable is defined
At least one of these environment variable is needed to run this program
- After setting JAVA_HOME environment variable, you need to restart your dos window or shell window to make the settings take effect.
- Then you can start up Tomcat by run the command startup.bat ( Windows ) or startup.sh ( Linux ) command in Tomcat bin folder.
cd D:\Work\Tool\apache-tomcat-9.0.45\bin
> startup.bat
- Then Java console window popup and displaying the log information generated by the Tomcat process.
- When you see a message like Server startup in 1000 ms in the java console, that means it has been started successfully and is ready to process the client request.
- Open a web browser and browse URL http://localhost:8080/, then you will see the Apache Tomcat home page.
3. Install Tomcat As Windows Service.
Install and run Tomcat as windows service is commonly used in production and quality assurance environment.
3.1 Advantages of install tomcat as a windows service.
- Tomcat server startup do not need active administrator login.
- Tomcat server startup automatically when your server restart. This is very useful because in many cases you may need to restart your windows server. With this feature, you do not need to log in to your windows to start it again after os restart. Because as a windows service it will start automatically when os started.
- It is more secure when running a Tomcat server under a specific system account than an administrator account.
3.2 Steps to install tomcat as a windows service.
- Download the Tomcat windows installer file, the file name is 32-bit/64-bit Windows Service Installer.
- Click the installer to install Tomcat use default settings step by step.
- When you click the Finish button on the last screen. It will popup a progress bar to tell you that it just installing the Tomcat server as a windows service.
- After installation, click the Windows start menu, you can see the Apache Tomcat 9.0 Tomcat9 menu folder.
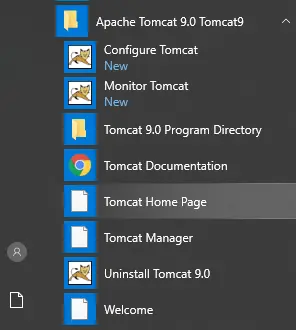
- When you click the Configure Tomcat sub-menu for the first time, it will prompt a dialog window with the error message The item referred to by this shortcut cannot be accessed. You may not have the appropriate permissions.
- To fix the above error, you can click the Tomcat 9.0 Program Directory sub-menu and it will popup an alert dialog with the message You don’t currently have permission to access this folder. Click Continue to permanently get access to this folder. Then you can click the Continue button and it will open the tomcat install folder.
- Now click the Configure Tomcat sub-menu again will open the Apache Tomcat 9.0 Tomcat9 Properties dialog window.
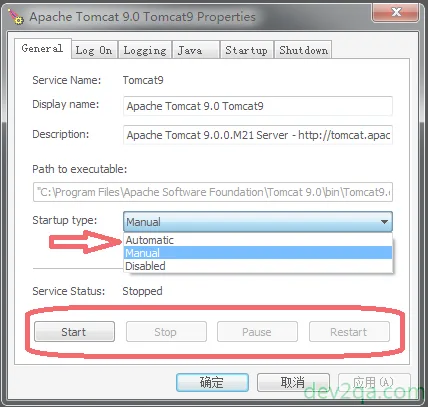
- In the above Apache Tomcat 9.0 Tomcat9 Properties dialog window, you can configure to start the tomcat manually or automatically when windows startup. You can also stop, pause, restart it by clicking different buttons.
4. Different between Tomcat9.exe and Tomcat9w.exe.
- There are two wrapper programs in the Apache Tomcat bin directory, one is Tomcat9.exe the other is Tomcat9w.exe.
- Tomcat9.exe is the wrapper program that makes it run as a windows service in the background. We can see this from the above Apache Tomcat 9.0 Tomcat9 Properties dialog window Path to executable text box.
- .You can run it with a lot of input parameters. You can find all the parameters description and how to use them by click here.
- Tomcat9w.exe is the wrapper program that will pop up the Apache Tomcat 9.0 Tomcat9 Properties configure panel. You can do a lot of configuration in that panel.
- You can leave comments in this article. Our expert will respond to you asap.
5. Question & Answer.
5.1 Can not start tomcat service as windows service.
- I can run the Tomcat portable version ( the zip file version ) from command line successfully, for example, run the command startup.bat to start tomcat. Now I want to install Tomcat as a Windows service, then I open a dos window as windows administrator and run the command tomcat_home/bin/service.bat install, and its success. I can see the Tomcat Service in Windows Services list. But when I click the Start button in Windows Service to start it, it prompts the below error messge. Windows could not start the Apache Tomcat 9 on Local Computer. For more information, review the System Event Log. And I find the below error message in the Windows system event log. Apache Tomcat 9 service terminated with the following service-specific error: The operation completed successfully. How to fix this error.