Servlet is the most important web component in the Java EE Web application. It is also the foundation of many Java EE frameworks such as Spring, JSF, Struts, etc. In this article, we will show you how to write a basic hello world servlet java program use eclipse step by step.
1. Steps To Create Java Servlet Use Eclipse.
- Open Eclipse and create a dynamic web application project. If you do not know how to do that, please click the above link to learn how to use tomcat and create a web application use Eclipse first.
- Right-click project name, click New —> Servlet in the popup menu.
- Input Java package name such as com.dev2qa.example.servlet, and Class name such as HelloWorld in the Create Servlet dialog. Please note that your class’s superclass is javax.servlet.http.HttpServlet.
- Click the Next button, input “This is the first web application hello world example.” in the Description input text box.
- Please note the URL mappings section, we will use this mapping path to access this servlet.
- The mapping path is the context path relative to the web application’s context path. For example, if you access your application by URL http://localhost:8080/Dev2qaWebAppExample/, then you need to use http://localhost:8080/Dev2qaWebAppExample/HelloWorld to access the HelloWorld servlet running in the web application.
- The Initialization parameters: list are used to save configuration settings such as username and password, java database connection URL, etc. We will use it later in this example.
- Click Next, you will see a lot of servlet life cycle methods in the next panel. Just check init(), doGet(), doPost() and destroy() methods, article Servlet Life Cycle has a detail introduction for those methods.
- Click the Finish button to complete the wizard.
- You may can not find configuration xml added in web.xml, but you can find below added java code in HelloWorld.java file. This is because Tomcat 7.0 and above versions is servlet 3.0 compatible, and servlet 3.0 will use annotation to replace XML configuration in web.xml.
@WebServlet( urlPatterns = { "/HelloWorld" }, initParams = { @WebInitParam(name = "username", value = "Jerry Zhao") }) public class HelloWorld extends HttpServlet { private static final long serialVersionUID = 1L; - To configure it in web.xml, you need to change the project’s dynamic web module’s version to 2.5 or lower then create another servlet again.
2. Steps To Add Servlet Configuration In web.xml Automatically.
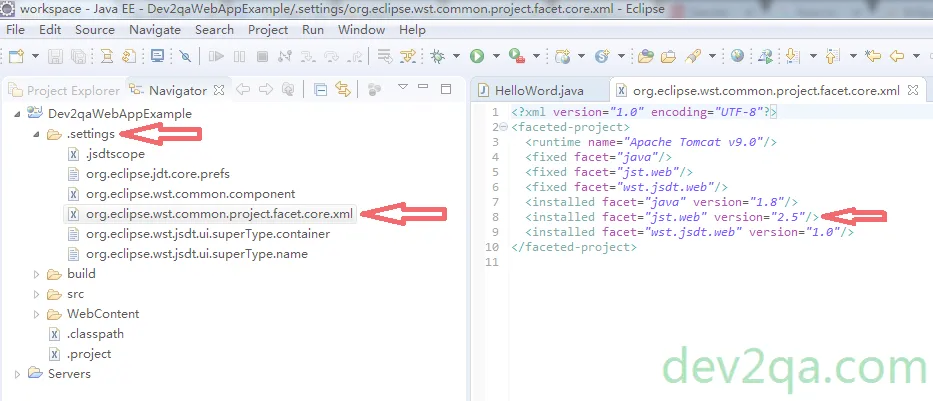
- Click Window —> Show View —> Navigator in eclipse main menu.
- Click .settings folder —> org.eclipse.wst.common.project.facet.core.xml file in left panel. Change facet jst.web‘s version value to 2.5 in right panel.
- Create another servlet within package com.dev2qa.example.servlet, and the class name is HelloWorld1. Then you can see the below XML configuration added in web.xml.
<servlet> <description></description> <display-name>HelloWorld1</display-name> <servlet-name>HelloWorld1</servlet-name> <servlet-class>com.dev2qa.example.servlet.HelloWorld1</servlet-class> <init-param> <param-name>username</param-name> <param-value>Jerry Zhao</param-value> </init-param> <load-on-startup>-1</load-on-startup> </servlet> <servlet-mapping> <servlet-name>HelloWorld1</servlet-name> <url-pattern>/HelloWorld1</url-pattern> </servlet-mapping> - You can also select dynamic web module version 2.5 when you create the web application project.
- Click File —> New —> Dynamic Web Project in eclipse main menu.
- In the popup Dynamic Web Project dialog, choose version 2.5 in the Dynamic web module version drop-down list.
3. Write Java Code In Hello World Example Project.
- We will now create java code for our project.
- Write below java code in HelloWorld.java’s doGet() method.
PrintWriter pw = response.getWriter(); pw.println("Hello World in doGet() method."); - Right-click your project name, click Debug As —> Debug On Server to start Tomcat for debugging.
- After Tomcat server startup. Input URL http://localhost:8080/Dev2qaWebAppExample/HelloWorld in your favorite web browser. Click Enter key, you will see the HelloWorld servlet page with the message Hello World in doGet() method.
- Write below java code in HelloWorld.java’s doPost() method.
PrintWriter pw = response.getWriter(); pw.println("Hello World in doPost() method." + this.userName); - Because we need to get the init parameter username’s value in above java code. So we should add a String type instance variable userName, and get it’s value in init() method. We can only get init parameter in init() method otherwise there will have a null pointer exception occurred in run time.
private String userName = ""; public void init(ServletConfig config) throws ServletException { userName = config.getInitParameter("username"); } - Add below html code in index.jsp file which is the welcome file.
<form action="/Dev2qaWebAppExample/HelloWorld" method="post">
<input type="submit" value="Submit"/>
</form>
- Browse URL “http://localhost:8080/Dev2qaWebAppExample/”, click the Submit button on the page. Then you will see the HelloWorld servlet success web page with the message Hello World in doPost() method. Jerry Zhao.