This article will show you how to use android studio to create an android Hello World example. It also explains the main example files and their role and relation.
1. Create android hello world example steps.
You can read the article Android Development Environment Setup first if you do not know.
- Open android studio by clicking Widows Start —> Android Studio —> Android Studio.
- Click Start a new Android Studio project link in the Welcome to Android Studio windows dialog.
- In the Create New Project window, input android project settings such as Application name ( for example HelloWorldExampleProject ), Company domain ( for example www.dev2qa.com ), and browse to select the Project location ( project saved directory), then click the Next button.
- In the Add an Activity to Mobile window, choose the default activity for this project. Select ” Empty Activity ” in this example then click the Next button.
- In the Customize the Activity window dialog, input the Activity Name(MainActivity) and the Layout Name(activity_main), you can use the default setting values here, click the Next button.
- Click the Finish button to complete the setup wizard.
2. Android project file explanation.
- Now the new android project has been created completely, you can see there has a lot of files in the android studio left panel tree.
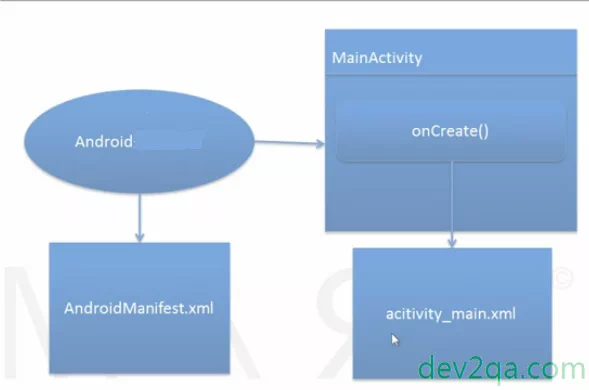
- The most important three files are AndroidManifest.xml, MainActivity.java, and activity_main.xml, we will explain them one by one.
- The below picture shows the relationship between the above three files.
- Below is the above 3 files in the android hello world project.
D:\WORK\DEV2QA.COM-EXAMPLE-CODE\ANDROIDEXAMPLEPROJECT\HELLOWORLDEXAMPLEPROJECT
│
├─app---
│      │
│      ├─main
│      │  │  AndroidManifest.xml
│      │  │
│      │  ├─java
│      │  │  └─com
│      │  │      └─dev2qa
│      │  │          │
│      │  │          └─www
│      │  │              └─helloworldexampleproject
│      │  │                      MainActivity.java
│      │  │
│      │  └─res
│      │      ├─layout
│      │      │      activity_main.xml
- AndroidManifest.xml: When the android app starts, the android operating system will read this file first, it is an XML file that includes the default activity information. Android will create the activity component configured in it. From this file, we can see the default activity is MainActivity. If you want android to use another activity as a startup activity, you can change the settings here.
- MainActivity.java: Double click this file in the left panel, you can see it extends the class
android.support.v7.app.AppCompatActivity, and it should override theonCreate(Bundle savedInstanceState)method. This method will be executed when this activity is called.public class MainActivity extends AppCompatActivity { @Override protected void onCreate(Bundle savedInstanceState) { super.onCreate(savedInstanceState); setContentView(R.layout.activity_main); } } - The
setContentView(R.layout.activity_main)method in the above code is used to set the content view layout file. The layout file will control how to display the UI components in activity view. And it is referenced withR.layout.activity_main. And activity_main is just the layout file name. - Android tools create the
Rclass dynamically before compiling the java source code, it includes all the resource files such as layout, UI components, image, string, id, etc. You can use it to reference all the resources. - activity_main.xml: This file located in the res/layout folder. It defines what components to display and how to display them in referenced activity view. Double click this file, you can see the content in the right panel, it has a Design view and a Text view, you can click the bottom Design and Text tab to switch.
- Our example activity_main.xml has been customized to below. We add an id to the TextView component, set it’s layout width and height value to match_parent, change the text, text color, size, and style.
<?xml version="1.0" encoding="utf-8"?> <android.support.constraint.ConstraintLayout xmlns:android="http://schemas.android.com/apk/res/android" xmlns:app="http://schemas.android.com/apk/res-auto" xmlns:tools="http://schemas.android.com/tools" android:layout_width="match_parent" android:layout_height="match_parent" tools:context="com.dev2qa.www.helloworldexampleproject.MainActivity"> <TextView android:id="@+id/helloWorldTxt" android:layout_width="match_parent" android:layout_height="match_parent" android:text="Hello World from dev2qa.com" android:textColor="@android:color/holo_green_dark" android:textSize="36sp" android:textStyle="bold" android:visibility="visible" app:layout_constraintBottom_toBottomOf="parent" app:layout_constraintHorizontal_bias="0.0" app:layout_constraintLeft_toLeftOf="parent" app:layout_constraintRight_toRightOf="parent" app:layout_constraintTop_toTopOf="parent" app:layout_constraintVertical_bias="0.298" /> </android.support.constraint.ConstraintLayout> - Right-click MainActivity.java, click the ” Run MainActivity ” menu from the popup menu list or click the Run button in the top toolbar to execute the app.
- In the Select Deployment Target windows dialog, select the virtual device that you have already added. Then wait for it to startup, after some time, you can see the app displayed in a device simulator.
3. How to get the TextView component in java code.
- From the above activity_main.xml, we add an id attribute to the TextView component. If you want to get that component in java code, you can use the below code.
TextView textView = (TextView) this.findViewById(R.id.helloWorldTxt);
- Change java code to below for MainActivity onCreate method.
@Override protected void onCreate(Bundle savedInstanceState) { super.onCreate(savedInstanceState); setContentView(R.layout.activity_main); TextView tv = (TextView) this.findViewById(R.id.helloWorldTxt); tv.setText("dev2qa.com is a good tutorial website."); tv.setTextColor(Color.RED); } - Do not forget to import the below classes.
import android.graphics.Color; import android.widget.TextView; - Now run MainActivity.java again, you can find text content and color is changed in the device simulator.
4. Create An Android APK File.
- Click ” Build —> Build APK ” in the Android Studio toolbar.
- After building you can see a popup dialog at the Android Studio right bottom corner. The dialog title is Build APK. Click the Show in Explorer link in the popup dialog to show the APK file in windows explorer.
- Generally, the APK file is saved in your android output folder like this
HelloWorldExampleProject\app\build\outputs\apk, you can get it there and copy it to your Android Simulator or physical device to run it.